Brother International MFC-J6710DW Quick Setup Guide - English - Page 3
Basic User's Guide - paper jam
 |
UPC - 012502626633
View all Brother International MFC-J6710DW manuals
Add to My Manuals
Save this manual to your list of manuals |
Page 3 highlights
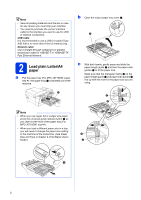
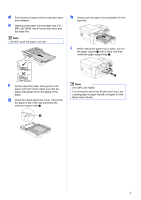
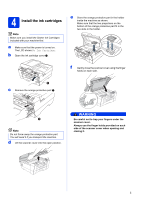
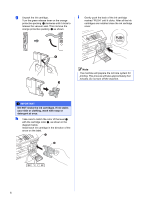
d Fan the stack of paper well to avoid paper jams and misfeeds. e Gently put the paper into the paper tray (For MFC-J6710DW, tray #1) print side down and top edge first. Note DO NOT push the paper in too far. h Slowly push the paper tray completely into the machine. i While holding the paper tray in place, pull out the paper support a until it clicks, and then unfold the paper support flap b. f Gently adjust the paper side guides to the paper with both hands. Make sure that the paper side guides touch the edges of the paper. g Close the output paper tray cover. Check that the paper is flat in the tray and below the maximum paper mark a. 1 2 1 Note (For MFC-J6710DW) For information about tray #2 (the lower tray), see Loading paper in paper tray #2 in chapter 2 of the Basic User's Guide. 3
-
 1
1 -
 2
2 -
 3
3 -
 4
4 -
 5
5 -
 6
6 -
 7
7 -
 8
8 -
 9
9 -
10
-
11
-
12
-
13
-
14
-
15
-
16
-
17
-
18
-
19
-
20
-
21
-
22
-
23
-
24
-
25
-
26
-
27
-
28
-
29
-
30
-
31
-
32
-
33
-
34
-
35
-
36
-
37
-
38
-
39
-
40
 |
 |
