Brother International S-7200B Service Manual - Page 30
Adjusting The Rotary Hook Lubrication Amount (-[]0[], []3[] Specifications), Caution
 |
View all Brother International S-7200B manuals
Add to My Manuals
Save this manual to your list of manuals |
Page 30 highlights
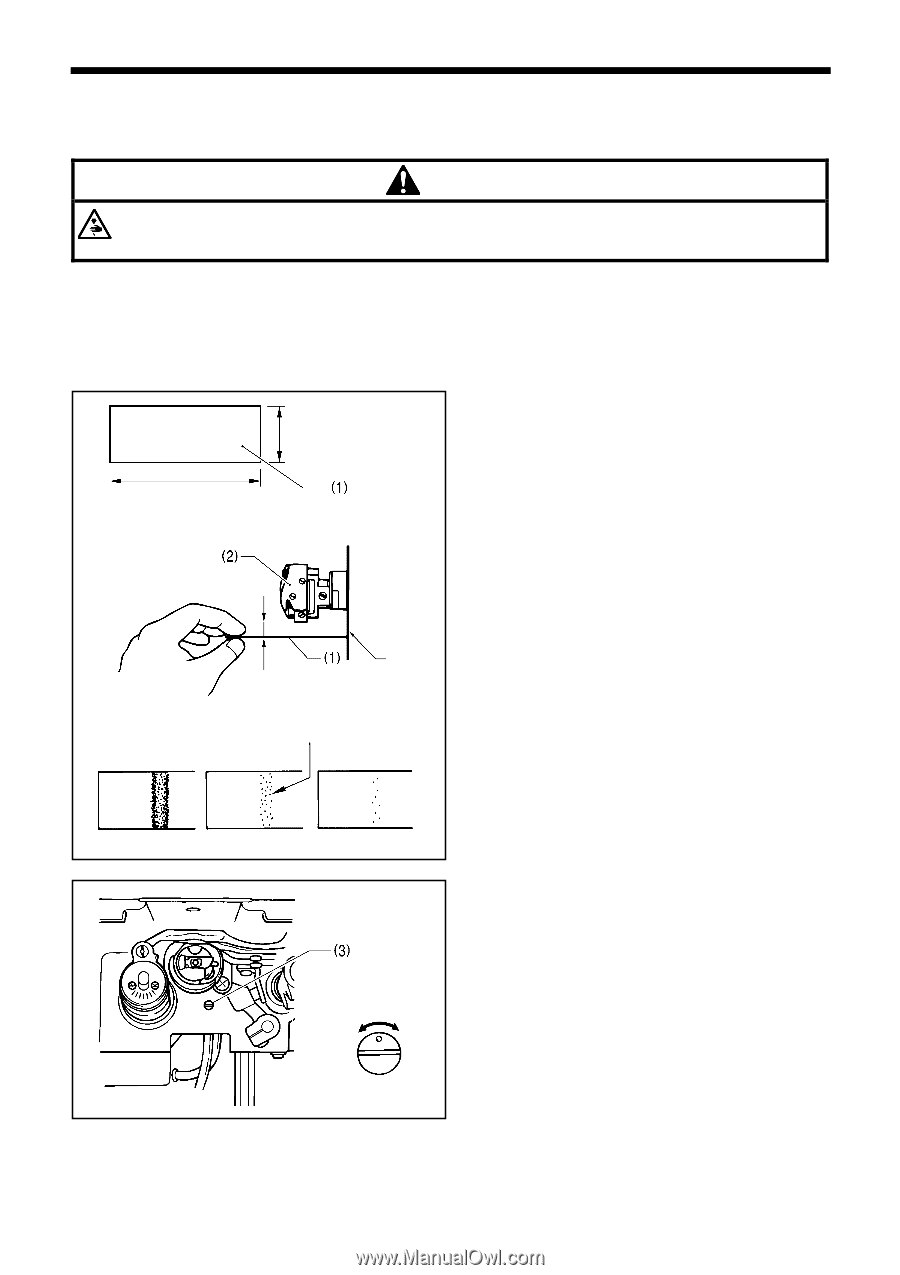
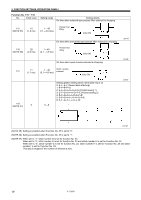
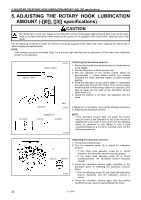
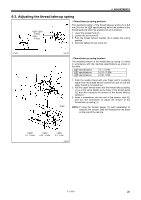
5. ADJUSTING THE ROTARY HOOK LUBRICATION AMOUNT (-[]0[], []3[] specifications) 5. ADJUSTING THE ROTARY HOOK LUBRICATION AMOUNT (-[]0[], []3[] specifications) CAUTION Be careful not to touch your fingers or the lubrication amount check sheet against moving parts such as the rotary hook or the feed mechanism when checking the amount of oil supplied to the rotary hook, otherwise injury may result. Use the following procedure to check the amount of oil being supplied to the rotary hook when replacing the rotary hook or when changing the sewing speed. NOTE: If the sewing machine is sub-class -[]5[], it is a fully dry-type machine and so adjustment of the rotary hook lubrication amount is not necessary. Approx. 70mm Approx. 25mm 2303M 1. Remove the thread from all points from the thread take-up to the needle. 2. Use the lifting lever to lift the presser foot. 3. Run the machine at the normal sewing speed for approximately 1 minute without sewing any material (following the same start/stop pattern as when actually sewing). 4. Place the lubrication amount check sheet (1) underneath the rotary hook (2) and hold it there. Then run the sewing machine at the normal sewing speed for 8 seconds. (Any type of paper can be used as the lubrication amount check sheet (1).) 5. Check the amount of oil which has spattered onto the sheet. Too much 5-10mm Bed 2304M Spattered oil Correct Too little 0935M If adjustment is necessary, carry out the following operations in "Adjusting the lubrication amount". NOTE: If the lubrication amount does not match the correct amount shown in the illustration at left (if the amount of spattered oil is too much or none at all), turn the adjusting screw (3) clockwise to fully tighten it, turn it back counterclockwise by 2 1/2 turns, and then carry out the following adjustment. Less oil More oil 3686M 1. Tilt back the machine head. 2. Turn the adjusting screw (3) to adjust the lubrication amount. ・ If the rotary hook adjusting screw (3) is turned clockwise, the lubrication amount becomes greater. ・ If the rotary hook adjusting screw (3) is turned counterclockwise, the lubrication amount becomes smaller. 3. Check the lubrication amount again according to the procedure given in "Checking the lubrication amount" above. * Turn the adjusting screw (3) and check the lubrication amount repeatedly until the lubrication amount is correct. 4. Check the lubrication amount again after the sewing machine has been used for approximately two hours. 23 S-7200B
-
 1
1 -
2
-
3
-
4
-
5
-
6
-
7
-
8
-
9
-
10
-
11
-
12
-
13
-
14
-
15
-
16
-
17
-
18
-
19
-
20
-
21
-
22
-
23
-
24
-
 25
25 -
 26
26 -
 27
27 -
 28
28 -
 29
29 -
 30
30 -
 31
31 -
 32
32 -
 33
33 -
 34
34 -
 35
35 -
36
-
37
-
38
-
39
-
40
-
41
-
42
-
43
-
44
-
45
-
46
-
47
-
48
-
49
-
50
-
51
-
52
-
53
-
54
-
55
-
56
-
57
-
58
-
59
-
60
-
61
-
62
-
63
-
64
-
65
-
66
-
67
-
68
-
69
-
70
-
71
-
72
-
73
-
74
-
75
-
76
-
77
-
78
-
79
-
80
-
81
-
82
-
83
-
84
 |
 |