Brother International S-7200B Service Manual - Page 45
REPLACING PARTS, 7-1. Fixed knife, 7-2. Movable knife
 |
View all Brother International S-7200B manuals
Add to My Manuals
Save this manual to your list of manuals |
Page 45 highlights
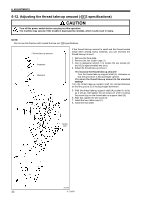
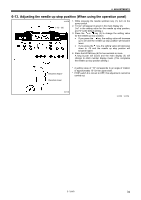
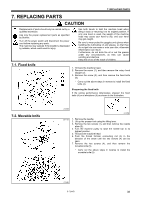
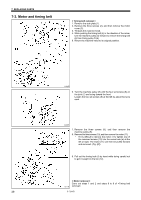
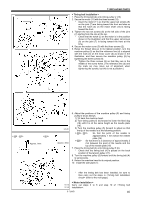
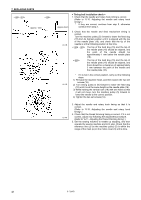
7. REPLACING PARTS 7. REPLACING PARTS CAUTION Replacement of parts should only be carried out by a qualified technician. Use only the proper replacement parts as specified by Brother. Turn off the power switch and disconnect the power cord before replacing any parts. The machine may operate if the treadle is depressed by mistake, which could result in injury. Use both hands to hold the machine head when tilting it back or returning it to its original position. If only one hand is used, the weight of the machine head may cause your hand to slip, and your hand may get caught. Be sure to wear protective goggles and gloves when handling the lubricating oil and grease, so that they do not get into your eyes or onto your skin, otherwise inflammation can result. Furthermore, do not drink the oil or eat the grease under any circumstances, as they can cause vomiting and diarrhea. Keep the oil out of the reach of children. 7-1. Fixed knife 1. Tilt back the machine head. 2. Remove the screw (1), and then remove the rotary hook stopper (2). 3. Remove the screw (3), and then remove the fixed knife (4). * Carry out the above steps in reverse to install the fixed knife (4). Sharpening the fixed knife If the cutting performance deteriorates, sharpen the fixed knife (4) on a whetstone (5) as shown in the illustration. 7-2. Movable knife 2309M 2310M 2311M 1. Remove the needle. 2. Lift up the presser foot using the lifting lever. 3. Remove the two screws (1), and then remove the needle plate (2). 4. Turn the machine pulley to raise the needle bar to its highest position. 5. Tilt back the machine head. 6. Push the thread trimmer connecting rod (3) in the direction of the arrow until the two screws (4) can be seen. 7. Remove the two screws (4), and then remove the movable knife (5). * Carry out the above steps in reverse to install the movable knife (5). 0739B S-7200B 38
-
 1
1 -
2
-
3
-
4
-
5
-
6
-
7
-
8
-
9
-
10
-
11
-
12
-
13
-
14
-
15
-
16
-
17
-
18
-
19
-
20
-
21
-
22
-
23
-
24
-
25
-
26
-
27
-
28
-
29
-
30
-
31
-
32
-
33
-
34
-
35
-
36
-
37
-
38
-
39
-
 40
40 -
 41
41 -
 42
42 -
 43
43 -
 44
44 -
 45
45 -
 46
46 -
 47
47 -
 48
48 -
 49
49 -
 50
50 -
51
-
52
-
53
-
54
-
55
-
56
-
57
-
58
-
59
-
60
-
61
-
62
-
63
-
64
-
65
-
66
-
67
-
68
-
69
-
70
-
71
-
72
-
73
-
74
-
75
-
76
-
77
-
78
-
79
-
80
-
81
-
82
-
83
-
84
 |
 |