Brother International S-7200B Service Manual - Page 54
<To continue sewing without applying grease>, While pressing the end backtack key 4
 |
View all Brother International S-7200B manuals
Add to My Manuals
Save this manual to your list of manuals |
Page 54 highlights
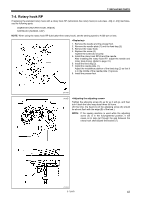
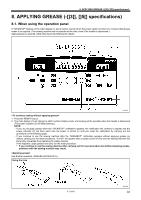
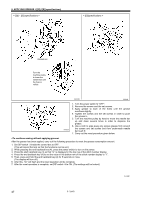
8. APPLYING GREASE (-[]3[], []5[] specifications) Marked red Turn the machine pulley to lower the needle bar until the hole is visible. 3683M 3684M 3685M 1. Turn the power switch to "OFF". 2. Remove the screws and the set screws. 3. Apply grease to each of the holes until the grease overflows slightly. 4. Tighten the screws and the set screws in order to push the grease in. 5. Turn the machine pulley by hand to move the needle bar up and down several times in order to disperse the grease. 6. Use a cloth to wipe away any excess grease from around the screws and set screws and from underneath needle bar bush D. 7. Carry out the reset procedure given below. After the grease has been applied, carry out the following procedure to reset the grease consumption amount. 1. Set DIP switch -3 inside the control box to OFF. (This will cancel the lock so that the functions can be set.) 2. While pressing the end backtack key (4), press the power switch to turn on the power. 3. Press the start backtack key (3) so that "G" is displayed in the top row of the stitch number display. 4. Press the end backtack key (4) to set the value in the bottom row of the stitch number display to "1". 5. Then, press and hold the end backtack key (4) for 5 seconds or more. (The display will turn off.) 6. After this, "Gr" will flash and the reset operation will be complete. 7. After the reset operation is complete, set DIP switch -3 to ON. (The settings will be locked.) 2139M 47 S-7200B
-
 1
1 -
2
-
3
-
4
-
5
-
6
-
7
-
8
-
9
-
10
-
11
-
12
-
13
-
14
-
15
-
16
-
17
-
18
-
19
-
20
-
21
-
22
-
23
-
24
-
25
-
26
-
27
-
28
-
29
-
30
-
31
-
32
-
33
-
34
-
35
-
36
-
37
-
38
-
39
-
40
-
41
-
42
-
43
-
44
-
45
-
46
-
47
-
48
-
 49
49 -
 50
50 -
 51
51 -
 52
52 -
 53
53 -
 54
54 -
 55
55 -
 56
56 -
 57
57 -
 58
58 -
 59
59 -
60
-
61
-
62
-
63
-
64
-
65
-
66
-
67
-
68
-
69
-
70
-
71
-
72
-
73
-
74
-
75
-
76
-
77
-
78
-
79
-
80
-
81
-
82
-
83
-
84
 |
 |
