Brother International XL-2600i Operation Manual - Page 26
Stitch Width Dial, Control de anchura de puntada, Reverse Sewing Lever, Pulsador de retroceso
 |
View all Brother International XL-2600i manuals
Add to My Manuals
Save this manual to your list of manuals |
Page 26 highlights
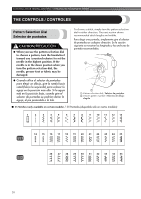
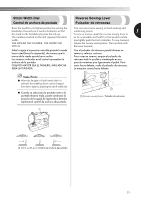
Stitch Width Dial Control de anchura de puntada Reverse Sewing Lever Pulsador de retroceso Raise the needle to its highest position by turning the handwheel toward you (counterclockwise) so that You can use reverse sewing for back tacking and reinforcing seams. 1 the mark on the handwheel points directly up. To sew in reverse, push the reverse sewing lever in The numbers marked on the dial represent the stitch as far as possible and hold it in that position while width. you lightly push the foot controller. To sew forward, THE HIGHER THE NUMBER, THE WIDER THE release the reverse sewing lever. The machine will STITCH. then sew forward. Suba la aguja a la posición más alta girando la rueda hacia usted (hacia la izquierda), de manera que la marca de la rueda apunte hacia arriba. Los números indicados en el control representan la anchura de la puntada. CUANTO MAYOR SEA EL NÚMERO, MÁS ANCHA SERÁ LA PUNTADA. Con el pulsador de retroceso puede hilvanar en reversa y reforzar costuras. Para coser en reversa, empuje el pulsador de retroceso todo lo posible y manténgalo en esa posición mientras pisa ligeramente el pedal. Para coser hacia delante, suelte el pulsador de retroceso. La máquina coserá hacia delante. Note/Nota ● When the Straight or Triple Stretch Stitch is selected, the needle position can be changed from left to right by adjusting the stitch width dial. ● Cuando se selecciona la puntada recta o la puntada elástica triple, puede cambiarse la posición de la aguja de izquierda a derecha mediante el control de anchura de puntada. . 1 1 1 Reverse sewing lever / Pulsador de retroceso 1 Stitch width dial / Control de anchura de puntada 25
-
 1
1 -
2
-
3
-
4
-
5
-
6
-
7
-
8
-
9
-
10
-
11
-
12
-
13
-
14
-
15
-
16
-
17
-
18
-
19
-
20
-
 21
21 -
 22
22 -
 23
23 -
 24
24 -
 25
25 -
 26
26 -
 27
27 -
 28
28 -
 29
29 -
 30
30 -
 31
31 -
32
-
33
-
34
-
35
-
36
-
37
-
38
-
39
-
40
-
41
-
42
-
43
-
44
-
45
-
46
-
47
-
48
-
49
-
50
-
51
-
52
-
53
-
54
-
55
-
56
-
57
-
58
-
59
-
60
-
61
-
62
-
63
-
64
-
65
-
66
-
67
-
68
-
69
-
70
-
71
-
72
-
73
-
74
-
75
-
76
-
77
-
78
-
79
-
80
-
81
-
82
 |
 |
