Brother International XL-2600i Operation Manual - Page 56
Sewing Buttons, Costura de botones
 |
View all Brother International XL-2600i manuals
Add to My Manuals
Save this manual to your list of manuals |
Page 56 highlights
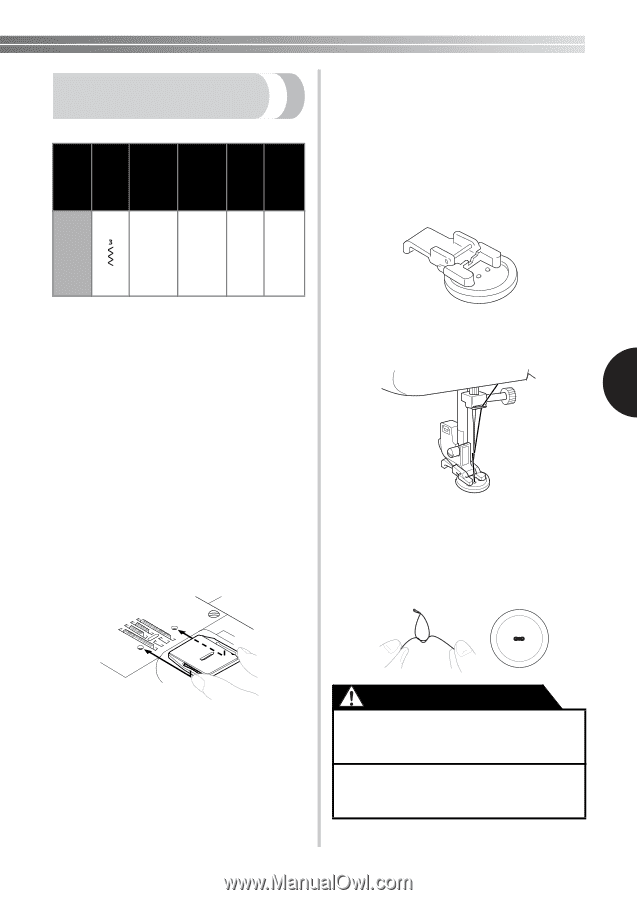
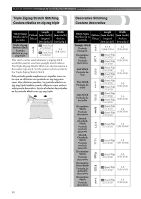
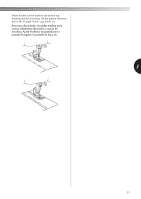
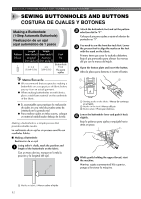
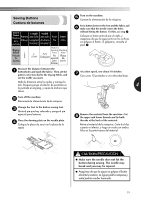
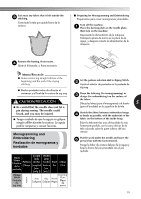
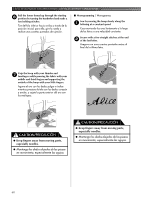
Sewing Buttons Costura de botones Stitch Name Nombre Length Pattern [mm (inch)] Width [mm (inch)] de la Dibujo Longitud Anchura puntada [mm (pulg.)] [mm (pulg.)] Foot Pie Other Otro Zigzag Stitch Puntada de zig-zag F (1/64) Button Sewing Darning Any Cualquiera Foot Pie especial Plate Placa de para zurcir botones Turn on the machine. 5 Conecte la alimentación de la máquina. Put a button between the foot and the fabric and 6 make sure that the needle enters the holes without hitting the button. If it hits, see step 1. Coloque un botón entre el pie y la tela, y asegúrese de que la aguja entra en los orificios sin golpear el botón. Si golpeara, consulte el paso 1. Measure the distance between the 1 buttonholes and mark the fabric. Then set the pattern selection dial to the Zigzag Stitch, and set the width you want. At a slow speed, sew about 10 stitches. 7 Cosa unas 10 puntadas a una velocidad baja. Mida la distancia entre los ojales y marque la tela. Después ponga el selector de puntadas en 4 la puntada en zig-zag, y ajuste la anchura que desee. Turn off the machine. 2 Desconecte la alimentación de la máquina. Change the foot to the button sewing foot. 3 Quite el pie que hay colocado y ponga el pie especial para botones. Place the darning plate on the needle plate. 4 Coloque la placa de zurcir en la placa de la aguja. Remove the material from the machine. Cut 8 the upper and lower threads and tie both threads at the back of the material. Retire el material de la máquina. Corte los hilos superior e inferior, y haga un nudo con ambos hilos en la parte trasera del material. CAUTION/PRECAUCIÓN ● Make sure the needle does not hit the button during sewing. The needle may break and you may be injured. ● Asegúrese de que la aguja no golpea el botón durante la costura. La aguja podría romperse y usted podría resultar lesionado. 55
-
 1
1 -
2
-
3
-
4
-
5
-
6
-
7
-
8
-
9
-
10
-
11
-
12
-
13
-
14
-
15
-
16
-
17
-
18
-
19
-
20
-
21
-
22
-
23
-
24
-
25
-
26
-
27
-
28
-
29
-
30
-
31
-
32
-
33
-
34
-
35
-
36
-
37
-
38
-
39
-
40
-
41
-
42
-
43
-
44
-
45
-
46
-
47
-
48
-
49
-
50
-
 51
51 -
 52
52 -
 53
53 -
 54
54 -
 55
55 -
 56
56 -
 57
57 -
 58
58 -
 59
59 -
 60
60 -
 61
61 -
62
-
63
-
64
-
65
-
66
-
67
-
68
-
69
-
70
-
71
-
72
-
73
-
74
-
75
-
76
-
77
-
78
-
79
-
80
-
81
-
82
 |
 |