Brother International XL-2600i Operation Manual - Page 57
Uso De Accesorios Y Aplicaciones
 |
View all Brother International XL-2600i manuals
Add to My Manuals
Save this manual to your list of manuals |
Page 57 highlights
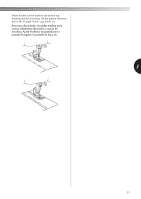
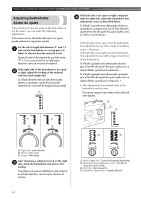
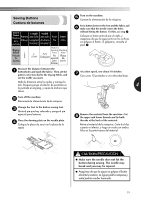
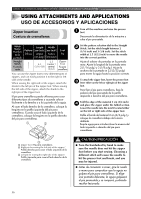
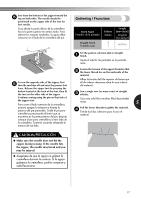
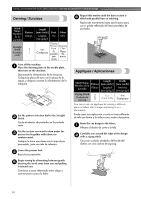
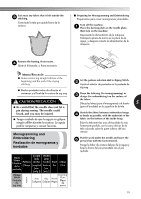
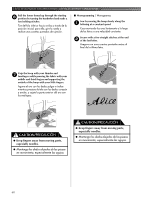
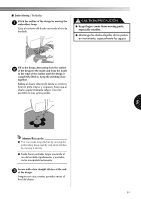
USING ATTACHMENTS AND APPLICATIONS / USO DE ACCESORIOS Y APLICACIONES 5 USING ATTACHMENTS AND APPLICATIONS USO DE ACCESORIOS Y APLICACIONES Zipper Insertion Costura de cremalleras Turn off the machine and raise the presser 1 foot. Desconecte la alimentación de la máquina y suba el pie prensatela. Stitch Name Nombre de la puntada Straight Stitch Puntada recta Length Width Pattern [mm (inch)] [mm (inch)] Foot Dibujo Longitud Anchura Pie [mm (pulg.)] [mm (pulg.)] 2-3 (1/16-1/8) 2.5 (center / centro) (3/32) Zipper Foot Pie para cremalleras You can use the zipper foot to sew different types of zippers, and can easily position it to the right or left side of the needle. When sewing the right side of the zipper, attach the shank to the left pin of the zipper foot. When sewing the left side of the zipper, attach the shank to the right pin of the zipper foot. El pie para cremalleras puede utilizarse para coser diferentes tipos de cremalleras y se puede colocar fácilmente a la derecha o a la izquierda de la aguja. Al coser el lado derecho de la cremallera, coloque la lengüeta en la patilla izquierda del pie para cremalleras. Cuando cosa el lado izquierdo de la cremallera, coloque la lengüeta en la patilla derecha del pie para cremalleras. 1 2 Set the pattern selection dial to the Straight 2 Stitch. Set the stitch length between 2 (1/16 inch) and 3 (1/8 inch). Set the stitch width at 2.5 (3/32 inch) to move the needle into the correct position. Ajuste el selector de puntadas en la puntada recta. Ajuste la longitud de la puntada entre 2 (1/16 pulg.) y 3 (1/8 pulg.). Ajuste la anchura de la puntada en 2,5 (3/32 pulg.) para mover la aguja hasta la posición correcta. To attach the zipper foot, lower the presser foot 3 lever either on the left or right pin of the zipper foot. Para fijar el pie para cremalleras, baje la palanca del pie prensatela de la patilla izquierda o derecha del pie para cremalleras. Fold the edge of the material 2 cm (3/4 inch) 4 and place the zipper under the folded section. Lower the needle into the notch located either on the left or right side of the zipper foot. Doble el borde del material 2 cm (3/4 pulg.) y coloque la cremallera debajo de la zona doblada. Baje la aguja para introducirla en la muesca del lado izquierdo o derecho del pie para cremalleras. 3 1 Zipper foot / Pie para cremalleras 2 Right pin for sewing the left side of the zipper / Patilla derecha para coser el lado izquierdo de la cremallera 3 Left pin for sewing the right side of the zipper / Patilla izquierda para coser el lado derecho de la cremallera CAUTION/PRECAUCIÓN ● Turn the handwheel by hand to make sure the needle does not hit the zipper foot before you start sewing. Choosing a different stitch will cause the needle to hit the presser foot and break, and you may be injured. ● Antes de comenzar a coser, gire la rueda a mano para comprobar que la aguja no golpea el pie para cremalleras. Si elige una puntada diferente, la aguja golpeará el pie prensatela y se romperá, pudiendo resultar lesionado. 56
-
 1
1 -
2
-
3
-
4
-
5
-
6
-
7
-
8
-
9
-
10
-
11
-
12
-
13
-
14
-
15
-
16
-
17
-
18
-
19
-
20
-
21
-
22
-
23
-
24
-
25
-
26
-
27
-
28
-
29
-
30
-
31
-
32
-
33
-
34
-
35
-
36
-
37
-
38
-
39
-
40
-
41
-
42
-
43
-
44
-
45
-
46
-
47
-
48
-
49
-
50
-
51
-
 52
52 -
 53
53 -
 54
54 -
 55
55 -
 56
56 -
 57
57 -
 58
58 -
 59
59 -
 60
60 -
 61
61 -
 62
62 -
63
-
64
-
65
-
66
-
67
-
68
-
69
-
70
-
71
-
72
-
73
-
74
-
75
-
76
-
77
-
78
-
79
-
80
-
81
-
82
 |
 |