Brother International XL-2600i Operation Manual - Page 67
fabric around the curled part of the presser foot - foot pedal
 |
View all Brother International XL-2600i manuals
Add to My Manuals
Save this manual to your list of manuals |
Page 67 highlights
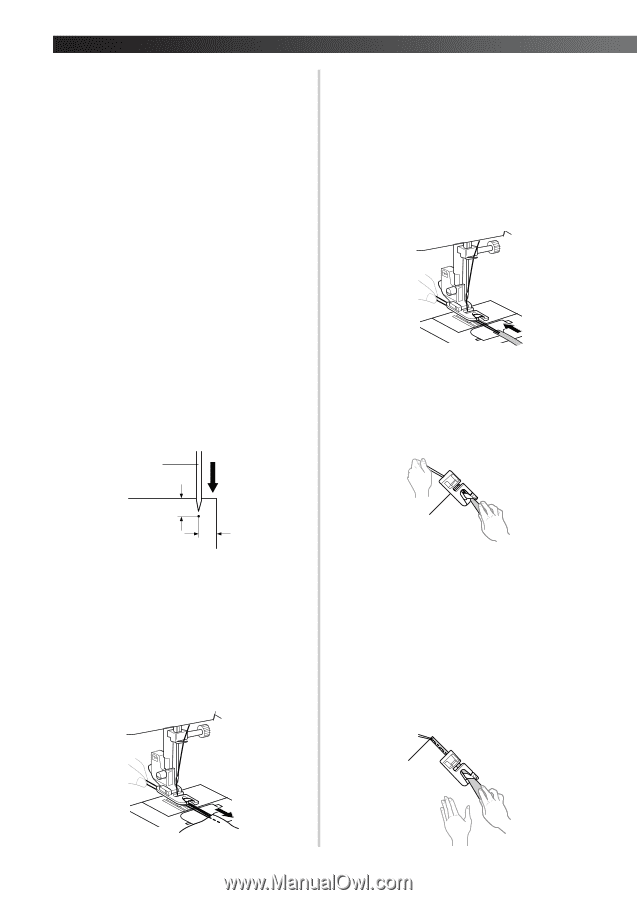
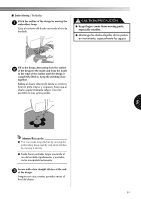
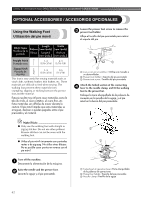
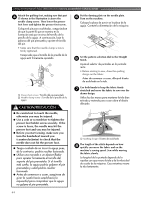
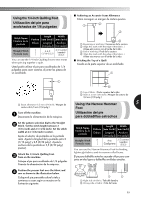
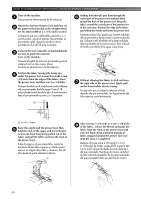
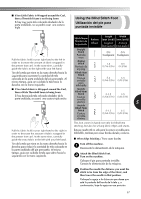
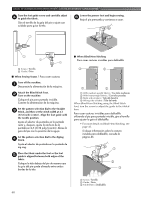
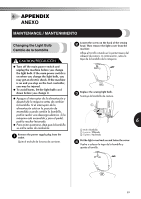
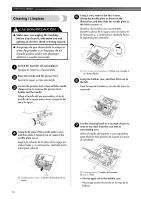
USING ATTACHMENTS AND APPLICATIONS / USO DE ACCESORIOS Y APLICACIONES Turn off the machine. 1 Desconecte la alimentación de la máquina. Attach the Narrow Hemmer Foot and then set 2 the pattern selection dial to the Straight Stitch. Set the stitch width at 2.5 (3/32 inch) (center). Coloque el pie para dobladillos estrechos y, a continuación, ajuste el selector de puntadas en la puntada recta. Ajuste la anchura de la puntada en 2,5 (3/32 pulg.) (centro). Connect the foot controller so that both hands 3 are free to guide the material. Turn on the machine. Conecte el pedal de manera que pueda guiar el material con las dos manos libres. Conecte la alimentación de la máquina. Position the fabric (wrong side facing up) 4 under the presser foot. Lower the needle 3 mm (1/8 inch) from the edges of the fabric, lower the presser foot, and then sew 2 or 3 stitches. Coloque la tela (con el revés hacia arriba) debajo del pie prensatela. Baje la aguja 3 mm (1/8 pulg.) desde los bordes de la tela. A continuación, baje el pie prensatela y cosa 2 ó 3 puntadas. 1 Holding both threads, pass them through the 6 curled part of the presser foot and pull them toward the back of the presser foot. Wrap the fabric around the curled part of the presser foot in the same way. Position the edge of the fabric just behind the needle and lower the presser foot. Sujetando ambos hilos, páselos por la parte ondulada del pie prensatela y llévelos hasta la parte trasera del pie. Coloque la tela alrededor de la parte ondulada del pie prensatela de la misma manera. Sitúe el borde de la tela justo detrás de la aguja y baje el pie. Without allowing the fabric to stick out from 7 the right side of the presser foot, lightly pull on the thread while slowly sewing. Sin permitir que se salga la tela por el lado derecho del pie prensatela, tire ligeramente del hilo mientras cose lentamente. 3 mm (1/8 inch) 3 mm (1/8 inch) 1 Needle / Aguja Raise the needle and the presser foot, then 5 hold the ends of the upper and lower thread to prevent them from being pulled out of the fabric and pull the fabric out from the front of the presser foot. Suba la aguja y el pie prensatela, sujete los extremos de los hilos superior e inferior para que no se salgan de la tela y, después, tire de ella desde la parte delantera del pie. After sewing 2 (3/4 inch) to 3 cm (1 1/8 inch) 8 of the fabric, release the thread and guide the fabric from the front of the presser foot with your left hand. Keep a uniform amount of fabric wrapped around the presser foot curl until the seam is completed. Después de coser entre 2 (3/4 pulg.) y 3 cm (1 1/8 pulg.) de la tela, suelte el hilo y guíe la tela con la mano izquierda desde la parte delantera del pie prensatela. Mantenga la misma cantidad de tela colocada alrededor de la parte ondulada del pie prensatela hasta que termine la costura. 66
-
 1
1 -
2
-
3
-
4
-
5
-
6
-
7
-
8
-
9
-
10
-
11
-
12
-
13
-
14
-
15
-
16
-
17
-
18
-
19
-
20
-
21
-
22
-
23
-
24
-
25
-
26
-
27
-
28
-
29
-
30
-
31
-
32
-
33
-
34
-
35
-
36
-
37
-
38
-
39
-
40
-
41
-
42
-
43
-
44
-
45
-
46
-
47
-
48
-
49
-
50
-
51
-
52
-
53
-
54
-
55
-
56
-
57
-
58
-
59
-
60
-
61
-
 62
62 -
 63
63 -
 64
64 -
 65
65 -
 66
66 -
 67
67 -
 68
68 -
 69
69 -
 70
70 -
 71
71 -
 72
72 -
73
-
74
-
75
-
76
-
77
-
78
-
79
-
80
-
81
-
82
 |
 |