Brother International XL-2600i Operation Manual - Page 70
Anexo
 |
View all Brother International XL-2600i manuals
Add to My Manuals
Save this manual to your list of manuals |
Page 70 highlights
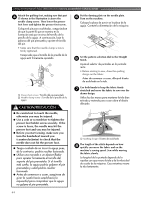
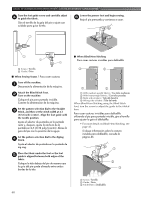
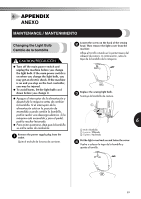
6 APPENDIX ANEXO MAINTENANCE / MANTENIMIENTO Changing the Light Bulb Cambio de la bombilla CAUTION/PRECAUCIÓN ● Turn off the main power switch and unplug the machine before you change the light bulb. If the main power switch is on when you change the light bulb, you may get an electric shock. If the machine is on and you step on the foot controller, you may be injured. ● To avoid burns, let the light bulb cool down before you change it. ● Apague el interruptor de la alimentación y desenchufe la máquina antes de cambiar la bombilla. Si el interruptor de la alimentación está en la posición de encendido cuando cambie la bombilla, podría recibir una descarga eléctrica. Si la máquina está encendida y pisa el pedal, podría resultar lesionado. ● Para evitar quemarse, deje que la bombilla se enfríe antes de cambiarla. Remove the power supply plug from the 1 outlet. Quite el enchufe de la toma de corriente. Loosen the screw on the back of the sewing 2 head. Then remove the light cover from the machine. Afloje el tornillo situado en la parte trasera del cabezal de costura. A continuación, retire la tapa de la bombilla de la máquina. Replace the sewing light bulb. 3 Sustituya la bombilla de costura. 1 2 3 6 1 Bulb / Bombilla 2 Loosen / Aflojado 3 Tighten / Apretado Put the light cover back on and fasten the screw. 4 Vuelva a colocar la tapa de la bombilla y apriete el tornillo. 69
-
 1
1 -
2
-
3
-
4
-
5
-
6
-
7
-
8
-
9
-
10
-
11
-
12
-
13
-
14
-
15
-
16
-
17
-
18
-
19
-
20
-
21
-
22
-
23
-
24
-
25
-
26
-
27
-
28
-
29
-
30
-
31
-
32
-
33
-
34
-
35
-
36
-
37
-
38
-
39
-
40
-
41
-
42
-
43
-
44
-
45
-
46
-
47
-
48
-
49
-
50
-
51
-
52
-
53
-
54
-
55
-
56
-
57
-
58
-
59
-
60
-
61
-
62
-
63
-
64
-
 65
65 -
 66
66 -
 67
67 -
 68
68 -
 69
69 -
 70
70 -
 71
71 -
 72
72 -
 73
73 -
 74
74 -
 75
75 -
76
-
77
-
78
-
79
-
80
-
81
-
82
 |
 |
