Brother International XR-40 Accessory Catalog - Page 11
Cording Foot, Cording Foot 5-hole, Braiding Foot, Clear-view Foot, Cording Foot 7-hole - sewing machines
 |
View all Brother International XR-40 manuals
Add to My Manuals
Save this manual to your list of manuals |
Page 11 highlights
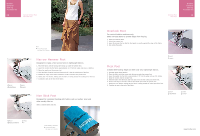
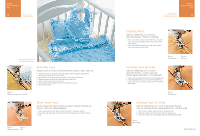
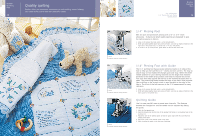
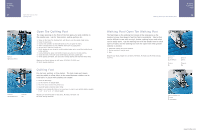
Brother Embellishment Feet 19 Braiding Foot Clear-view Foot Baby Blanket, Pillow & Bib created by June Mellinger Braiding Foot Attaches up to 3/16 inch (5 mm) wide braids, ribbons, tapes, cords, etc. 1. Loosen the screw on the presser foot and insert a braid through the guide before attaching the presser foot on the machine. 2. Slide the plate of the guide back and forth to fit the width of the braid. 3. Tighten the screw and pull the braid behind the presser foot. 4. Attach the presser foot onto the machine. 5. Set the zigzag width slightly wider than the width of the braid. 6. Stitch braid in place. SA141 All Brother home-use sewing machines Clear-view Foot Use this presser foot where visibility of seams or pattern markings are desired. Perfect for quilting appliqué! 1. Attach the presser foot and select a stitch from satin or decorative stitches. 2. Line up the center guide mark on the presser foot over the desired seams or pattern markings. 3. Sew. SA145 ABCDEFGHJKLMNO SA144 IP Brother Embellishment Feet Cording Foot Cording Foot (5-hole) 20 Cording Foot (7-hole) Cording Foot Used for embellishing 1 to 3 cords or decorative threads. Perfect for couching! 1. Slip a cord from the right of the presser foot, and place each cord into each guide (to use single cord, use the center guide). 2. Place cord under the presser foot, and select zigzag stitch with maximum stitch width. SA110 ABCDEFJKMN SA148 GHILOP Cording Foot (5-hole) Used for embellishing 1 to 5 cords or decorative threads. It can be used with brother sewing machines of 7 mm feed width. 1. Insert cords or threads into each hole on the presser foot. 2. Attach the presser foot and pull cords under the presser foot. 3. Line up the cords, and select zigzag stitch with maximum stitch width. SA157 ABCDEFJKMN Cording Foot (7-hole) Used for embellishing 1 to 7 cords or decorative threads. It can be used with brother sewing machines of 7 mm feed width. 1. Insert cords or threads into each hole on the presser foot. 2. Attach the presser foot and pull cords under the presser foot. 3. Line up the cords, and select zigzag stitch with maximum stitch width. SA158 ABCDEFJKMN www.brother.com
-
 1
1 -
2
-
3
-
4
-
5
-
 6
6 -
 7
7 -
 8
8 -
 9
9 -
 10
10 -
 11
11 -
 12
12 -
 13
13 -
 14
14 -
 15
15 -
 16
16 -
17
-
18
-
19
-
20
-
21
-
22
-
23
-
24
-
25
-
26
-
27
-
28
-
29
-
30
-
31
-
32
-
33
-
34
-
35
-
36
-
37
-
38
-
39
-
40
-
41
 |
 |
