Bushnell 363500 Quick Start Guide
Bushnell 363500 Manual
 |
View all Bushnell 363500 manuals
Add to My Manuals
Save this manual to your list of manuals |
Bushnell 363500 manual content summary:
- Bushnell 363500 | Quick Start Guide - Page 1
GPS RECEIVER Quick Start Guide Model # 363500 English Lit # 98-1246/08-08 - Bushnell 363500 | Quick Start Guide - Page 2
distance, velocity or topography. This device should not be used for any aircraft navigation applications. Warning: This device uses a rechargeable lithium-ion battery pack. Follow the directions for charging the battery before use. Do not attempt to open the battery pack, modify or charge it other - Bushnell 363500 | Quick Start Guide - Page 3
The Almanac Page and Solunar Edge Technology by Speedtech® Instruments The Bushnell ONIX 350 features a unique Almanac page, which uses patented Solunar Edge technology developed by Speedtech® Instruments to provide a significantly more accurate predictor of animal and fish activity - Bushnell 363500 | Quick Start Guide - Page 4
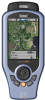
Continue referring to this manual and practicing as often as necessary until you master the basics, before heading out on a hike of any significant length or attempting to navigate an unfamiliar area. ONIX 350 Model # 363500 FEATURES • Extra Large 3.5" Full Color, Sunlight Readable LCD • Altimeter - Bushnell 363500 | Quick Start Guide - Page 5
List • ONIX 350 GPS Receiver • Lithium Ion Battery Pack • 512MB MicroSD Card • AC Charging Cord • USB Cable • Info Pack with Quick Start Guide, Registration Card, and CD-ROM battery charging, cleaning & maintenance • The internal Lithium Ion battery pack must be charged before the ONIX can be - Bushnell 363500 | Quick Start Guide - Page 6
info boxes. Current Page Indicator 3.5" Color LCD Display Screen Battery Level Indicator Power Button: located on right side of ONIX. Push to turn on. Once all actions: • Navigation • SafeTrack Accessory Port: used for AC charging cord Battery Pack Module: houses Lith-Ion battery pack. Also covers - Bushnell 363500 | Quick Start Guide - Page 7
The SEVEN pages OF THE ONIX350 1. SAT (Satellite) - this page allows you to monitor the signal strength of multiple GPS satellites, confirming when you have a "lock"-adequate number and quality of satellites to ensure good reception. 2. NAV (Navigation) - a basic display of the digital compass. - Bushnell 363500 | Quick Start Guide - Page 8
TIPS FOR MAXIMIZING BATTERY LIFE IN THE ONIX 350 The ONIX350 uses the latest technology and exclusive features to provide the most efficient combination of battery life and functionality. The rechargeable Lithium Ion battery pack provides an extended capacity of power. Power Saving Options The - Bushnell 363500 | Quick Start Guide - Page 9
battery pack before using the ONIX350. Attach the battery pack (first, verify that the MicroSD card is installed in its slot), referring to the instructions and photos on pg. 5. Plug the AC charger cord into the accessory in the global GPS system. These icons will turn green as the ONIX "locks on" - Bushnell 363500 | Quick Start Guide - Page 10
spend more time on the MAP page than any of the others while using the ONIX350. Using Bushnell's exclusive TruView Navigation screen layering feature, this page can display multiple location and navigation related information in a single view. The following items are always displayed on this page - Bushnell 363500 | Quick Start Guide - Page 11
Options utilizing TruView Technology You may manually select the right photo (or topo map) to use, as these downloaded files are "geo referenced", enabling your ONIX to your current direction of travel (i.e."track up"-like automotive GPS units). Satellite photos and topo maps are displayed "North - Bushnell 363500 | Quick Start Guide - Page 12
exploring the pages : MAP & Info Boxes Setting Up and Using the Info Boxes-continued Fig 7. Info Boxes Info Box Options (Nav) for lower boxes Fig 8. MAP Page Info Box Options for upper boxes Upper Info Boxes Lower Info Boxes (0 ~ 4, set by user) Fig 9. MAP Page 4 Info Boxes After Set Up and Exit - Bushnell 363500 | Quick Start Guide - Page 13
you left it. The ONIX350 utilizes a digital compass, so you do not need to be moving to obtain a bearing, unlike GPS driven compasses. The digital -they are mutually exclusive. •Bearing Arrow (Fig. 10)- only appears during active navigation (see pg.10, Fig. 3). This will be seen as a long black - Bushnell 363500 | Quick Start Guide - Page 14
ON" to for normal GPS operation, select "OFF" to conserve battery life if you are not going to be navigating, or while you are getting more familiar with your ONIX indoors where GPS reception is not possible. Two other options are available: WAAS (Wide Area Augmentation System)- turning WAAS on will - Bushnell 363500 | Quick Start Guide - Page 15
. The vertical scale automatically changes to "fit" max presssure. If the ONIX unit's power is turned off, temperature and pressure will not continue to to enter "sleep mode" while maintaining uninterrupted weather sensor operation with minimized battery drain. No HOT button menu is available for the - Bushnell 363500 | Quick Start Guide - Page 16
each can be shown on the graph or not, removed, or "Set to Now" to indicate your current position. Select the Elevation page on your ONIX350 and explore the features and options: Fig 21. Elevation: 16 Trip List - Bushnell 363500 | Quick Start Guide - Page 17
is different than what the display indicates (this can happen due to changes in barometric pressure), press OK to use the onscreen keyboard to manually enter the true altitude for your position. Calibrating Altitude is a recommended step to ensure the best possible accuracy of all data shown on the - Bushnell 363500 | Quick Start Guide - Page 18
onix350 gps receiver : Setting Waypoints / Map Areas Fig 26. Waypoint Menu-Press OK to set new waypoint Setting Waypoints The simplest GPS Fig 27. Options for previous waypoints: Navigate To, Edit or Delete To set an www.bushnell.com/gps/ by clicking the Product Support link. 18 Let's take - Bushnell 363500 | Quick Start Guide - Page 19
using your onix350 gps receiver : Map Areas/Fence Posts How to Define a New Map Area (Using warning if you enter the Map Area (for example, to prevent accidentally trespassing on private property). Navigate To-go towards the closest point in the area relative to your current position Sq. Miles Fig - Bushnell 363500 | Quick Start Guide - Page 20
onix350 gps you are on the MAP or NAV page, all basic navigation actions are easily controlled by Bushnell's exclusive "HOT button". The HOT button is also . 5) My Trails-pick from list of saved Trails (see next section). The ONIX will start pointing you to the closest point on that trail. A trail is - Bushnell 363500 | Quick Start Guide - Page 21
onix350 gps receiver : The HOT Button 7) My Map Areas-pick from list of your previously created custom map areas 8) My Photos (or Topos)-after you pick a photo or topo from the list (arrow down to it) and press OK to confirm you wish to navigate towards that area, the ONIX guides Battery - Bushnell 363500 | Quick Start Guide - Page 22
using your onix350 gps receiver : My Stuff Menu / SafeTrack™ Fig 39. My navigate towards a stored satellite photo or topo map, and to manage them (photos & maps are downloaded, not user created). SafeTrack™ Battery Conservation Mode Fig 42. My Trails- 22 End & Save Trail SafeTrack is a Bushnell - Bushnell 363500 | Quick Start Guide - Page 23
ONIX will automatically make GPS satellite contact every 5 minutes (default, can be changed in SafeTrack Options menu), which extends battery life significantly while still allowing you to instantly get a fix on your location and resume navigation name in the memory of the ONIX350. How to Set or Edit - Bushnell 363500 | Quick Start Guide - Page 24
Update Downloads, Troubleshooting and Frequently Asked Questions, and the Bushnell Shopping Cart to purchase accessories, Photo/Map downloads, and printable Photos/Maps. So log on, log in, and start downloading to experience a whole new world of GPS functionality. The Bushnell GPS ONIX CD-ROM Your - Bushnell 363500 | Quick Start Guide - Page 25
from the website to any PC. Just click the "Product Support" tab at the top of the main page, then "Software Updates" in the left frame. Component PC System Requirements (to use the "PC Companion" software with Bushnell ONIX GPS products) CPU 500 megahertz (MHz), Pentium III processor or higher - Bushnell 363500 | Quick Start Guide - Page 26
comply with the limits for a Class B digital device, pursuant to part 15 of the FCC Rules installed and used in accordance with the instructions, may cause harmful interference to radio ONIX does not contain any user-serviceable parts. Repairs should only be made by an Authorized Bushnell - Bushnell 363500 | Quick Start Guide - Page 27
Your Bushnell® GPS receiver , or maintenance provided by someone other than a Bushnell Authorized Service Department. Any return made under this warranty must the defect 4) Proof of Date Purchased 5) Product should be well packed in a sturdy outside shipping carton, to prevent damage in transit, - Bushnell 363500 | Quick Start Guide - Page 28
For further questions or additional information please contact: Bushnell Outdoor Products 9200 Cody, Overland Park, Kansas 66214 Customer Service (800) 423-3537 • www.bushnell.com ©2008 Bushnell Outdoor Products
-
 1
1 -
 2
2 -
 3
3 -
 4
4 -
 5
5 -
 6
6 -
 7
7 -
8
-
9
-
10
-
11
-
12
-
13
-
14
-
15
-
16
-
17
-
18
-
19
-
20
-
21
-
22
-
23
-
24
-
25
-
26
-
27
-
28
 |
 |

GPS RECEIVER
Quick Start Guide
Model # 363500
Lit # 98-1246/08-08
English