Canon 2263B002 Setup Guide
Canon 2263B002 - imageFORMULA ScanFront 220 Manual
 |
UPC - 013803085150
View all Canon 2263B002 manuals
Add to My Manuals
Save this manual to your list of manuals |
Canon 2263B002 manual content summary:
- Canon 2263B002 | Setup Guide - Page 1
Setup Guide Read This First Please read this manual before using the device. After you finish reading this manual, keep it in a safe place for future reference. - Canon 2263B002 | Setup Guide - Page 2
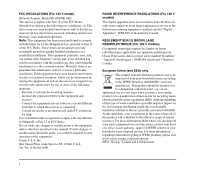
in accordance with the instructions, may cause harmful manual. If such changes or modifications should be made, you could be required to stop operation of the equipment. Canon U.S.A. Inc. One Canon service. For more information regarding return and recycling of WEEE products, please visit www.canon - Canon 2263B002 | Setup Guide - Page 3
gt 70 dB(A) oder weniger gemäß EN ISO 7779" For CA, USA Only Included battery contains Perchlorate Material - special handling may apply. See ACCORDING TO LOCAL, STATE OR FEDERAL LAWS. Trademarks • Canon and the Canon logo are registered trademarks of Canon Inc. in the United States and may also be - Canon 2263B002 | Setup Guide - Page 4
in part on the work of the Independent JPEG Group. Copyright 2008 by CANON ELECTRONICS INC. All rights reserved. No part of this publication may be reproduced MERCHANTABILITY, FITNESS FOR A PARTICULAR PURPOSE OF USE OR NONINFRINGEMENT. CANON ELECTRONICS INC. SHALL NOT BE LIABLE FOR ANY DIRECT, INCIDENTAL, - Canon 2263B002 | Setup Guide - Page 5
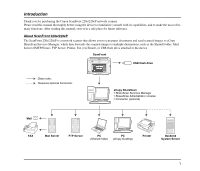
you to scan paper documents and send scanned images to eCopy ShareScan Services Manager, which then forwards the scanned images to multiple destinations, such as the Shared Folder, Mail Server (SMTP/Notes), FTP Server, Printer, Fax (via Email), or USB flash drive attached to the device. ScanFront - Canon 2263B002 | Setup Guide - Page 6
including troubleshooting. For details on configuring ShareScan Services Manager and Quick Connect, please refer to the eCopy ShareScan 4.5 Installation and Setup Guide (electronic manual). eCopy ShareScan 4.5 Installation and Setup Guide/eCopy Quick Connect Administrator's Guide Describes - Canon 2263B002 | Setup Guide - Page 7
Table of Contents 1. Important Safety Instructions 5 Installation Location 5 Power 5 Moving the Device 6 Handling 6 About and Registering the Device 20 Installing Quick Connect 23 8. Configuring ShareScan Services Manager ..........24 9. Documents 25 Plain Paper 25 Business Card 25 Plastic - Canon 2263B002 | Setup Guide - Page 8
ScanFront 220e/220eP. 1. Important Safety Instructions (See p. 5) Read the safety Establishing the Connection between the Device and ShareScan Services Manager (See p. 18) In order to configure Guide (electronic manual). 9. Documents (See p. 25) This section describes the types of paper supported - Canon 2263B002 | Setup Guide - Page 9
1. Important Safety Instructions To ensure the safe operation of this device, be sure to read the safety warnings and precautions described below. ❏ Installation Location The performance of this - Canon 2263B002 | Setup Guide - Page 10
with any other electrical devices. Model: MG1-3968 ● If you have any questions regarding the power supply, contact your local authorized Canon dealer or service representative for further information. ❏ Moving the Device ● When moving the device, always hold it with both hands to avoid dropping it - Canon 2263B002 | Setup Guide - Page 11
device, immediately turn the power OFF, and disconnect the power plug from the power outlet. Then, contact your local authorized Canon dealer or service representative to have the unit serviced. ■ Do not install the device in a humid or dusty location. Doing so may result in a fire or electric shock - Canon 2263B002 | Setup Guide - Page 12
❏ About the Fingerprint Sensor (ScanFront 220eP only) ● The following actions may damage the sensor or cause it to malfunction: - Dropping an object on the fingerprint sensor, or otherwise subjecting it to a strong impact - Scratching the surface of the fingerprint sensor, or poking it with a - Canon 2263B002 | Setup Guide - Page 13
the lever toward you to unlock the panel unit. d Document Feed Tray Pull out the feed tray to match the length of the document. e Document Guides Adjust these to match the width of the document. f Panel Unit Open this when there is a paper jam or to perform maintenance. g Touch Panel Touch - Canon 2263B002 | Setup Guide - Page 14
a USB1.1/Hi-Speed USB2.0 compatible USB flash drive, USB keyboard, or USB mouse. p Power Connector (16 V DC) Connect the plug of the supplied AC adapter. q Service Switch This is a service switch. Do not insert any object into this hole. r Ventilation Holes 10 - Canon 2263B002 | Setup Guide - Page 15
Card (U.S.A. and Canada only) Power Cord* (Cord length: 3.3 ft. (1 m)) 0880281099-L5T1P7-BR01 CANON CANADA INC. 6390 DIXIE RD MISSISSAUGA ON L5T 9Z9 Registration Card (U.S.A. and Canada only) Setup Guide (this manual) * Make sure to use only the supplied AC adapter and power cord. ** The PDF - Canon 2263B002 | Setup Guide - Page 16
be attached to the device during installation. (See p. 13.) AC Adapter* (Cord length: 4.9 ft. (1.5 m)) Power Cord* (Cord length: 3.3 ft. (1 m)) Setup Guide (this manual) eCopy ShareScan 4.5 Setup CD-ROM** eCopy Desktop Setup CD-ROM** Information sheet on how to obtain the eCopy ShareScan Product - Canon 2263B002 | Setup Guide - Page 17
4. Removing the Packing Materials and Attaching the Feed Roller Remove all of the packing materials protecting the device, and attach the feed roller. 1. Remove the orange tape (3 pieces) securing the outer case. CAUTION The open/close movement of the panel unit is linked to the up/ down movement - Canon 2263B002 | Setup Guide - Page 18
5. Open the roller cover for the feed roller. 8. Move the lock lever in the direction of the arrow, then insert it into the hole in the feed roller. 6. Lift up the roller lock lever a, and slide it in the direction of the arrow b. 9. Lower the roller lock lever to lock the feed roller into - Canon 2263B002 | Setup Guide - Page 19
11. Gently close the panel unit. Press on both sides of the unit until you hear a click, which indicates the unit is locked. 12. Gently close the document eject tray. 15 - Canon 2263B002 | Setup Guide - Page 20
5. Connecting the AC Adaptor and Connecting to a Network Before setting up the device, you need to connect the AC adaptor and network cable. ❏ Connecting the AC Adapter Follow the procedure shown below to connect the AC adapter. CAUTION Make sure to use only the AC adapter and power cord included - Canon 2263B002 | Setup Guide - Page 21
6. Turning the Power ON and OFF Use the power switch to turn the device ON and OFF. ❏ Turning the Power ON Press the power switch to turn the device ON. The power indicator lights, and the Startup Menu screen appears. Startup Menu screen Power switch Power indicator ❏ Turning the Power OFF Press - Canon 2263B002 | Setup Guide - Page 22
with higher specifications may be required. For details, refer to the eCopy ShareScan 4.5 Installation and Setup Guide (electronic manual). ❏ Installing Services Manager Install Services Manager (and other necessary software) on the computer using the eCopy ShareScan 4.5 Setup CDROM supplied with - Canon 2263B002 | Setup Guide - Page 23
restart the computer appears after installation is complete, follow the instructions to restart the computer. The eCopy Agent icon appears in appears. 3. Make sure that the host name of the computer on which Service Manager is installed is displayed, and click [OK]. The [Select ShareScan Manager] - Canon 2263B002 | Setup Guide - Page 24
the pull-down menu at the top right of the Startup Menu. IMPORTANT If you continuously press the touch panel before the connection to ShareScan Services Manager can be established, an error may occur and operation may be disabled. In such cases, restart the device and perform operations again from - Canon 2263B002 | Setup Guide - Page 25
2. Set the administrator password. Hint If you press [Next] without entering a password, the password will be left unconfigured and password entry will not be required for starting the device. To ensure security, we recommend configuring the password. 3. Configure network settings for the device. - Canon 2263B002 | Setup Guide - Page 26
[OK]. When the device starts again, a screen for entering the IP address of the computer on which Services Manager is installed appears. 5. Enter the IP address of the computer on which Services Manager is installed, and press [Connect]. Hint The [Use HTTPS] option is enabled by default. You can - Canon 2263B002 | Setup Guide - Page 27
connection between the device and eCopy ShareScan Services Manager is established, and you can For details, refer to the operating instructions for the computer or related documents, performed manually. For details, refer to the eCopy ShareScan 4.5 Installation and Setup Guide (electronic manual). • - Canon 2263B002 | Setup Guide - Page 28
After connection between the ScanFront and eCopy ShareScan Services Manager is established, you can configure the various settings of eCopy ShareScan and QuickConnect to suit your requirements. For details, please refer to the eCopy ShareScan 4.5 Installation and Setup Guide (electronic manual). 24 - Canon 2263B002 | Setup Guide - Page 29
9. Documents The ScanFront can scan documents in a range of sizes from business cards to LTR/A4. It is possible to feed documents of the following sizes and thicknesses depending on the feeding method used. ❏ Plain Paper Size Width: 2" to 8 1/2" (50.8 mm to 216 mm) Length: 2 1/8" to 14" (53.9 mm - Canon 2263B002 | Setup Guide - Page 30
❏ Plastic Card Size 2.12" × 3.37" (53.9 × 85.5 mm) (Conforming to ISO7810 Standards) Thickness 0.0299" (0.76 mm) and below Insertion orientation Landscape CAUTION A plastic card placed into the document feed tray in the portrait orientation may not be output properly because a load is placed on it - Canon 2263B002 | Setup Guide - Page 31
10. Preparing the Device When placing a document in the device, pull out the document feed tray so that it matches the size of the document, and then move the feed selection lever to the appropriate position for the desired feed method (page separation feeding or bypass feeding) for the document. - Canon 2263B002 | Setup Guide - Page 32
❏ Feed Selection Lever Change the position of the lever to the desired feed method for the document. Page Separation Feeding Move the lever downward to separate a stack of documents one page at a time in order to continuously feed the documents. Bypass Feeding Move the lever upward to feed a - Canon 2263B002 | Setup Guide - Page 33
❏ Using a PS/2 Keyboard and PS/2 Mouse You can connect a PS/2 keyboard and mouse to the PS/2 port and use them to operate the device. Green (Top): Mouse Purple (Bottom): Keyboard IMPORTANT Turn OFF the device before connecting or disconnecting the PS/2 mouse and keyboard. 29 - Canon 2263B002 | Setup Guide - Page 34
tray with the top edge of the document at the bottom of tray. ❏ Placing a Document Follow the procedure below to place a document. 1. Adjust the document guides to be wider than the width of the document. 3. Place the document face down with its top edge at the bottom of the tray. 2. Fan - Canon 2263B002 | Setup Guide - Page 35
loaded into the document feed tray. When placing the document, make sure the size of stack does not exceed the loading marks on the document guides. 3. Place the card face down in the landscape orientation with the top edge at the bottom of the tray. Loading mark ❏ Placing a Cards (Business Card - Canon 2263B002 | Setup Guide - Page 36
errors continue to occur even after cleaning, contact the ScanFront administrator and replace the rollers (feed roller and retard roller), and document holding guides. Type of error When this occurs, clear the paper jam (or document that stopped mid-feed) and perform one of the following procedures - Canon 2263B002 | Setup Guide - Page 37
CAUTION The open/close movement of the panel unit is linked to the up/ down movement of the document eject tray. Do not press on the document eject tray when you open the panel unit. 3. Pull out the jammed document in the direction that seems the easiest to remove it. 4. Close the panel unit and - Canon 2263B002 | Setup Guide - Page 38
13. Fingerprint Sensor (ScanFront 220eP) The ScanFront 220eP is equipped with a fingerprint sensor for registering fingerprints and authenticating users. The fingerprint sensor is a precision component. Be careful when handling this sensor. ❏ Cautions for Handling the Fingerprint Sensor - Canon 2263B002 | Setup Guide - Page 39
verification of the identity of a person. Hint For details on the procedures for fingerprint registration and authentication, refer to the eCopy ShareScan 4.5 Installation and Setup Guide (electronic manual). 35 - Canon 2263B002 | Setup Guide - Page 40
configure Quick Connect on the Services Manager PC, and configure the scanning conditions and destination for scanned data. For details, refer to the eCopy ShareScan 4.5 Installation and Setup Guide/eCopy Quick Connect Administrator's Guide (electronic manual). 2. Place a document in the device - Canon 2263B002 | Setup Guide - Page 41
5. Press [Next]. 7. Press [Send]. The filename entry screen appears. 6. Enter a filename. The scanned data is sent. After the data is successfully sent, a screen for selecting the next operation appears. 8. Select the next operation. You can enter the filename for the scanned data by pressing to - Canon 2263B002 | Setup Guide - Page 42
❏ Preview Screen Images of scanned data appear in the Preview screen. You can manipulate the images by pressing the buttons on the screen. a Scan More When you press this button after placing additional documents in the feeder, the new documents are scanned and added to the previous scan data. The - Canon 2263B002 | Setup Guide - Page 43
The layout of the on-screen keyboard is similar to that of standard QWERTY keyboards. The following describes the unique buttons on the keyboard. Shift focus to a different text box when multiple boxes are displayed. Display candidates for text when typing with the "Search while typing" option - Canon 2263B002 | Setup Guide - Page 44
INC. 1248, SHIMOKAGEMORI, CHICHIBU-SHI, SAITAMA 369-1892, JAPAN CANON U.S.A. INC. ONE CANON PLAZA, LAKE SUCCESS, N.Y. 11042, U.S.A. CANON CANADA INC. 6390 DIXIE ROAD, MISSISSAUGA, ONTARIO L5T 1P7, CANADA CANON EUROPA N.V. BOVENKERKERWEG 59-61, P.O.BOX 2262, 1180 EG AMSTELVEEN, THE NETHERLANDS
-
 1
1 -
 2
2 -
 3
3 -
 4
4 -
 5
5 -
 6
6 -
 7
7 -
8
-
9
-
10
-
11
-
12
-
13
-
14
-
15
-
16
-
17
-
18
-
19
-
20
-
21
-
22
-
23
-
24
-
25
-
26
-
27
-
28
-
29
-
30
-
31
-
32
-
33
-
34
-
35
-
36
-
37
-
38
-
39
-
40
-
41
-
42
-
43
-
44
 |
 |
Setup Guide
Read This First
Please read this manual before using the device.
After you finish reading this manual, keep it in a safe place
for future reference.