Canon 4200F CanoScan 4200F Quick Start Guide
Canon 4200F - CanoScan Flatbed Scanner Manual
 |
UPC - 013803046533
View all Canon 4200F manuals
Add to My Manuals
Save this manual to your list of manuals |
Canon 4200F manual content summary:
- Canon 4200F | CanoScan 4200F Quick Start Guide - Page 1
the Package Contents 3 p. Install the Software 4 p. Unlock the Scanning Unit 5 p. Connect the Scanner 6 p. Try Scanning 7 p. Try the Additional Features Using the Scanner Buttons p.10 Scanning Film p.11 Please read this guide before operating this scanner. After you finish reading - Canon 4200F | CanoScan 4200F Quick Start Guide - Page 2
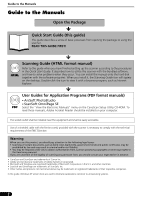
. It describes how to utilize the scanner with the bundled software, and how to solve problems when they occur. You can install this manual onto the hard disk together with the software programs. When you install it, the Scanning Guide icon will appear on the desktop. Double-click the icon to view - Canon 4200F | CanoScan 4200F Quick Start Guide - Page 3
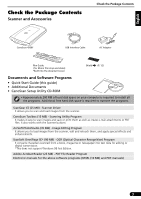
Scanner and Accessories Check the Package Contents CanoScan 4200F USB Interface Cable AC Adapter Film Guide (for 35mm film strip and slides) *Built into the document cover Shield (P. 12) Documents and Software Programs • Quick Start Guide (this guide) • Additional Documents • CanoScan - Canon 4200F | CanoScan 4200F Quick Start Guide - Page 4
USER LICENSE AGREEMENT. Click [Yes] if you accept the terms. The [Install] window will display. 4 Click [Start Installation]. You will install five software programs and the Scanning Guide (HTML format manual). 5 The installation procedure will start. Follow the on-screen message prompts and click - Canon 4200F | CanoScan 4200F Quick Start Guide - Page 5
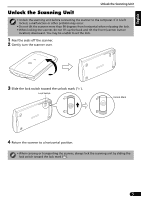
Unlock the Scanning Unit Unlock the Scanning Unit • Unlock the scanning unit before connecting the scanner to the computer. If it is left locked, a malfunction or other problem may occur. • Do not tilt the scanner more than 90 degrees from horizontal when releasing the lock. • When locking the - Canon 4200F | CanoScan 4200F Quick Start Guide - Page 6
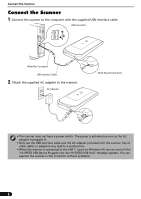
The power is activated as soon as the AC adapter is plugged in. • Only use the USB interface cable and the AC adapter provided with the scanner. Use of other cables or adapters may lead to a malfunction. • When the scanner is connected to the USB 1.1 port on Windows XP, do not worry if the "HI-SPEED - Canon 4200F | CanoScan 4200F Quick Start Guide - Page 7
English Try Scanning The following steps explain how to scan with ArcSoft PhotoStudio. 1 Place a photo or a picture on the glass Top by aligning its top edge with the alignment mark, and close the Bottom document cover. Try Scanning Alignment Mark 2 Select [Start], [Programs] or [All - Canon 4200F | CanoScan 4200F Quick Start Guide - Page 8
time onward with the same scanner. • You will need to do this step if you select a different scanner or a digital camera. 4 Color)/Magazine (Color)/Newspaper (B&W)/Document (Grayscale). 6 Click [Preview]. After calibration, the preview scan will start and gradually display the image. The image - Canon 4200F | CanoScan 4200F Quick Start Guide - Page 9
window • If the scanner does not perform as described above, read the "Troubleshooting" section of the Scanning Guide (HTML format manual). • For details about the bundled software programs, read the Scanning Guide or the user guides (PDF format manuals) for each software program on the CanoScan - Canon 4200F | CanoScan 4200F Quick Start Guide - Page 10
CS, CanoScan Toolbox, ArcSoft PhotoStudio and Adobe Acrobat Reader should be installed from the CanoScan Setup Utility CD-ROM. COPY Button To print (copy) the scanned image with a printer: 1 Press the [COPY] button. The scanner will scan the item. The scanned image will print. • The printer driver - Canon 4200F | CanoScan 4200F Quick Start Guide - Page 11
document cover and sliding it downward into place. • Always put the protective sheet back when you are not scanning film to protect the light source in the document cover. • You can purchase the Accessory Kit for CanoScan 4200F (CSAK-4200F) if the protective sheet or Film Guide are lost or damaged - Canon 4200F | CanoScan 4200F Quick Start Guide - Page 12
block the calibration slot on the Film Guide when you are scanning film. Colors will not be scanned correctly if the calibration slot is obstructed. Place the film face down with the frames in reverse order. Close the film holder. Film Strip Slides Calibration Slot Calibration Slot • Ensure - Canon 4200F | CanoScan 4200F Quick Start Guide - Page 13
Hdoocldumtheendt occouvmere, natncdotvheernandd c tilt insert the bottom edge of the top of the Film Guide the up Film Guide into the bottom groove in into the document cover until it locks the securely into place with a click. 6 Close the document cover. When you close - Canon 4200F | CanoScan 4200F Quick Start Guide - Page 14
to step 4 on page 8. 3 Select the [Select Source]. You can select from the following options for films. Negative Film (Color) / Positive Film (Color) 4 Click [Preview]. ScanGear CS will display the preview image(s). 5 Place a check mark beside the number(s) of the frame(s) to be scanned. By default - Canon 4200F | CanoScan 4200F Quick Start Guide - Page 15
the scanner does not perform as described above, read the "Troubleshooting" section of the Scanning Guide (HTML format manual). • For details about the bundled software programs, read the Scanning Guide or the user guides (PDF format manuals) for each software program on the CanoScan Setup Utility - Canon 4200F | CanoScan 4200F Quick Start Guide - Page 16
supported for film scanning only. *2 The fastest speed in USB 2.0 Hi-Speed mode on Windows PC. Transfer time to computer is not included. *3 Calibration processing time is not included. *4 Slides must be less than 2 mm thick. *5 AC adapter type varies according to the region in which the scanner - Canon 4200F | CanoScan 4200F Quick Start Guide - Page 17
Dealer Tel: Dealer Address: Scanner Model: CanoScan 4200F Serial Number (on the back of the equipment): • About the Computer Used Manufacturer: CPU: Memory Capacity (RAM): Hard Disk Capacity: OS: Windows XP Me Monitor Type: Printer: Type of Printer: Installed Virus Protection Program
-
 1
1 -
 2
2 -
 3
3 -
 4
4 -
 5
5 -
 6
6 -
 7
7 -
8
-
9
-
10
-
11
-
12
-
13
-
14
-
15
-
16
-
17
 |
 |

1
English
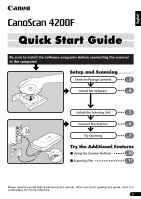
Setup and Scanning
Try the Additional Features
Check the Package Contents
Install the Software
Unlock the Scanning Unit
Connect the Scanner
Try Scanning
p.
3
p.
4
p.
5
p.
6
p.
7
Using the Scanner Buttons
p.
10
Scanning Film
p.
11
Be sure to install the software programs before connecting the scanner
to the computer!
Quick Start Guide
Quick Start Guide
Please read this guide before operating this scanner. After you finish reading this guide, store it in
a safe place for future reference.