Canon 4400F Quick Start Guide Instructions
Canon 4400F - CanoScan - Flatbed Scanner Manual
 |
UPC - 013803067880
View all Canon 4400F manuals
Add to My Manuals
Save this manual to your list of manuals |
Canon 4400F manual content summary:
- Canon 4400F | Quick Start Guide Instructions - Page 1
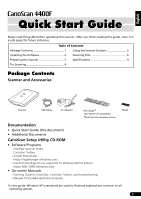
Nederlands Português Español Italiano Deutsch Français English Quick Start Guide Guide de démarrage rapide Schnellstart-Referenz Guida rapida all'installazione Guía de inicio rápido Guia de Início Rápido Aan de Slag gids - Canon 4400F | Quick Start Guide Instructions - Page 2
- ScanGear (scanner driver) - CanoScan Toolbox - ArcSoft PhotoStudio - Presto! PageManager (Windows only) - ScanSoft OmniPage SE (not supported for Windows 98 First Edition) - Adobe RGB (1998) (Windows only) • On-screen Manuals - Scanning Guide (for ScanGear, CanoScan Toolbox, and troubleshooting - Canon 4400F | Quick Start Guide Instructions - Page 3
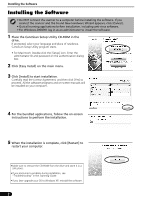
software programs and on-screen manuals will be installed on your computer. 4 For the bundled applications, follow the on-screen instructions encounter a problem during installation, see "Troubleshooting" in the Scanning Guide. • If you later upgrade your OS to Windows XP, reinstall the software. 2 - Canon 4400F | Quick Start Guide Instructions - Page 4
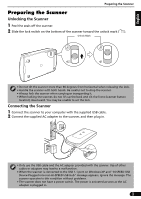
to the USB 1.1 port on Windows XP and "HI-SPEED USB Device Plugged into non-HI-SPEED USB Hub" message appears, ignore the message. The scanner operates in this condition without problems. • The scanner does not have a power switch. The power is activated as soon as the AC adapter is plugged in. 3 - Canon 4400F | Quick Start Guide Instructions - Page 5
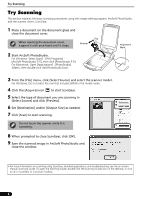
the scanner while it is operating. 8 When prompted to close ScanGear, click [OK]. 9 Save the scanned image in ArcSoft PhotoStudio and close the window. • For more information on scanning using ScanGear, bundled applications, and troubleshooting, see the on-screen manual Scanning Guide. To open the - Canon 4400F | Quick Start Guide Instructions - Page 6
and select CanoScan Toolbox in [When a scanner button is pressed, open:]. - Mac OS X 10.2.8: Select [Other] in [When a scanner button is pressed, open:]. Select CanoScan Toolbox and click [Open]. Click [OK] and quit Image Capture. For more information, see "Troubleshooting" in the Scanning Guide. 5 - Canon 4400F | Quick Start Guide Instructions - Page 7
Scanning Film Scanning Film This scanner can scan 35 mm film (film strip or slide). Follow the procedure below when scanning film. 1 Remove the protective sheet from the document cover. When you finish scanning, put the protective sheet back by aligning it with the grooves in the document cover and - Canon 4400F | Quick Start Guide Instructions - Page 8
short or curled film, extra light may enter through gaps and produce bands of color around the edges of the scanned image. If this occurs, use the supplied shield as shown in the figure. 5 Set the Film Guide to the document cover, and a b close the document cover. Hold the document cover and - Canon 4400F | Quick Start Guide Instructions - Page 9
to scan. Perform image corrections as needed. 9 Click [Scan] to start scanning. Do not touch the scanner while it is operating. 10 When prompted to close ScanGear, click [OK]. 11 Save the scanned image in ArcSoft PhotoStudio and close the window. • Do not leave the film strip in the film guide for - Canon 4400F | Quick Start Guide Instructions - Page 10
the scanner is purchased. Use only AC adapters listed in the user instructions.(Canon AC Adapter: K30279 is for United Kingdom and K30278 is for other EU countries). Do not use them for other products • Specifications are subject to change without notice. Model Number: K10293 (CanoScan 4400F) 9 - Canon 4400F | Quick Start Guide Instructions - Page 11
Russia only For Canon Customer Support contacts, please see the back cover of the European Warranty System (EWS) Booklet or visit www.canon-europe.com. Windows® are either registered trademarks or trademarks of Microsoft Corporation in the U.S. and/or other countries. • Macintosh, Mac and the Mac - Canon 4400F | Quick Start Guide Instructions - Page 12
(pilote du scanner) - CanoScan Toolbox - ArcSoft PhotoStudio - Presto! PageManager (Windows uniquement) - ScanSoft OmniPage SE (non pris en charge par Windows 98 Première Edition) - Adobe RGB (1998) (Windows uniquement) • Manuels en ligne - Guide de numérisation (pour ScanGear, CanoScan Toolbox et - Canon 4400F | Quick Start Guide Instructions - Page 13
Windows 2000/XP, ouvrez une session en tant qu'administrateur pour installer les logiciels. 1 Insérez le CD-ROM de l'Utilitaire d'installation CanoScan , suivez les instructions qui s'affichent Guide de numérisation. • Si vous mettez par la suite à niveau votre système d'exploitation vers Windows XP - Canon 4400F | Quick Start Guide Instructions - Page 14
un dysfonctionnement. • Si le scanner est raccordé au port USB 1.1 sous Windows XP et si le message « Périphérique USB à haut débit connecté à un concentrateur USB à débit réduit » s'affiche, ignorez-le. Le scanner fonctionne ainsi sans problème. • Le scanner n'est pas doté d'un interrupteur - Canon 4400F | Quick Start Guide Instructions - Page 15
de numérisation de base à l'aide du programme de retouche d'image, ArcSoft PhotoStudio, et du pilote du scanner, ScanGear. 1 Posez un document sur la vitre du scanner et fermez le couvercle du scanner. Lors de l'ouverture du couvercle du scanner, soutenez-le avec la main jusqu'à ce qu'il soit en - Canon 4400F | Quick Start Guide Instructions - Page 16
sur une touche du scanner. Lancez Capture d'images, puis procédez comme suit. - Mac OS X 10.3 : cliquez sur [Options] et sélectionnez CanoScan Toolbox dans [When a scanner button is pressed, open:] (Quand vous appuyez sur un de ses boutons, ouvrir :). - Mac OS X 10.2.8 : cliquez sur [Other] (Autre - Canon 4400F | Quick Start Guide Instructions - Page 17
vous ne numérisez pas de film afin de protéger la source lumineuse située dans le couvercle du scanner. 2 Retirez la guide de film du couvercle du scanner. a b Soutenez le couvercle du scanner afin qu'il ne se ferme pas, puis a abaissez et maintenez la patte de la partie supérieure gauche - Canon 4400F | Quick Start Guide Instructions - Page 18
des bandes de couleur autour des bords de l'image numérisée. Si c'est le cas, utilisez la protection fournie de la manière illustrée. 5 Installez le guide de film sur le couvercle du a b scanner, puis fermez ce dernier. Maintenez le couvercle du scanner et a insérez le bord inférieur du - Canon 4400F | Quick Start Guide Instructions - Page 19
la numérisation. Ne touchez pas le scanner pendant son fonctionnement. 10 Si vous êtes invité à fermer ScanGear, cliquez sur [OK]. 11 Enregistrez l'image numérisée dans ArcSoft PhotoStudio et fermez la fenêtre. • Ne laissez pas le film dans son guide pendant une période prolongée, car la chaleur - Canon 4400F | Quick Start Guide Instructions - Page 20
Fiche technique Fiche technique Type de scanner A plat Elément de numérisation CCD couleur 6 lignes Source lumineuse Lampe fluorescente à cathode froide Résolution optique *1 4 800 x 9 600 ppp Résolution au choix 25-19 200 ppp (ScanGear) Nombre de bits de numérisation Couleur Niveaux de - Canon 4400F | Quick Start Guide Instructions - Page 21
service de collecte des déchets, le plan DEEE approuvé ou le service connaître les contacts du support clientèle Canon, reportez-vous à la derni • Microsoft® et Windows® sont des marques ou des marques dépos dans d'autres pays. • Macintosh, Mac et le logo Mac sont des marques d'Apple Computer, Inc 10 - Canon 4400F | Quick Start Guide Instructions - Page 22
98 First Edition) - Adobe RGB (1998) (nur Windows) • Online-Handbücher - Scanner-Benutzerhandbuch (für ScanGear, CanoScan Toolbox und Störungsbeseitigung) - Anleitungen für die im Lieferumfang enthaltene Bundle-Software *In diesem Handbuch werden Punkte, die alle Betriebssysteme betreffen, mit - Canon 4400F | Quick Start Guide Instructions - Page 23
auf dem Laufwerk zu nehmen. Bewahren Sie sie gut auf. • Sollten Sie bei der Installation einem Problem begegnen, lesen Sie den Abschnitt „Störungsbeseitigung" im Scanner-Benutzerhandbuch. • Wenn Sie Ihr Betriebssystem später auf Windows XP aktualisieren, müssen Sie die Software neu installieren. 2 - Canon 4400F | Quick Start Guide Instructions - Page 24
-Port nach USB-Norm 1.1 kann bei Windows XP die Meldung „Hi-Speed USB-Gerät an USB-Port angeschlossen, der diese Geschwindigkeit nicht unterstützt" erscheinen. Ignorieren Sie diese Meldung einfach. Der Scanner arbeitet auch in diesem Fall ohne Probleme. • Der Scanner hat keinen Ein/Aus-Schalter. Er - Canon 4400F | Quick Start Guide Instructions - Page 25
Scannen mit ScanGear, die Bundle-Anwendungen und die Störungsbeseitigung finden Sie im Online-Handbuch mit dem Titel Scanner-Benutzerhandbuch. Zum Öffnen des Scan-Handbuchs doppelklicken Sie auf das Symbol Scanner-Benutzerhandbuch auf dem Desktop oder klicken in ScanGear bzw. CanoScan Toolbox auf - Canon 4400F | Quick Start Guide Instructions - Page 26
am Scanner nicht beschriftet sind. COLOR (FARBE Mac OS X 10.3: Klicken Sie auf [Options] (Optionen) und wählen Sie bei [When a scanner button is pressed, open:] (Öffnen, wenn Scannertaste gedrückt wird:) CanoScan Toolbox. - Mac OS X 10.2.8: Klicken Sie bei [When a scanner button is pressed, open - Canon 4400F | Quick Start Guide Instructions - Page 27
Scannen von Filmen Scannen von Filmen Der Scanner kann 35-mm-Filmstreifen (Negative oder Diapositive) scannen. Folgen Sie beim Scannen von Filmstreifen den nachstehenden Anweisungen. 1 Ziehen Sie das Schutzblatt aus dem Vorlagendeckel. Bringen - Canon 4400F | Quick Start Guide Instructions - Page 28
Deutsch 4 Legen Sie den Filmstreifen in die Filmleiste ein. Legen Sie den Film mit nach unten weisender Vorderseite und den Bildnummern in umgekehrter Reihenfolge ein. Scannen von Filmen • Entfernen Sie Staub, der eventuell auf der Filmoberfläche anhaftet und die Bildqualität beeinträchtigt, mit - Canon 4400F | Quick Start Guide Instructions - Page 29
Bildnummer(n). Führen Sie ggf. erforderliche Bildkorrekturen durch. 9 Klicken Sie auf [Scan] (Scannen) um den Scanvorgang zu starten. Während des Scanvorgangs den Scanner nicht berühren. 10 Wenn der Computer zum Schließen von ScanGear auffordert, klicken Sie auf [OK]. 11 Speichern Sie das gescannte - Canon 4400F | Quick Start Guide Instructions - Page 30
ScanGear) Scan-Bit-Tiefe Farbe Graustufen 48 Bit Eingabe (16 Bit für jede Farbe) 48 Bit oder 24 Bit Ausgabe (16 Bit oder 8 Bit pro Farbe) 48 Bit Eingabe (16 Bit pro Farbe) 16 Bit *2 oder 8 Bit 50qF bis 95qF) 10% bis 90% örsatz Zubehörsatz CSAK-4400F *1 Die optische Aufl Windows- (Canon Netzadapter - Canon 4400F | Quick Start Guide Instructions - Page 31
Canon Customer Support finden Sie auf der hinteren Umschlagseite der EWS-Broschüre (European Warranty System) oder bei www.canon-europe ndern. • Microsoft® und Windows® sind entweder eingetragene Warenzeichen anderen Ländern. • Macintosh, Mac und das Mac-Logo sind Warenzeichen von Apple Computer 10 - Canon 4400F | Quick Start Guide Instructions - Page 32
supplementari CD-ROM del programma di installazione CanoScan • Programmi Software - ScanGear (driver dello scanner) - CanoScan Toolbox - ArcSoft PhotoStudio - Presto! PageManager (solo per Windows) - ScanSoft OmniPage SE (non disponibile per Windows 98 First Edition) - Adobe RGB (1998) (solo - Canon 4400F | Quick Start Guide Instructions - Page 33
tutte le applicazioni in uso, compreso l'antivirus. • In Windows 2000/XP e' necessario collegarsi al sistema con un nome utente di amministratore per installare il software. 1 Inserire il CD-ROM del programma di installazione di CanoScan nella relativa unita'. Se richiesto selezionare la lingua - Canon 4400F | Quick Start Guide Instructions - Page 34
di corrente. • Usare unicamente il cavo USB e l'adattatore CA forniti con lo scanner. L'uso di altri cavi o adattatori può causare un funzionamento non corretto. • Se mentre si è collegati alla posta USB 1.1 su Windows XP compare il messaggio "Periferica USB HI-SPEED collegata a hub di tipo non HI - Canon 4400F | Quick Start Guide Instructions - Page 35
[File] fare clic su [Select Source] (Seleziona origine) e selezionare il modello dello scanner. Per Windows: Non selezionare il nome del modello che include [WIA]. 4 Fare clic sull'icona [Acquire] (Acquisisci) per avviare ScanGear. 5 Selezionare il tipo di documento di cui si vuole effettuare la - Canon 4400F | Quick Start Guide Instructions - Page 36
proprie necessità. Si noti che questi pulsanti non sono indicati sullo scanner. Pulsante COLOR (A COLORI) Effettua la scansione di immagini a colori in formato CanoScan. Fare riferimento a "Installazione del software" a pag. 2. • Per Mac OS X 10.3 e 10.2.8: Prima di usare i pulsanti dello scanner - Canon 4400F | Quick Start Guide Instructions - Page 37
Scansione della pellicola Scansione della pellicola Questo scanner può acquisire una pellicola da 35 mm (striscia o diapositiva). Per acquisire una pellicola adottare le procedure seguenti. 1 Rimuovere il foglio di protezione dal coperchio dei - Canon 4400F | Quick Start Guide Instructions - Page 38
attraverso le fessure puo' entrare troppa luce che provocherebbe bande di colore attorno ai bordi dell'immagine acquisita. In questo caso utilizzare la 'alloggiamento inferiore del coperchio dei documenti, quindib inclinare la parte superiore della guida verso il coperchio dei documenti fino a - Canon 4400F | Quick Start Guide Instructions - Page 39
ScanGear. Seguire le procedure 2-4 della "Prova di scansione" a pag. 4. 7 Selezionare [Negative Film (Color)] (Pellicola negativa (A colori)) o [Positive Film (Color [Scan] (Scansione) per avviare la scansione. Non toccare lo scanner mentre e' in funzione. 10 Alla richiesta di chiusura di ScanGear - Canon 4400F | Quick Start Guide Instructions - Page 40
selezionabile 25-19200 dpi (ScanGear) Colore Profondita' di scansione Scala di grigi entrata a 48 bit (16 bit per ogni colore) uscita a 48 bit o 24 bit (16 bit o 8 bit per ogni colore) entrata a 48 bit (16 bit per ogni colore) uscita a 16 bit *2 o 8 bit Velocita'di scansione *3 (fotografia - Canon 4400F | Quick Start Guide Instructions - Page 41
sullo smaltimento e il recupero dei prodotti WEEE, visitare il sito www.canon-europe.com/environment. (AEE: Norvegia, Islanda e Liechtenstein) Solo per ® e Windows® sono marchi registrati o marchi di Microsoft Corporation negli U.S.A. e/o in altri paesi. • Macintosh, Mac e il logo Mac sono marchi - Canon 4400F | Quick Start Guide Instructions - Page 42
de instalación CanoScan • Programas de software - ScanGear (controlador del escáner) - CanoScan Toolbox - ArcSoft PhotoStudio - Presto! PageManager (sólo para Windows) - ScanSoft OmniPage SE (no compatible con Windows 98 First Edition) - Adobe RGB (1998) (sólo para Windows) • Manuales en pantalla - Canon 4400F | Quick Start Guide Instructions - Page 43
que se estén ejecutando, incluido el software antivirus. • En Windows 2000/XP, deberá iniciar sesión como administrador para instalar el software. 1 Inserte el CD-ROM de la Herramienta de instalación CanoScan en la unidad. Si se le solicita, seleccione el idioma y el lugar de residencia. Se inicia - Canon 4400F | Quick Start Guide Instructions - Page 44
puede provocar un fallo de funcionamiento en la unidad. • Si el escáner está conectado al puerto USB 1.1 en Windows XP y aparece el mensaje "Dispositivo USB de alta velocidad conectado en un concentrador USB no de alta velocidad", ignórelo. El escáner funciona sin problemas en este estado - Canon 4400F | Quick Start Guide Instructions - Page 45
superior Parte inferior Marca de alineación 3 En el menú [File] (Archivo), haga clic en [Select Source] (Selección del origen) y elija el modelo del escáner. Para Windows: No seleccione el nombre de modelo que incluya [WIA]. 4 Haga clic en el icono [Acquire] (Adquirir) para iniciar ScanGear - Canon 4400F | Quick Start Guide Instructions - Page 46
ón del escáner. Inicie Image Capture y, a continuación, realice lo siguiente. - Mac OS X 10.3: Haga clic en [Options] (Opciones) y seleccione CanoScan Toolbox en [When a scanner button is pressed, open:] (Cuando se pulse un botón del escáner, abrir:). - Mac OS X 10.2.8: Seleccione [Other] (Otros) en - Canon 4400F | Quick Start Guide Instructions - Page 47
1 Retire la hoja protectora de la tapa de documentos. Cuando finalice el escaneado, vuelva a colocar la hoja protectora alineando los bordes con las que no se cierre y, a continuación, a mantenga presionada la lengüeta de la parte superior izquierda de la guía de películas y b incline la guía de - Canon 4400F | Quick Start Guide Instructions - Page 48
de calibración de la guía de películas durante el escaneado de una película. Los colores no se escanearán correctamente si la ranura de calibración se ón, a introduzca el margen inferior de la guía de películas en la ranura inferior de la tapa de documentos y b incline la parte superior de la - Canon 4400F | Quick Start Guide Instructions - Page 49
desea escanear. Realice las correcciones de imagen que sean necesarias. 9 Haga clic en [Scan] (Escanear) para iniciar el escaneado. No toque el escáner mientras está funcionando. 10 Cuando se le pregunte si desea cerrar ScanGear, haga clic en [OK] (Aceptar). 11 Guarde la imagen escaneada en ArcSoft - Canon 4400F | Quick Start Guide Instructions - Page 50
.200 ppp (ScanGear) Profundidad de bits de escaneado Color Escala de grises Entrada de 48 bits (16 bits para cada color) salida de 48 o 24 bits (16 bits u 8 bits para cada color) Entrada de 48 bits (16 bits para cada color) salida de 16 bits *2 u 8 bits Velocidad de escaneado *3 Color (fotograf - Canon 4400F | Quick Start Guide Instructions - Page 51
ón y reciclado de productos WEEE, visite la web www.canon-europe.com/environment. (EEA: Noruega, Islandia y Liechtenstein) Windows® son marcas comerciales registradas o marcas comerciales de Microsoft Corporation en los Estados Unidos o en otros países. • Macintosh, Mac y el logotipo de Mac 10 - Canon 4400F | Quick Start Guide Instructions - Page 52
RGB (1998) (somente Windows) • Manuais na tela - Guia de digitalização (para o ScanGear, CanoScan Toolbox e solução de problemas) - Manuais para aplicativos incluídos Protetor *Neste manual, foram usadas imagens do Windows XP para ilustrar explicações comuns a todos os sistemas operacionais. 1 - Canon 4400F | Quick Start Guide Instructions - Page 53
[Cancel] (Cancelar). • Feche todos os aplicativos em execução antes da instalação, incluindo o software antivírus. • Para o Windows 2000/XP, efetue o login como um administrador para instalar o software. 1 Coloque o CD-ROM do Utilitário de instalação do CanoScan na unidade. Se solicitado, selecione - Canon 4400F | Quick Start Guide Instructions - Page 54
, ligue-o. • Use somente o cabo USB e o adaptador de CA fornecidos com o scanner. A utilização de outros cabos ou adaptadores poderá causar mau funcionamento. • Quando o scanner estiver conectado à porta USB 1.1 no Windows XP, e for exibida uma mensagem avisando que um dispositivo "USB HI-SPEED est - Canon 4400F | Quick Start Guide Instructions - Page 55
, ArcSoft PhotoStudio, e o driver do scanner, ScanGear. 1 Coloque um documento sobre o vidro de documentos e feche a tampa. Ao abrir a tampa de documentos, segurea com as mãos até que ela pare. Parte superior Parte inferior 2 Inicie o ArcSoft PhotoStudio. No Windows: Selecione [start] (Iniciar - Canon 4400F | Quick Start Guide Instructions - Page 56
[Easy Install] (Instalação fácil) do programa Utilitário de instalação do CanoScan. Consulte "Instalar o software" na página 2. • No Mac OS X 10.3 e 10.2.8: Antes de usar os botões do scanner, é necessário definir a Image Capture (Captura de imagem) (na pasta [Applications] (Aplicativos)) para abrir - Canon 4400F | Quick Start Guide Instructions - Page 57
scanner pode digitalizar um filme de 35 mm (diafilme ou slide). Siga os procedimentos a seguir para digitalizar o filme. 1 Retire a folha de proteção da tampa de documentos. Quando terminar de digitalizar, recoloque a folha de proteção, alinhando-a com os e segure a alça na parte de cima da Guia de - Canon 4400F | Quick Start Guide Instructions - Page 58
Guia de filme. Coloque o filme virado para baixo com os quadros na ordem inversa. Digitalizar filme • Use uma escova , e feche a tampa de documentos. Segure a tampa de documentos e a insira a parte inferior da Guia de filme na abertura inferior da tampa de documentos. Em seguida, b - Canon 4400F | Quick Start Guide Instructions - Page 59
ScanGear. Siga as etapas de 2 a 4 em "Digitalizar" na página 4. 7 Selecione [Negative Film (Color)] (Filme negativo (colorido)) ou [Positive Film (Color [Scan] (Digitalizar) para começar a digitalizar. Não toque no scanner enquanto ele estiver em operação. 10 Quando solicitado para fechar o ScanGear, - Canon 4400F | Quick Start Guide Instructions - Page 60
varia de acordo com a região em que o scanner foi adquirido. Use apenas os adaptadores de CA listados nas instruções para o usuário. (Adaptador de CA Canon: K30279 é para o Reino Unido e K30278 é para os outros países da União Européia). Não os utilize para outros produtos. • As especificações est - Canon 4400F | Quick Start Guide Instructions - Page 61
equipamentos elé canon-europe.com. A tomada deve estar instalada próxima ao equipamento e estar facilmente acessível. Aviso Ao utilizar este produto, observe os Windows® são marcas comerciais ou registradas da Microsoft Corporation nos E.U.A. e/ou em outros países. • Macintosh, Mac e o logotipo da Mac - Canon 4400F | Quick Start Guide Instructions - Page 62
(deze handleiding) • Aanvullende documenten Cd-rom met CanoScan-setupprogramma • Software - ScanGear (scannerstuurprogramma) - CanoScan Toolbox - ArcSoft PhotoStudio - Presto! PageManager (enkel voor Windows) - ScanSoft OmniPage SE (niet compatibel met Windows 98 First Edition) - Adobe RGB (1998 - Canon 4400F | Quick Start Guide Instructions - Page 63
u de scanner aansluit en de wizard Nieuwe hardware verschijnt, klikt u op [Cancel] (Annuleren). • Sluit alle programma's af, inclusief de anti-virussoftware. • Voor Windows 2000/XP meldt u zich aan als beheerder om de software te installeren. 1 Plaats de cd-rom voor het CanoScan- setupprogramma in - Canon 4400F | Quick Start Guide Instructions - Page 64
de USB-kabel en de netspanningsadapter die bij de scanner zijn geleverd. Het gebruik van andere kabels of adapters kan de scanner beschadigen. • Het bericht "Snel USB-apparaat op trage USB-hub aangesloten" dat verschijnt wanneer de scanner onder Windows XP is aangesloten op de USB 1.1-poort, mag - Canon 4400F | Quick Start Guide Instructions - Page 65
Windows: Selecteer [start] - [(All) Programs] ((Alle) Programma's) - [ArcSoft PhotoStudio 5.5] en klik op [PhotoStudio 5.5]. Macintosh: Open Klik op [Scan] (Scannen) om het scannen te starten. Raak de scanner tijdens het scannen niet aan. 8 Klik op [OK] als u wordt gevraagd om ScanGear te sluiten. - Canon 4400F | Quick Start Guide Instructions - Page 66
zijn niet gelabeld op de scanner. Knop COLOR (KLEUR) Kleurenafbeeldingen in A4 open:). - Mac OS X 10.2.8: Selecteer [Other] (Andere) in [When a scanner button is pressed, open:] (Als er op een scannerknop wordt gedrukt, open:). Selecteer CanoScan Toolbox en klik op [Open]. Klik op [OK] en sluit Image - Canon 4400F | Quick Start Guide Instructions - Page 67
Film scannen Film scannen Deze scanner kan 35 mm films (filmstroken of dia's) scannen. Om film te scannen volgt vast en b schuif de filmgeleider naar buiten om deze te verwijderen. 3 Open de filmhouder. Druk op de beide zijden van de filmhouder om deze te openen. Filmhouder Kalibratiegleuf 6 - Canon 4400F | Quick Start Guide Instructions - Page 68
4 Plaats de film in de filmgeleider. Plaats de film met de bovenkant naar beneden met de kaders in omgekeerde volgorde. Film scannen • Gebruik een haardroger voor het verwijderen van stof op de film: stof tast de beeldkwaliteit aan. Houd de film aan de zijkanten vast om te vermijden dat er vuil of - Canon 4400F | Quick Start Guide Instructions - Page 69
en vervolgens ScanGear. Volg stap 2 tot 4 van "Scannen" op pagina 4. 7 Selecteer [Negative Film(Color)] (Negatieve film (kleur))of [Positive Film(Color)] ( op [Scan] (Scannen) om het scannen te starten. Raak de scanner tijdens het scannen niet aan. 10 Klik op [OK] als u wordt gevraagd om Scangear te - Canon 4400F | Quick Start Guide Instructions - Page 70
scanner Flatbed Scanelement CCD 6-lijnen kleur Lichtbron Koude fluorescerende kathodelamp Optische resolutie *1 4.800 x 9.600 dpi Selecteerbare resolutie 25-19.200 dpi (ScanGear) Scanbitdiepte Kleur Grijswaarden 48 bits invoer (16 bits voor iedere kleur) 48 bits of 24 bits 4400F Windows- - Canon 4400F | Quick Start Guide Instructions - Page 71
recyclen van afgedankte elektrische en elektronische apparatuur naar www.canon-europe.com/environment. (EER: Noorwegen, IJsland Windows® zijn handelsmerken of gedeponeerde handelsmerken van Microsoft Corporation in de Verenigde Staten en/of andere landen. • Macintosh, Mac en het Mac bedrijven. 10 - Canon 4400F | Quick Start Guide Instructions - Page 72
with the instructions, may cause Part 15 of the FCC Rules. Do not make any changes or modifications to the equipment unless otherwise specified in the manual . If such changes or modifications should be made, you could be required to stop operation of the equipment. Canon U.S.A., Inc. One Canon - Canon 4400F | Quick Start Guide Instructions - Page 73
QT5-0618-V03 ©CANON INC. 2007 PRINTED IN CHINA IMPRIME EN CHINE
-
 1
1 -
 2
2 -
 3
3 -
 4
4 -
 5
5 -
 6
6 -
 7
7 -
8
-
9
-
10
-
11
-
12
-
13
-
14
-
15
-
16
-
17
-
18
-
19
-
20
-
21
-
22
-
23
-
24
-
25
-
26
-
27
-
28
-
29
-
30
-
31
-
32
-
33
-
34
-
35
-
36
-
37
-
38
-
39
-
40
-
41
-
42
-
43
-
44
-
45
-
46
-
47
-
48
-
49
-
50
-
51
-
52
-
53
-
54
-
55
-
56
-
57
-
58
-
59
-
60
-
61
-
62
-
63
-
64
-
65
-
66
-
67
-
68
-
69
-
70
-
71
-
72
-
73
 |
 |

Quick Start Guide
Guide de démarrage rapide
Schnellstart-Referenz
Guida rapida all’installazione
Guía de inicio rápido
Guia de Início Rápido
Aan de Slag gids
English
Deutsch
Italiano
Nederlands
Fran
çais
Espa
ñol
Portugu
ês