Canon 45 MC ZR50 ZR45MC Instruction Manual - Page 14
Attaching and charging the battery packs
 |
UPC - 013803010510
View all Canon 45 MC manuals
Add to My Manuals
Save this manual to your list of manuals |
Page 14 highlights
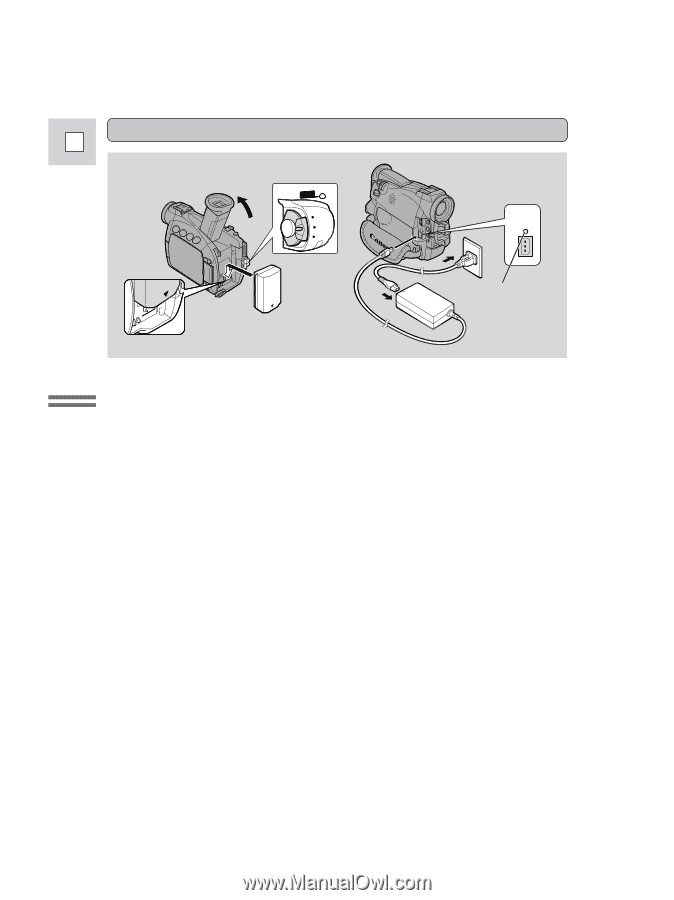
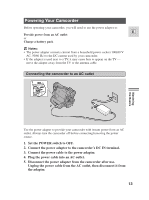
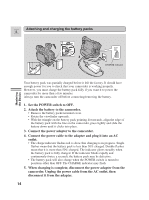
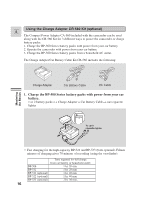
Attaching and charging the battery packs E 1 POWER CAMERA OFF PLAY(VCR) 3 2 DC IN 9.5V CHARGE 3 4 CHARGE indicator Mastering the Basics Your battery pack was partially charged before it left the factory. It should have enough power for you to check that your camcorder is working properly. However, you must charge the battery pack fully if you want it to power the camcorder for more than a few minutes. Always turn the camcorder off before connecting/removing the battery. 1. Set the POWER switch to OFF. 2. Attach the battery to the camcorder. • Remove the battery packs' terminal cover. • Rotate the viewfinder upwards. • With the triangle on the battery pack pointing downwards, align the edge of the battery pack with the line on the camcorder, press lightly and slide the battery down until it clicks into place. 3. Connect the power adapter to the camcorder. 4. Connect the power cable to the adapter and plug it into an AC outlet. • The charge indicator flashes red to show that charging is in progress. Single flashes mean that the battery pack is less than 50% charged. Double flashes mean that it is more than 50% charged. The indicator glows steadily when the battery pack is fully charged. If the indicator blinks rapidly and continuously (twice a second), the battery pack may be defective. • The battery pack will also charge when the POWER switch is turned to positions other than OFF. The CHARGE indicator may flash. 5. When charging is complete, disconnect the power adapter from the camcorder. Unplug the power cable from the AC outlet, then disconnect it from the adapter. 14
-
 1
1 -
2
-
3
-
4
-
5
-
6
-
7
-
8
-
 9
9 -
 10
10 -
 11
11 -
 12
12 -
 13
13 -
 14
14 -
 15
15 -
 16
16 -
 17
17 -
 18
18 -
 19
19 -
20
-
21
-
22
-
23
-
24
-
25
-
26
-
27
-
28
-
29
-
30
-
31
-
32
-
33
-
34
-
35
-
36
-
37
-
38
-
39
-
40
-
41
-
42
-
43
-
44
-
45
-
46
-
47
-
48
-
49
-
50
-
51
-
52
-
53
-
54
-
55
-
56
-
57
-
58
-
59
-
60
-
61
-
62
-
63
-
64
-
65
-
66
-
67
-
68
-
69
-
70
-
71
-
72
-
73
-
74
-
75
-
76
-
77
-
78
-
79
-
80
-
81
-
82
-
83
-
84
-
85
-
86
-
87
-
88
-
89
-
90
-
91
-
92
-
93
-
94
-
95
-
96
-
97
-
98
-
99
-
100
-
101
-
102
-
103
-
104
-
105
-
106
-
107
-
108
-
109
-
110
-
111
-
112
-
113
-
114
-
115
-
116
-
117
-
118
-
119
-
120
-
121
-
122
-
123
-
124
-
125
-
126
-
127
-
128
-
129
-
130
-
131
-
132
-
133
-
134
-
135
-
136
-
137
-
138
-
139
-
140
-
141
-
142
-
143
-
144
-
145
-
146
-
147
-
148
-
149
-
150
-
151
-
152
-
153
-
154
-
155
-
156
-
157
-
158
-
159
-
160
-
161
-
162
-
163
-
164
 |
 |