Canon 9842A002 User Manual
Canon 9842A002 Manual
 |
View all Canon 9842A002 manuals
Add to My Manuals
Save this manual to your list of manuals |
Canon 9842A002 manual content summary:
- Canon 9842A002 | User Manual - Page 1
Document Scanner Startup Manual Please read this manual before operating this unit. After you finish reading this manual, store it in a safe place for future reference. - Canon 9842A002 | User Manual - Page 2
by any information storage or retrieval system without the prior written permission of CANON ELECTRONICS INC. Disclaimers The information in this document is subject to change without notice. CANON ELECTRONICS INC. MAKES NO WARRANTY OF ANY KIND WITH REGARD TO THIS MATERIAL, EITHER EXPRESS OR IMPLIED - Canon 9842A002 | User Manual - Page 3
you to use the SOFTWARE. No updates, fixes or support will be made available for the SOFTWARE. 4. LIMITED WARRANTY AND DISCLAIMER OF INDEMNITY: Canon, Canon's affiliate, their distributor or dealer will not guarantee uninterrupted service, or absence or correction of errors. Therefore, the SOFTWARE - Canon 9842A002 | User Manual - Page 4
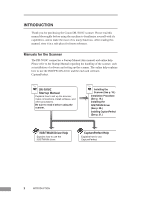
the Canon DR-5010C scanner. Please read this manual thoroughly before using the machine to familiarize yourself with it's capabilities, and to make the most of its many functions. After reading this manual, store it in a safe place for future reference. Manuals for the Scanner The DR-5010C scanner - Canon 9842A002 | User Manual - Page 5
uses the following symbols and indications. Before you start reading this manual, read the following and familiarize yourself with their meanings. WARNING Indicates a warning concerning operations that may lead to death or injury to persons if not - Canon 9842A002 | User Manual - Page 6
Manuals for the Scanner 2 Conventions ...3 Before Using the Scanner 5 Safe Operation ...5 Installation Location ...5 Power ...6 Moving the Scanner ...6 Normal Handling ...7 Disposal ...8 Features of the DR-5010C Driver Guide 47 Troubleshooting ...81 Specifications ...87 Index ...90 4 Contents - Canon 9842A002 | User Manual - Page 7
such a spot, hang a heavy curtain or similar object to shade the scanner. • Avoid dusty locations. Dust can get inside of the scanner and cause problems. • Avoid warm or humid locations, such as in the vicinity of a water faucet, water heater, or humidifier, and avoid locations where the fumes from - Canon 9842A002 | User Manual - Page 8
cord. • Do not place other objects around the outlet. • If you have any questions concerning your local power supply, contact your local authorized Canon dealer or your local power company. Moving the Scanner • To avoid dropping or damaging the scanner, always carry it with two hands. The scanner - Canon 9842A002 | User Manual - Page 9
does somehow become damaged, immediately turn the scanner OFF and unplug the power cord. Contact your local authorized Canon dealer or service representative to have the scanner serviced. • Always turn the scanner OFF and unplug the power cord before moving the scanner. • Notice to Cardiac Pacemaker - Canon 9842A002 | User Manual - Page 10
shock. If such foreign matter does get inside of the scanner, unplug the power cord immediately, and then contact your local authorized Canon dealer or service representative for assistance. • Do not set up the scanner in a dusty or humid location. Doing so creates a risk of fire or electrical - Canon 9842A002 | User Manual - Page 11
Features of the DR-5010C The main features of the DR-5010C scanner are listed below. ■ Fast Document Feeding .4 mm x 312 mm x 191.4 mm) (W x D x H). ■ SCSI III/USB 2.0 Interface Supported The scanner is equipped with both SCSI III and Hi-Speed USB 2.0 interfaces for connecting to a personal computer - Canon 9842A002 | User Manual - Page 12
spots left when scanning documents that have had holes punched in them and been stored in a binder. ■ Multistreaming Function The scanner supports multistreaming, which, according to the application, can create two images with different scanning conditions from one image. However, this function can - Canon 9842A002 | User Manual - Page 13
local authorized Canon dealer or service representative. DR-5010C Scanner Document Startup Manual Scanner KeeRpeathdisthmisamnuaanluinalathsoarfoeupglhalcyebfeofrofruetuurseinrgeftehriesnsccea.nner. Startup Manual (This Manual) Quick Reference Guide Document Eject Guide DR-5010C Setup Disc - Canon 9842A002 | User Manual - Page 14
Removing the Protective Packing Materials Remove all of the protective packing materials (marked ▼ in the diagrams) before using the scanner. 1. Remove the protective tape from the scanner. 2. Slowly open the Document Feed Tray, then remove the protective tape. Feed tray 3. Hold the edge of the - Canon 9842A002 | User Manual - Page 15
4. Remove the protective sheet then the protective material securing the pickup roller. Pickup Roller 5. Remove the roller cover, then remove the protective material securing the retard roller. Replace the roller cover. Roller Cover Retard Roller 6. Gently close the Upper unit. Be sure that the - Canon 9842A002 | User Manual - Page 16
Stop Button Push it to stop scanning. Start Button Push it to start scanning. Document Eject Tray 1 Scanned documents are ejected here. (See p. 45.) Document Guides Adjust them to align with the width of the document. Document Stopper Moves up and down according to the paper feed switch lever. (See - Canon 9842A002 | User Manual - Page 17
SCSI Connector Connect to a 50-pin half-pitch (pin type) SCSI cable. (See p. 21.) USB Connector Connect the USB cable provided or one that supports Hi-Speed USB 2.0. (See p. 23.) CAUTION Do not connect anything to the connectors that are not used. If anything is plugged into those connectors it - Canon 9842A002 | User Manual - Page 18
the DR-5010C, your computer must satisfy the following system requirements: • A computer that meets the following specifications: on your operating system IMPORTANT • USB connection is not supported on Windows NT. Connect the scanner via a SCSI Canon dealer or service representative for more detailed - Canon 9842A002 | User Manual - Page 19
driver when using the DR5010C. Contact your local authorized Canon dealer or service representative. for more detailed information. • If the CPU, memory, interface card, and other specifications the functions described in this guide. • Make sure that the device driver and application software that - Canon 9842A002 | User Manual - Page 20
Installation Procedure The procedure for installing the scanner is outlined below. (For a detailed outline of this procedure, see "Connecting the Scanner to Your PC," on p. 21.) 1. Check the interface card in your computer. (See "Interface Cards," on p. 19.) 2. Connect the scanner to the PC. (See " - Canon 9842A002 | User Manual - Page 21
the SCSI card is one of the recommended cards listed below that supports SCSI III. SCSI Cards When connecting the scanner via SCSI, verify : Adaptec Models: APA-1480 IMPORTANT • Follow the instructions in your computer's and the SCSI card's manuals to install the SCSI card into your computer. • - Canon 9842A002 | User Manual - Page 22
IMPORTANT • Follow the instructions in your computer's and the USB 2.0 interface card's manuals to install the USB 2.0 interface card into your computer. • Use the most recent version of the USB 2.0 driver provided by Microsoft. Note If the USB 2.0 interface is not compatible with Hi-Speed USB 2.0, - Canon 9842A002 | User Manual - Page 23
both a SCSI cable and a USB cable concurrently. • Do not connect multiple DR-5010C scanners to one (1) computer. • After having changed the connection, be sure via SCSI Notes on the Shape of Connectors and the SCSI Cable • The DR-5010C is equipped with a 50-pin half-pitch (pin type) SCSI Connector. - Canon 9842A002 | User Manual - Page 24
Note • The SCSI ID is set to 2 at the factory. • The SCSI ID is set with the Dip Switches on the back of the scanner. The Dip Switches are on when they are down, and off when they are up. • To change the SCSI ID, be sure to turn OFF the scanner and the computer and refer to the following table to - Canon 9842A002 | User Manual - Page 25
for use with the scanner. (See "USB 2.0 Interface Card," on p. 19.) Computer USB Cable DR-5010C IMPORTANT • If the operating system you are using is Windows NT, the connection via USB is not supported. When using the DR-5010C with Windows NT, be sure to connect the scanner via SCSI. • When using - Canon 9842A002 | User Manual - Page 26
Connecting the Power Cord Connect the power cord that is provided with this scanner to the power cord connector located on the rear of the scanner, and then plug the cord into a power outlet. WARNING • Be sure to use the power cord provided with the scanner. • Be sure the scanner is turned OFF - Canon 9842A002 | User Manual - Page 27
and unplug the power cord. Contact your local authorized Canon dealer or service representative to have the scanner serviced. 3. Log on to Windows. IMPORTANT If you are to install the scanner driver. Follow the instructions on the screen to proceed with the installation. Installing the Scanner 25 - Canon 9842A002 | User Manual - Page 28
letter assigned to your CDROM drive), and then click the [OK] button. 6. On the Driver Files Search Results screen, click the [Next] button. 7. If the message "Digital Signature Not [Install from a list or specific location (Advanced)], and then click the [Next] button. 26 Installing the Scanner - Canon 9842A002 | User Manual - Page 29
the driver "has not passed Windows logo testing", click the [Continue Anyway] button in the [Hardware Installation] dialog box. 5. Click the [Finish] button on the Completing the Found New Hardware Wizard screen. IMPORTANT • The DR-5010C is registered as "CANON DR-5010C SCSI" or "CANON DR-5010C USB - Canon 9842A002 | User Manual - Page 30
already installed in your PC, you must back up the files listed below. These files may be overwritten when you install this ISIS/TWAIN driver. C:\Windows\System\pix*.dll C:\Windows\PixTran\*.* Note The name of the "\Windows" and "\Windows\System" folder varies, depending on which version of Windows - Canon 9842A002 | User Manual - Page 31
and then click the [OK] button. The Installer starts. 5. Follow the instructions on the screen and complete the installation. 6. Restart Windows when you have completed the installation. Note Installing the ISIS/TWAIN driver creates the following shortcuts in the Start menu: Installing the Software - Canon 9842A002 | User Manual - Page 32
Canon DR-5010C Help Online help for ISIS/TWAIN driver. (See "Using the ISIS/TWAIN Driver," on p. 35.) PATCH x(xx) (Patch Code Sample Sheet) These sheets are used to automatically separate batches of documents when the scanner recognizes the patch code - Canon 9842A002 | User Manual - Page 33
"D:\CapturePerfect\Setup.exe" (assuming that "D" is the letter assigned to your CD-ROM drive), and then click the OK button. The Installer starts. 5. Follow the instructions on the screen and complete the installation process. Installing the Software 31 - Canon 9842A002 | User Manual - Page 34
Uninstalling Software Follow the procedure described below to uninstall the ISIS/TWAIN driver and CapturePerfect. IMPORTANT If you are using Windows NT 4.0 Workstation, Windows 2000 Professional, or Windows XP, be sure to log on as a user with administrator - Canon 9842A002 | User Manual - Page 35
Remove Programs Properties] dialog box is displayed. Note If you are using Windows XP, the [Add or Remove Programs] dialog box is displayed. 3. Select [Canon DR-5010C Driver] or [CapturePerfect] from the list in the dialog box, and then click [Add/Remove]. Note If you are using Windows XP, click the - Canon 9842A002 | User Manual - Page 36
4. The [Confirm File Deletion] dialog box appears. When [Canon DR-5010C Driver] is selected. When [CapturePerfect] is selected 5. Click the [Yes] button to start the uninstaller. Follow the instructions on the screen to finish uninstalling the software. 34 Installing the Software - Canon 9842A002 | User Manual - Page 37
DR5010C], and then click [Canon DR-5010C Help], or click the Help button displayed in the dialog box. Note Before using the ISIS/TWAIN Driver, select the scanner [Canon DR-5010C] with the software. For more information, refer to [Canon DR-5010C Help] and the manual for the software you are using - Canon 9842A002 | User Manual - Page 38
Using CapturePerfect Follow the procedure described below to start and close CapturePerfect. Note The basic method for scanning using CapturePerfect is described in CapturePerfect help. From the [Help] menu on the CapturePerfect menu bar, click [Help], then refer to the explanation of how to use - Canon 9842A002 | User Manual - Page 39
starts. 4. On the Scan menu, click [Select Scanner]. 5. Select [Canon DR-5010C], and then click the [OK] button. Note If [Canon DR-5010C] is not displayed in the list of scanners, re-install the ISIS/TWAIN driver. (See "Installing the ISIS/TWAIN Driver" on p. 28. ) Using the Software 37 - Canon 9842A002 | User Manual - Page 40
On the Scan menu, click [Scanner Setting] and then configure scanning parameters. Note For details about how to configure scanning parameters, see ISIS/TWAIN driver help. (See p. 35.) 7. Execute the scan operation from the [Scan] menu. Note Details about actually using CapturePerfect can be found in - Canon 9842A002 | User Manual - Page 41
with the Event Function DR-5010C and CapturePerfect support Windows Scanner Event function. By installing the ISIS/TWAIN driver and CapturePerfect, CapturePerfect starts automatically when the scanners Start Button is pressed. Note Windows NT does not support this function. Confirming Scanner - Canon 9842A002 | User Manual - Page 42
2. Select [Canon DR-5010C SCSI] (or [Canon DR-5010C USB]), and then click the [Properties] buton to display Properties. 3. Click the [Events] tab. 40 Using the Software - Canon 9842A002 | User Manual - Page 43
4. Make sure that [CapturePerfect] is checked. Note • When an application is started by an event, it may not work correctly depending on the application. • To disable the Event function, check the [Disable device events] check box. • Restart Windows to enable new settings after changing the event - Canon 9842A002 | User Manual - Page 44
, and weight. Scanning different types of paper at one time can cause the scanner to jam. • Scanning documents before the ink is dry can cause problems with the scanner. Always make sure that the ink on a document is dry before scanning it. 42 Using the Scanner - Canon 9842A002 | User Manual - Page 45
• Scanning documents that are written in pencil or similar material can make the rollers dirty, which can then transfer the dirt to subsequent documents. Always clean the rollers after scanning a document written in pencil. • When scanning a two-sided document that is printed on thin paper, the - Canon 9842A002 | User Manual - Page 46
Setting Up the Document Feed Tray and the Document Eject Tray 1. Hold the middle of the Document Feed Tray and slowly open it toward you. CAUTION Do not place anything other than documents on the Document Feed Tray. Doing so may damage the scanner, reduce scanning quality, or cause the feed tray to - Canon 9842A002 | User Manual - Page 47
Document Eject Tray The scanner has two eject methods; documents can be eject to the front of the scanner in a U-Turn Path, or to the back of the scanner in a Straight Path. The eject method can be switched by opening or closing Document Eject Tray 2. Select the eject method according to what you - Canon 9842A002 | User Manual - Page 48
Using the Straight Path 1. Open Document Eject Tray 2. Note When using the Straight Path, the ejected documents are stacked in reverse order to how they were fed. IMPORTANT • Be sure there is enough space for documents that are ejected behind the scanner when using the Straight Path. If there is not - Canon 9842A002 | User Manual - Page 49
and become jammed in the scanner. Avoid this problem by attaching the Document Eject Guide. 1. Open the Document Eject Tray Extention toward you. 2. Attach the Document Eject Guide in the order ➀, ➁ as shown. 3. Press the Document Eject Guide to attach it to Document Eject Tray Extention. Using - Canon 9842A002 | User Manual - Page 50
4. To remove the Document Eject Guide, lift the Document Eject Tray Extension a little and unhook the Document Eject Guide. 5. Reverse the procedure for attaching the Document Eject Guide to remove it. 48 Using the Scanner - Canon 9842A002 | User Manual - Page 51
Placing a Document for Scanning There are two methods for paper separation, called the Page Separation mode and Bypass mode for feeding documents. Feeding documents continuously from a stack of documents placed in the feed tray is called the Page Separation mode. Feeding documents one sheet at a - Canon 9842A002 | User Manual - Page 52
. • Be careful when placing a document in the scanner. It is possible to cut your hand on the edge of a sheet of paper. 3. Set the Document Guides so they are wider than the document to be scanned. 4. Place the documents face up into the Document Feed Tray and so they touch the - Canon 9842A002 | User Manual - Page 53
(80g/m2)). Doing so may cause a paper jam. 5. Adjust the document guides so they matche the width of the document. Note Before starting a scan, make a system error or a paper jam while the scanner is scanning, resolve the problem, make sure that the scanned image of the last page that was fed has - Canon 9842A002 | User Manual - Page 54
go down. • The ISIS/TWAIN Driver settings change to the manual feed mode automatically when the Feed Selection Lever is lowered. 2. Place the document into the Document Feed Tray one sheet at a time and adjust the position of the Document Guides - Canon 9842A002 | User Manual - Page 55
IMPORTANT • When scanning documents that are fastened together, such as invoices, set the edge that is fastened together as the leading edge. • Note that when scanning with nonseparated feed, if you place several documents that are not fastened together on the feed tray at one time, they will be fed - Canon 9842A002 | User Manual - Page 56
refer to the ISIS/TWAIN Driver Help. • Patch code sheets only work with an application which support file separation by patch code PATCH T (LTR)]. Click the [Start] button in Windows, point to [Programs] - [Canon DR-5010C], and then click [PATCH X(XX)]. Then print the sheets to use them. Note To - Canon 9842A002 | User Manual - Page 57
the sheets as an image has been disabled in the patch code detection settings. Using Patch Code Sheets 1. Print out the patch code sheets on a printer. Use paper that is the same size as the patch code sheet data. Note • Use A4size paper for [PATCH II (A4)] and [PATCH T (A4)] • Use - Canon 9842A002 | User Manual - Page 58
Effective Area for Detecting Patch Code Patterns 0.2" (5 mm) Patch Code Pattern 0.2" (5 mm) (Effective area for detecting patch code patterns.) 0.2" (5 mm) 3.7" (94 mm) IMPORTANT • When you copy the originals, adjust the size and density settings to match the originals. Extremely dark or light - Canon 9842A002 | User Manual - Page 59
Clearing a Paper Jam When paper jams occur during scanning, use the following procedure to clear them. CAUTION Be careful when removing jammed paper. It is possible to cut your hand on the edge of a sheet of paper. 1. Remove any documents that have been left in the eject tray. 2. Close the Document - Canon 9842A002 | User Manual - Page 60
4. Remove the jammed document. When the jam occurred in the feed section When the jam occurred in the eject section IMPORTANT Do not pull hard on the jammed sheet; remove it gently. If the sheet does rip, be sure to remove all of the remaining pieces of paper. 5. Close the Upper unit slowly. Be sure - Canon 9842A002 | User Manual - Page 61
IMPORTANT Do not force the Upper unit to close. Doing so may damage the scanner. Note After removing the jammed paper, check to see if the last page was scanned, and then continue scanning. Using the Scanner 59 - Canon 9842A002 | User Manual - Page 62
while doing continuous scanning. There are two methods for multiple feed detection as shown below, the detection method is selected by the ISIS/TWAIN driver. Detecting Double Feed by Document Length This function uses the length of the first document as the standard, and then detects a multiple scan - Canon 9842A002 | User Manual - Page 63
Regular Maintenance Clean the scanner on a regular basis as described below to maintain peak scanning quality. CAUTION • When cleaning the scanner or inside of the scanner, turn OFF the Power Switch and unplug the power cord from the outlet. • The power needs to be ON when cleaning the rollers and - Canon 9842A002 | User Manual - Page 64
Cleaning the Sensor Glass and the Rollers If scanned images have extraneous marks, or if the scanned documents are dirty, then the sensor glass or rollers inside the scanner may be dirty. Clean them periodically. 1. Hold the Upper unit as shown in the diagram, and open it slowly until it stops. - Canon 9842A002 | User Manual - Page 65
errors. If there are scratches on the sensor glass, contact your local authorized Canon dealer or service representative to replace the sensor glass. 3. Wipe the rollers with a firmly wrung cloth moistened with water. Guide Board CAUTION Do not use detergent to clean the rollers, since any detergent - Canon 9842A002 | User Manual - Page 66
to rotate. Just clean the part that you can see. Forcing the rollers to rotate may cause a feeding error. • Be careful not to bend the guide boards that are against the rollers on the Upper unit. 4. Remove the pickup roller, feed roller, and retard roller. (See "Removing and Attaching the Rollers - Canon 9842A002 | User Manual - Page 67
Cleaning the Shading Boards The shading boards are the white standard boards located behind the platen rollers. A dirty shading board may alter scanned colors or cause marks on the images. 1. Turn ON the power. 2. Hold the Upper unit as shown in the diagram, and open it slowly until it stops. - Canon 9842A002 | User Manual - Page 68
4. Wipe the only surface of the shading boards with a firmly wrung cloth moistened with water. Do not wipe the back side of the shading boards. Be careful not to bend the shading boards while doing this. CAUTION Wipe both the upper and lower shading boards. Do not spray water or detergent directly - Canon 9842A002 | User Manual - Page 69
is displayed. • Be sure to reset the counter when you replace the rollers. (See "Resetting the Counter," on p. 68.) • Windows NT does not support the roller replacement message display. Check the number of pages that have been scanned in the "Total Scanning Count" in the version information for the - Canon 9842A002 | User Manual - Page 70
• Contact your local authorized Canon dealer or service representative for information about the exchange roller kit (pickup [Control Panel] window is displayed. 2. Double-click the [Scanners and Cameras] icon. The [Scanners and Cameras Properties] dialog box is displayed. 68 Regular Maintenance - Canon 9842A002 | User Manual - Page 71
3. Click on [Properties] for the scanner you are using. 4. Click the [Counter] tab. 5. Press the [Reset] button, and then make sure that the counter for the Roller being used is set to 0. Regular Maintenance 69 - Canon 9842A002 | User Manual - Page 72
Removing and Attaching the Pickup Roller Follow the procedures below to remove and attach the pickup roller for cleaning or replacement. CAUTION • Turn ON the power to the scanner to remove or attach the pickup roller. Be careful when working on the scanner when the power is ON. • Do not use - Canon 9842A002 | User Manual - Page 73
CAUTION The pickup roller is located in the middle of the Upper unit. Do not hold the protrusion on the Upper unit when you open it. Doing so may deform the pickup roller or cause a feeding error. 3. Push up on the pickup roller to open the hook, and then remove the pickup roller. Attaching the - Canon 9842A002 | User Manual - Page 74
2. Place the shaft of the pickup roller on the hooks, and then press it into place. 3. Make sure that the shaft of the pickup roller is correctly inserted. 4. Close the Upper unit slowly. Be sure that the Upper unit is completely closed by pushing on both edges with both hands until you hear a click - Canon 9842A002 | User Manual - Page 75
Removing and Attaching the Feed Roller Follow the procedure below to remove and attach the feed roller unit for cleaning or replacement. CAUTION Do not use excessive force when removing or attaching the rollers. Doing so may damage them. Removing the Feed Roller 1. Hold the Upper unit as shown in - Canon 9842A002 | User Manual - Page 76
3. Move the roller lock lever down and forward (➀), and then slide it to the right (➁). 4. Shift the feed roller to the right to remove it. Attaching the Feed Roller 1. Position the feed roller so the notch in the roller is facing the scanner's shaft. 74 Regular Maintenance - Canon 9842A002 | User Manual - Page 77
2. Slide the roller lock lever to the left, and insert it into the feed roller hole. 3. Lift up the roller lock lever and lock the feed roller. 4. Attach the roller cover. Regular Maintenance 75 - Canon 9842A002 | User Manual - Page 78
5. Close the Upper unit slowly. Be sure that the Upper unit is completely closed by pushing on both edges with both hands until you hear a click. IMPORTANT Do not force the Upper unit to close. Doing so may damage the scanner. 76 Regular Maintenance - Canon 9842A002 | User Manual - Page 79
Removing and Attaching the Retard Roller Follow the procedure below to remove and attach the retard roller when you clean or replace it. CAUTION Do not use excessive force when removing or attaching the rollers. Doing so may damage them. Removing the Retard Roller 1. Hold the Upper unit as shown in - Canon 9842A002 | User Manual - Page 80
3. Move the roller lock lever upward (➀), and then slide it to the right (➁). 4. Shift the retard roller to the right to remove it. Attaching the Retard Roller 1. Position the retard roller so the notch in the roller is facing the scanner's shaft. 78 Regular Maintenance - Canon 9842A002 | User Manual - Page 81
2. Slide the roller lock lever to the left, and insert it into the retard roller hole. 3. Move the roller lock lever forward and down to lock the retard roller. 4. Attach the roller cover. Regular Maintenance 79 - Canon 9842A002 | User Manual - Page 82
5. Close the Upper unit slowly. Be sure that the Upper unit is completely closed by pushing on both edges with both hands until you hear a click. IMPORTANT Do not force the Upper unit to close. Doing so may damage the scanner. 80 Regular Maintenance - Canon 9842A002 | User Manual - Page 83
, and how to resolve them. Refer to the troubleshooting section related to the problem that you have encountered. The Scanner Does Not Turn above section you still cannot resolve the problem, contact your local authorized Canon dealer or your service representative. The Scanner Does Not Turn ON - Canon 9842A002 | User Manual - Page 84
to the SCSI Controller entry. If either of these symbols is displayed, refer to the instruction manual for the SCSI card and make the SCSI card settings again. Windows XP Click [Start appears, refer to the instruction manual for the SCSI card and reconfigure the SCSI card. 82 Troubleshooting - Canon 9842A002 | User Manual - Page 85
then turn the scanner ON first, and then the PC. (See p. 25.) Cause Remedy There is a problem with another SCSI device that is connected in the daisy chain. Do not use the daisy chain connection configuration. . Remedy Use a recommended SCSI card. (See "SCSI Cards," on p. 19) Troubleshooting 83 - Canon 9842A002 | User Manual - Page 86
the PC correctly referring to the instruction manual for the USB 2.0 interface card. support the USB cable. Remedy Use the USB cable provided with the scanner. (See p. 23.) Cause The scanner does not support the USB HUB. Remedy Remove the USB HUB to use the scanner. (See p. 23.) 84 Troubleshooting - Canon 9842A002 | User Manual - Page 87
support Hi-Speed 2.0. Remove the USB HUB or replace it with one that supports driver been installed? • Has the application software been installed correctly? Has the application software been set up correctly? • Is there a problem your local authorized Canon dealer or service representative to purchase a - Canon 9842A002 | User Manual - Page 88
to install the scanner driver, see "Installing the ISIS/TWAIN Driver," on p. 28. For details on how to install the application software, refer to the application software instruction manual. Cause Remedy Attempting to use a function of the DR-5010C that is not supported by the application software - Canon 9842A002 | User Manual - Page 89
Scanning Document Specifications Width: 42 to 546 g/m2 (0.05 mm to 0.66 mm) Business cards are supported. However, scanning embossed cards is not guaranteed. Size: 2.12" x 3.37" ± 0.08 mm) Document Feeding Method Automatic/Manual Scanning Method Contact image sensor Light Source LED - Canon 9842A002 | User Manual - Page 90
functions described above can be used if they are supported by the application software. • Some functions may to allow the ISIS/TWAIN driver to recognize bar codes. Replacement Canon dealer or service representative for detailed information about the options and replacement parts. 88 Specifications - Canon 9842A002 | User Manual - Page 91
.6" (398.4) 7.6" (194) 7.4" (188) 5.6" (142) 7.5" (191.4) 3.2" (82) 26.3" (668) (Document Feed Tray Extension is open) 21.3" (541) (Document Feed Tray is open) 17.3" (440) (Document Eject Guide is open) 3.7" (95) (Document Eject Tray 2 is open) 12.3" (312) Specifications 89 - Canon 9842A002 | User Manual - Page 92
DIP Switches 15 Disposal 8 Documents 42 Documents Eject Guide 14,47 Documents Stopper 14 Document Eject Tray 19 USB 2.0 Interface Card 19 ISIS/TWAIN Driver Install 28 Uninstall 32 Using 35 N Normal Specifications 87 Start Button 14 Stop Button 14 Straight Path 45,46 T Troubleshooting - Canon 9842A002 | User Manual - Page 93
MEMO - Canon 9842A002 | User Manual - Page 94
MEMO - Canon 9842A002 | User Manual - Page 95
installed and used in accordance with the instructions, may cause harmful interference to radio communications manual. If such changes or modifications should be made, you could be required to stop operation of the equipment. Canon U.S.A. Inc. One Canon Model DR-5010C is identical to model M11051. - Canon 9842A002 | User Manual - Page 96
INC. 1248, SHIMOKAGEMORI, CHICHIBU-SHI, SAITAMA 369-1892, JAPAN CANON U.S.A. INC. ONE CANON PLAZA, LAKE SUCCESS, N.Y. 11042, U.S.A. CANON CANADA INC. 6390 DIXIE ROAD, MISSISSAUGA, ONTARIO L5T 1P7, CANADA CANON EUROPA N.V. BOVENKERKERWEG 59-61, P.O.BOX 2262, 1180 EG AMSTELVEEN, THE NETHERLANDS
-
 1
1 -
 2
2 -
 3
3 -
 4
4 -
 5
5 -
 6
6 -
 7
7 -
8
-
9
-
10
-
11
-
12
-
13
-
14
-
15
-
16
-
17
-
18
-
19
-
20
-
21
-
22
-
23
-
24
-
25
-
26
-
27
-
28
-
29
-
30
-
31
-
32
-
33
-
34
-
35
-
36
-
37
-
38
-
39
-
40
-
41
-
42
-
43
-
44
-
45
-
46
-
47
-
48
-
49
-
50
-
51
-
52
-
53
-
54
-
55
-
56
-
57
-
58
-
59
-
60
-
61
-
62
-
63
-
64
-
65
-
66
-
67
-
68
-
69
-
70
-
71
-
72
-
73
-
74
-
75
-
76
-
77
-
78
-
79
-
80
-
81
-
82
-
83
-
84
-
85
-
86
-
87
-
88
-
89
-
90
-
91
-
92
-
93
-
94
-
95
-
96
 |
 |
Startup Manual
Please read this manual before operating this unit. After you finish
reading this manual, store it in a safe place for future reference.
Document Scanner