Canon A300 PowerShot A300 Camera User Guide
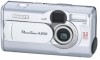
Canon A300 - PowerShot 3.2MP Digital Camera Manual
 |
UPC - 013803024197
View all Canon A300 manuals
Add to My Manuals
Save this manual to your list of manuals |
Canon A300 manual content summary:
- Canon A300 | PowerShot A300 Camera User Guide - Page 1
CDI-E078-010 Camera User Guide ENGLISH DIGITAL CAMERA © 2003 CANON INC. PRINTED IN CHINA Camera User Guide • Please read the "Read this First" section (p. 11). • Please refer to the Software Starter Guide for information on installing the software and downloading images. • Please read the " - Canon A300 | PowerShot A300 Camera User Guide - Page 2
(p. 18) Open the CF card slot / battery cover and insert a CF card and batteries. Open the lens cover and slide it in the direction of the arrow to turn the power on. (p. 26) The indicator next to the viewfinder starts blinking green. • When the date / time set up menu is displayed, refer to page 23 - Canon A300 | PowerShot A300 Camera User Guide - Page 3
. To erase Press the button while the image is displayed. Confirm that [Erase] is selected and press the SET button. When you have finished shooting photos ➀ Installing the software ➾ Software Starter Guide ➁ Connecting the camera to a computer ➾ This guide ➂ Downloading images to a computer - Canon A300 | PowerShot A300 Camera User Guide - Page 4
Cover (p. 83) DIGITAL Terminal* (p. 83) DC IN Terminal (p. 121) Lens Lens Cover (p. 26) * Computer: USB Interface Cable IFC-300PCU (supplied with camera) Direct Print Compatible your Bubble Jet Printer user guide. (For a list of printers that work with this camera, please refer to the System Map.) 4 - Canon A300 | PowerShot A300 Camera User Guide - Page 5
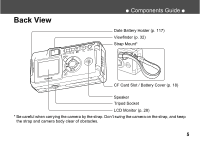
View ● Components Guide ● Date Battery Holder (p. 117) Viewfinder (p. 32) Strap Mount* CF Card Slot / Battery Cover (p. 18) Speaker Tripod Socket LCD Monitor (p. 28) * Be careful when carrying the camera by the strap. Don't swing the camera on the strap, and keep the strap and camera body clear of - Canon A300 | PowerShot A300 Camera User Guide - Page 6
Components Guide ● Operation Panel MENU Button (p. 36) DISP. (Display) lens cover or whenever you press the shutter button. Upper Indicator Green: Ready to shoot, or ready to communicate with your computer. Blinking Green: Camera is starting up, reading the CF card, erasing data on the CF card - Canon A300 | PowerShot A300 Camera User Guide - Page 7
About this Camera User Guide Symbols Used Icons on the right end of title bars show the operations mode. As in the example below, the shooting mode should be set - Canon A300 | PowerShot A300 Camera User Guide - Page 8
Panel 6 About this Camera User Guide 7 Read this First 11 Preparing the Camera 18 Installing the Battery and CF Card 18 Setting the Date / Time 23 Setting the Language 24 Basic Functions 26 Turning the Power ON / OFF 26 8 Using the LCD Monitor 28 Information Displayed on the LCD - Canon A300 | PowerShot A300 Camera User Guide - Page 9
Nine 67 Viewing Movies 68 Editing Movies 69 Rotating Images in the Display 72 Attaching Sound Memos to Image 73 Auto Play 75 Protecting Images 76 77 Formatting a CF Card 78 Printing 79 About Printing 79 Selecting from the Print Order Menu..........81 Connecting the Camera to a Printer - Canon A300 | PowerShot A300 Camera User Guide - Page 10
the USB Cable 101 Downloading directly from a CF card ....... 104 List of Menu Options and Messages 105 FUNC. Menu 105 Rec. Menu 106 Play Menu 107 Set up Menu 109 My Camera Menu 111 Resetting the Settings to Default 112 List of Messages 113 Appendices 117 Replacing the Date Battery 117 - Canon A300 | PowerShot A300 Camera User Guide - Page 11
is designed to perform optimally when used with genuine Canon brand digital camera accessories ("Canon Brand Accessories"). You may use non Canon Brand Accessories with this Digital camera. However, Canon makes no warranties concerning, and is not responsible for damages resulting from, use of - Canon A300 | PowerShot A300 Camera User Guide - Page 12
in the country of sale. If a problem arises while the camera is in use abroad, please convey it back to the country of sale before proceeding with a warranty claim to a Canon Customer Support Help Desk. For Canon Customer Support contacts, please see the Canon Limited Warranty supplied with your - Canon A300 | PowerShot A300 Camera User Guide - Page 13
so may result in fire or electrical shock. Immediately turn the camera's power off, remove the camera batteries or unplug the power cord from the power outlet. Confirm that smoke or fume emissions have ceased. Please consult your camera distributor or the closest Canon Customer Support Help Desk. 13 - Canon A300 | PowerShot A300 Camera User Guide - Page 14
do so may result in fire or electrical shock. Immediately turn the camera's power off, remove the camera batteries or unplug the power cord from the power outlet. Please consult your camera distributor or the closest Canon Customer Support Help Desk. • Do not allow the equipment to come into contact - Canon A300 | PowerShot A300 Camera User Guide - Page 15
power outlet after recharging and when the camera is not in use to avoid fires and other hazards. • The camera terminal of the battery charger cord and the compact power cord is designed for exclusive use with your camera. Do not use it with other products or batteries. There is a risk of fire and - Canon A300 | PowerShot A300 Camera User Guide - Page 16
sunlight and heat may cause the batteries to leak, overheat or explode, resulting pictures in rapid succession. Either action could result in burns. • Do not operate the flash with dirt, dust or other items stuck to its lens. The resulting heat build-up could damage the flash. • If your camera - Canon A300 | PowerShot A300 Camera User Guide - Page 17
from the bag. ● If Condensation Forms Inside the Camera Stop using the camera immediately if you detect condensation. Continued use may damage the equipment. Remove the CF card and battery or power cord (if connected) from the camera and wait until the moisture evaporates completely before resuming - Canon A300 | PowerShot A300 Camera User Guide - Page 18
Preparing the Camera Installing the Battery and CF Card Insert two (2) AA-size alkaline batteries (included with the camera) or two (2) AA-size NiMH batteries (sold separately) and insert the CF card. 1 Be sure that the camera power is off. 2 Slide the CF card slot / battery cover and open it. 3 - Canon A300 | PowerShot A300 Camera User Guide - Page 19
damaged as a result. • Turn the camera off • Open the CF card slot / battery cover • Shake the camera ● Preparing the Camera ● Be aware that use of CF cards whose contents have been edited on another camera or with another company's software may cause the camera to operate incorrectly. We recommend - Canon A300 | PowerShot A300 Camera User Guide - Page 20
may shorten at low temperatures when alkaline batteries are used. Also due to their specifications, alkaline batteries may expire faster than NiMH batteries. If you are using the camera in cold areas or for a long time, we recommend using Canon AA-size NiMH Battery Kit. While it is possible to use - Canon A300 | PowerShot A300 Camera User Guide - Page 21
this. Batteries with all or part of the seal (electrical insulation sheath) peeled off. The positive electrode (plus terminal) is flat. The negative terminal is correctly formed (protruding from the metal base), but the seal does not extend up over the edge of the metal base. ● Preparing the Camera - Canon A300 | PowerShot A300 Camera User Guide - Page 22
any of the following buttons: the omni selector, DISP., and FUNC. Change the batteries Batteries are fully depleted and the camera can no longer operate. Replace the batteries immediately. About CF Cards CF cards are high-precision electronic devices. Do not bend them, apply force to them, or - Canon A300 | PowerShot A300 Camera User Guide - Page 23
Setting the Date / Time The Date / Time menu will be displayed when camera power is turned on for the first time or at low date battery power. Perform operations from Step 5 (Replace the date battery when power from the current one is exhausted (p. 117).). 1 Turn the power on (p. 26). 2 Press the - Canon A300 | PowerShot A300 Camera User Guide - Page 24
● Preparing the Camera ● 5 Set the date and time. Press to select the item to be set. Press button to set the date and time. Setting the Language Sets the display language for LCD monitor menus and messages. 1 Press the MENU button. The Rec. or Play menu will display. 6 Press the SET button. - Canon A300 | PowerShot A300 Camera User Guide - Page 25
series) or the direct print function compatible Bubble Jet Printer is connected to the camera, or while replaying movies.) 4 Set the language. Press to select the language ) Use the soft case for storing the camera, batteries and CF card. • Soft case appearance may differ in some regions. 25 - Canon A300 | PowerShot A300 Camera User Guide - Page 26
will power up. The indicator next to the viewfinder starts blinking green. Close the lens cover. The power goes off. Replay Mode 1 Press the button until the image is displayed on the LCD monitor. The camera powers up in Replay mode. open close 26 Press the off. button again to turn the - Canon A300 | PowerShot A300 Camera User Guide - Page 27
saving function will not activate while the camera is in auto play mode and is connected to a computer (p. 75). • The camera's settings can be changed to turn To return from power-saving function Shooting Mode Slide the lever of lens cover down. Replay Mode / While Connecting to a Printer Press - Canon A300 | PowerShot A300 Camera User Guide - Page 28
. However, when the LCD monitor is turned on and the "Change the Batteries" message appears, the LCD monitor may not automatically turn on the next time the camera is started. • When the LCD monitor is set to On (no information display) or Off, if you wish to change the shooting settings, shooting - Canon A300 | PowerShot A300 Camera User Guide - Page 29
Replay Mode Press the button to turn the LCD monitor on. The display changes when the DISP. button is pressed. Single Image Replay Simple display Detailed display No display Index Replay (9 images) Simple display No display ● Basic Functions ● 29 - Canon A300 | PowerShot A300 Camera User Guide - Page 30
p. 63 p. 47 p. 47 p. 49 p. 51 p. 52 p. 58 Movie Recording Mode ● (red) Digital Zoom Setting* 1.3x 1.6x 2.0x 2.5x 3.2x 4.0x 5.1x Camera Shake Warning Low Battery p. 55 p. 34 p. 30 p. 22 * Displayed during digital zoom. The flash, continuous shoot, self-timer, macro, infinity, and light - Canon A300 | PowerShot A300 Camera User Guide - Page 31
file not supported by "Design rule for Camera File system" standards. RAW file format Unrecognizable file formats Please note that image information recorded by this camera may not display correctly on other cameras and image information recorded by other cameras may not display correctly on this - Canon A300 | PowerShot A300 Camera User Guide - Page 32
the optical viewfinder and shoot. About the AF Function This camera employs AiAF (artificial intelligence autofocus) technology which uses a broad between the viewfinder and lens. This is called the parallax phenomenon and is more noticeable the closer the subject is to the lens. In some cases, - Canon A300 | PowerShot A300 Camera User Guide - Page 33
shot. The upper indicator blinks green while the image is being recorded to the CF card. (p. 6) You cannot shoot an image while the flash is charging up. AF- If the AF-assist beam is turned off, it may become more difficult for the camera to focus. • Even if the AF-assist beam is turned off, if the - Canon A300 | PowerShot A300 Camera User Guide - Page 34
in the LCD monitor. Press the shutter button halfway again to stop displaying it and to continue shooting. You can erase the images while they are displayed (p. 77). Using the Digital Zoom When the LCD monitor is on, you can digitally zoom in on a subject. Images can be zoomed up to approximately - Canon A300 | PowerShot A300 Camera User Guide - Page 35
and Settings Use the menus as shown below to operate the camera's basic settings used for shooting and replaying. You can to change the settings will appear on the left of the LCD monitor. • The icons displayed indicate the current settings. 2 Press to select a menu item. 4 Press the FUNC. - Canon A300 | PowerShot A300 Camera User Guide - Page 36
them, click the SET button and carry out the settings from the next displayed menu. Once the settings are complete, press the SET button again and shooting mode. mode 2 Press to select the Rec. / Play, Set up or My Camera menu. 3 Press to select a menu item. 5 Press the MENU button. In - Canon A300 | PowerShot A300 Camera User Guide - Page 37
Menu Display FUNC. Menu Shooting Mode FUNC. Menu Rec. / Play / Set up / My Camera Menu Shooting Mode Change the Menu ● Basic Functions ● Set and Confirm End Replay Mode Rec. Menu Differs slightly depending on the shooting mode Set up Menu My Camera Menu Play Menu Menus can be switched - Canon A300 | PowerShot A300 Camera User Guide - Page 38
Resolution Available Settings -2 - ±0* - +2 AUTO / 50* / 100 / 200 / 400 (Still picture) * / / / (Movie) / */ Items set with the MENU button Menu Items Available Settings Rec. Menu (red) AiAF Self-timer AF-assist Beam Digital Zoom Review On* / Off 10sec* / 2sec On* / Off On* / Off Off - Canon A300 | PowerShot A300 Camera User Guide - Page 39
Power Down On* / Off p. 109 Date / Time Sets the date / time p. 23 Set up Menu (Yellow) Format Formats the CF card p. 78 Shutter Volume Off / 1 / 2* / 3 / 4 / 5 p. 109 Playback Vol. Off / 1 / 2* / 3 / 4 / 5 p. 109 Start-up Vol. Off / 1 / 2* / 3 / 4 / 5 p. 110 Operation Vol. Off - Canon A300 | PowerShot A300 Camera User Guide - Page 40
Shutter Sound Turns image protection On and Off Rotates the displayed the image Attaches a sound memo to images Erases all Camera Menu's ( ) and ( ), you can set up your favorite picture and sound. For details, refer to "Registering My Camera Settings (p. 43)", or to your Software Starter Guide. - Canon A300 | PowerShot A300 Camera User Guide - Page 41
● Basic Functions ● Customizing the Camera (My Camera Settings) My Camera allows you to customize the start-up image and start-up, shutter, operation and selftimer sounds. Each menu item has three choices. Example: Start-up - Canon A300 | PowerShot A300 Camera User Guide - Page 42
In mode • Differs slightly depending on the shooting mode. mode 2 Select a [ (My Camera)] menu with . 3 Select a menu item with , and the contents you wish to ] in step 3, you can select a consistent theme for each of the My Camera settings. If the Beep option in the Set up menu is set to [On - Canon A300 | PowerShot A300 Camera User Guide - Page 43
use the supplied software to upload your computer's images and sounds to the camera. 1 Press the button. 2 Press the MENU button. The menu will appear. ● Basic Functions ● 3 Select a [ (My Camera)] menu with . 4 Select a menu item with choose and with will be displayed. , and . 5 Press the - Canon A300 | PowerShot A300 Camera User Guide - Page 44
Sound: 0.3 second, Self-Timer Sound: 2 seconds, Shutter Sound: 0.3 second 44 Sounds recorded with the movie and sound memo functions (p. 73) cannot be added as My Camera settings. When you register new My Camera settings, the previously registered settings are erased. - Canon A300 | PowerShot A300 Camera User Guide - Page 45
to the below file formats. However, CF card images shot with this camera can be registered as My Camera settings regardless of the below formats. • you can customize your camera by creating and adding new My Camera settings. See the supplied Software Starter Guide for more information on creating and - Canon A300 | PowerShot A300 Camera User Guide - Page 46
Shooting Selecting the Shooting Mode The following modes are available with this camera. Auto Manual Stitch Assist The camera automatically makes most of the settings for you. You can manually adjust the exposure, white balance, and other settings before shooting. For shooting panorama - Canon A300 | PowerShot A300 Camera User Guide - Page 47
89 mm (4.7 x 3.5 in.) prints (Medium 2) 1024 x 768 pixels (Small) 640 x 480 pixels * Paper sizes vary according to region. Small • Print card size 86 x 54 mm (3.4 x 2.1 in.) prints • Send images via e-mail • Shoot more images Compression Superfine Purpose High Quality • Shoot higher quality - Canon A300 | PowerShot A300 Camera User Guide - Page 48
Select * or * with . *The current setting is displayed. 4 Press the FUNC. button. See "Functions Available in Each Shooting Mode" (p. 142). For information on necessary space per image (approximate), types of CF cards and the number of images per card see, "Specifications" (p. 132, 133). Example - Canon A300 | PowerShot A300 Camera User Guide - Page 49
Using the Flash Auto Red-Eye Reduction, Auto The flash fires automatically as required by the light level. The flash may fire automatically as required by the light level. The red-eye reduction indicator fires with each shot. Flash On The flash will fire. Flash Off SlowSynchro The flash will - Canon A300 | PowerShot A300 Camera User Guide - Page 50
avoid camera shake under these conditions. • Shooting in Mode Be careful to hold the camera still to avoid camera shake. • Shooting in or / Mode Fix the camera to 50 Recharging time may vary according to shooting conditions and battery charge levels. The flash fires twice. A preparatory pre-flash - Canon A300 | PowerShot A300 Camera User Guide - Page 51
Use this mode when the distance from the lens tip to the subject is 5 to 20 cm (2 to 7.9 in.). Use this mode to shoot landscapes. Also use this mode for compositions combining both near and distant objects. 1 Press the / ( on the omni selector) to display or . - 2 Shoot the image. If the flash - Canon A300 | PowerShot A300 Camera User Guide - Page 52
● Shooting ● Continuous Mode Self-Timer The camera shoots continuously at approximately 2.2 frames per second* (Large/ Fine, LCD monitor off) while the shutter button is held down. * The figures reflect Canon's testing standard. The actual figures will vary according to the shooting conditions and - Canon A300 | PowerShot A300 Camera User Guide - Page 53
you must stitch the images together on your computer. ● Shooting ● To create the panorama at your computer, use the PhotoStitch software that came with your camera. Framing a Subject The PhotoStitch program detects the overlapping portions of adjoining images and merges them. When shooting, try to - Canon A300 | PowerShot A300 Camera User Guide - Page 54
consistent. The final image will appear unnatural if the difference in brightness is too great. • Pan (swivel) the camera to take successive shots. • To shoot close-ups, slide the camera over the subject, keeping it parallel as you move. Shooting 1 Shoot the first image. 2 Shoot the next image - Canon A300 | PowerShot A300 Camera User Guide - Page 55
. After shooting, the green indicator blinks while recording to the CF card. You cannot shoot images at this time. See "Functions Available in ) on a computer. QuickTime (for Windows) is included on the Canon Digital Camera Solution Disk. On the Macintosh platform, this program is generally bundled - Canon A300 | PowerShot A300 Camera User Guide - Page 56
distance as the main subject is centered in the viewfinder or in the AF frame displayed on the LCD monitor. 2 Press and hold the shutter button halfway, and wait until the camera beeps twice. 3 Re-aim the camera direction to compose the shot as desired and press the shutter button all the way - Canon A300 | PowerShot A300 Camera User Guide - Page 57
AF Modes While the AF function is set to AiAF, you can change it to the center AF frame. The camera automatically selects On an AF frame from five AF frames to focus on according to the shooting conditions. 1 In AF mode. The center AF frame mode is used when the digital zoom is activated. 57 - Canon A300 | PowerShot A300 Camera User Guide - Page 58
Appropriate for standard shooting conditions, including backlit scenes. The camera divides images into several zones for light metering. It for the main subject. 1 Press ( on the omni selector) as necessary to display either , , or . 2 Shoot the image. CenterWeighted Averaging Averages the light - Canon A300 | PowerShot A300 Camera User Guide - Page 59
to correct the exposure so that the subject doesn't come out too dark. 1 Press the FUNC. button and select * with . *The current settings is displayed. 2 Press to adjust the compensation. • The settings can be adjusted in 1/3 steps in the range -2 to +2. • You can check the results of the - Canon A300 | PowerShot A300 Camera User Guide - Page 60
match the light source, the camera can reproduce colors more accurately. Auto Daylight Cloudy The camera sets the white balance automatically according Press the FUNC. button and select * with . *The current settings is displayed. 2 Press to select white balance. • See page 61 for the option. - Canon A300 | PowerShot A300 Camera User Guide - Page 61
the FUNC. button and select * with . *The current settings is displayed. 2 Select with . ● Shooting ● 3 Aim the camera at a piece of white paper or cloth, and press the SET button. • Aim the camera so that the white paper, cloth or gray card completely fills the frame at the center of the LCD - Canon A300 | PowerShot A300 Camera User Guide - Page 62
● Shooting ● To set and use a custom white balance setting, it is advisable to select the shooting mode and set the exposure compensation to zero ( ). The correct white balance may not be obtained when the exposure is incorrect (image is completely black or white). Since the white balance data - Canon A300 | PowerShot A300 Camera User Guide - Page 63
Photo Effect Mode. Effect Off Records normally with this setting. 1 Press the FUNC. button, and select * with . *The current settings is displayed. Vivid Emphasizes the contrast and color saturation to record in bold colors. Neutral Tones down the contrast and color saturation to record - Canon A300 | PowerShot A300 Camera User Guide - Page 64
when you wish to shoot in a dark area or use a fast shutter speed. 1 Press the FUNC. button, and select * with . *The current settings is displayed. Higher ISO speeds increase the image noise. To take clean images, use as low an ISO speed as possible. Although the AUTO setting selects the - Canon A300 | PowerShot A300 Camera User Guide - Page 65
unused) CF card. On If you insert a card that already contains some images, numbering resumes from the next available number. The camera remembers the last 100 to 998 (Folder numbers cannot contain 99 in the last two digits). Folder File Capacity Each folder usually contains up to 100 images. However - Canon A300 | PowerShot A300 Camera User Guide - Page 66
at a time on the LCD monitor (Single Image Replay). 1 Press the button. The last image shot is displayed. 2 Press to switch the displayed image. Hold down continuously. to display images Magnifying Images 1 Press the button during single replay. The image enlarges gradually by up to 10 - Canon A300 | PowerShot A300 Camera User Guide - Page 67
on the LCD monitor (Index View) so that you can search the image quickly. 1 Press the button. Nine images appear at a time. Changing the Displayed Images 1 Press the button while the index is being replayed. 2 Press to change the image. 2 Press to select the image. 3 Press the button for - Canon A300 | PowerShot A300 Camera User Guide - Page 68
press the SET button. The movie images and sound will play. • You can adjust the volume with . • When a movie has finished replaying, it will display the last frame. Pausing and Resuming Play • Press the SET button to pause the movie. Press it again to resume. The movie cannot be replayed - Canon A300 | PowerShot A300 Camera User Guide - Page 69
Fast Forwarding/Rewinding Select one of the following operations with , and press the SET button. : Return to Single Image View : First Frame : Previous Frames (Rewinds if the SET button is held down) : Next Frame (Fast forwards if the SET button is held down) : Last Frames ● Replaying ● Editing - Canon A300 | PowerShot A300 Camera User Guide - Page 70
SET button while it is playing. 6 Select (Save) with , and press the SET button. • When is selected, the edited movie is not saved and the camera reverts to replay. Editing position 70 - Canon A300 | PowerShot A300 Camera User Guide - Page 71
is not deleted. • When there is not enough space left on the CF card, only the overwrite function is available. If this happens, appears on the counter It may take approx. 3 minutes to save an edited movie. In case the battery runs out during that period, the saving process may not be able to be - Canon A300 | PowerShot A300 Camera User Guide - Page 72
● Replaying ● Rotating Images in the Display You can rotate an image by 90° or 270° clockwise images cannot be rotated. If an image has been rotated in the camera before being loaded onto a computer, the particular software in use will determine whether or not the rotation settings are retained. - Canon A300 | PowerShot A300 Camera User Guide - Page 73
, and press the SET button. 3 Select with , and press the SET button. • The recording starts and the elapsed time is displayed. Speak towards the microphone of the camera. • To stop recording, press the SET button. To restart recording press the SET button again. • You can add as many - Canon A300 | PowerShot A300 Camera User Guide - Page 74
an incompatible sound file attached. If you attempt to record or play such images the "Incompatible WAVE format" message will display. Incompatible sound files can be deleted with this camera. Sound memos for protected images cannot be erased (p. 76). You can also adjust the volume of the sound memo - Canon A300 | PowerShot A300 Camera User Guide - Page 75
feature to automatically replay all of the images in the CF card (Auto Play). The LCD monitor displays each image for approximately 3 seconds. 1 In the [Play Stopping Auto Play To stop Auto Play, press the MENU button. The display interval may vary for some images. Movie images play for the length of - Canon A300 | PowerShot A300 Camera User Guide - Page 76
the SET button. The icon appears on the protected image. 3 Press the MENU button. Please note that even protected images are erased when a CF card is reformatted. Protected Icon • To release the protection, press the SET button again. • You can make the selection of images easier by toggling - Canon A300 | PowerShot A300 Camera User Guide - Page 77
Erasing Remember that erased images cannot be recovered. Be careful to avoid accidental erasures. This function will not erase protected images (p. 76). Erasing Single Images Erasing All Images 1 Press the to select the image you want to erase and press the button. 1 In the [Play] Menu, - Canon A300 | PowerShot A300 Camera User Guide - Page 78
Cancel] and press the SET button to cancel the formatting. If the camera is not operating correctly, the CF card may be corrupted. Formatting the card may solve the problem. If you are using a CF card from another manufacturer and the card is not functioning correctly, you may be able to correct the - Canon A300 | PowerShot A300 Camera User Guide - Page 79
printer (CP series)*1 or a Bubble Jet printer (sold separately) that supports the direct print function, you can send the image from the CF card directly to the printer using the camera buttons. Or, you can specify the images on your CF card you want to print and how many copies you want (DPOF - Canon A300 | PowerShot A300 Camera User Guide - Page 80
Select the image you want to send through e-mail* (p. 98) * The supplied DPOF-compliant software is needed for actually transferring the images. BJ Printer with the direct print function Optional Canon direct print function compliant printer (CP series) Printed images Photo lab Print Settings for - Canon A300 | PowerShot A300 Camera User Guide - Page 81
● Selecting from the Print Order Menu Use the Print Order Menu as shown below to select all print settings. Make sure to keep the camera in replay mode. Direct Print Function - Replay Style Image (p. 87) Paper (p. 88) Borders (p. 87) Date (p. 87) Number of copies (p. 87) Trimming (p. 90) DPOF - Canon A300 | PowerShot A300 Camera User Guide - Page 82
on the type of printer you have, it may or may not use rechargeable batteries. Refer to your printer's user guide. Refer to the System Map included with this camera kit for printer information. Please see your printer's manual for instructions on loading paper and installing an ink cassette. 82 - Canon A300 | PowerShot A300 Camera User Guide - Page 83
cable, make sure the mark of the cable faces the front of the camera. ● Printing ● 4 Press the printer's ON/OFF button to turn on the power. With the Card Photo Printer CP-10, the power turns on when the power cord is connected to the printer as shown in step 2. 5 Press the button - Canon A300 | PowerShot A300 Camera User Guide - Page 84
to the Camera Please read the user guide supplied with your BJ printer to see if it is compatible with the direct print function, and for instructions on connection cables and general operations. 1 Turn off the camera. 2 Turn the BJ printer's power on after you have connected the power cord to the - Canon A300 | PowerShot A300 Camera User Guide - Page 85
camera and the printer 1. Disconnect the cable from the printer 2. Turn off the camera 3. Disconnect the cable form the camera When disconnecting the cable from the camera's Digital slightly for BJ printers. An image can be printed when displayed in single replay or selected in index replay. 1 - Canon A300 | PowerShot A300 Camera User Guide - Page 86
printer will stop after the current print is complete and the camera will display its replay screen at that point. • BJ Printers The error message. - On BJ printers equipped with an operation panel, an error number displays on the panel. Please refer to the Bubble Jet Printer Quick Start Guide - Canon A300 | PowerShot A300 Camera User Guide - Page 87
You can specify print settings while a printer is connected. Setting the Number of Copies 1 While displaying the image, press the SET button and press to select [copies]. Setting the Print Style You You can set from 1 to 99 prints. * This setting is only available for Card-Size paper. . 87 - Canon A300 | PowerShot A300 Camera User Guide - Page 88
#1], [Card #2], [Card #3], [LTR] or [A4] Refer to the BJ printer's manual for papers can be used Borderless Prints right to the edges of the paper Bordered Prints with a border Prints the image's creation date 1 While displaying the image, press the SET button. Press to select [Style], then - Canon A300 | PowerShot A300 Camera User Guide - Page 89
Print Function Compliant Printer (CP Series)) Select [Standard] or [Multiple] Paper (Direct Print Function Compatible BJ Printer) Select [Card #1], [Card #2], [Card #3], [LTR] or [A4] Borders Select [Borderless] or [Bordered]. Date Select [On] or [Off]. ● Printing ● 4 Press the MENU button - Canon A300 | PowerShot A300 Camera User Guide - Page 90
Printing Area (Trimming) You can print a portion of the image. Before Trimming Please set the Print Style (image, paper, borders, date, etc.) first. (p. 87) 1 While displaying the image, press the SET button. Press to select [Trimming] and press the SET button. 90 - Canon A300 | PowerShot A300 Camera User Guide - Page 91
trimming frame can be changed to a minimum selection of approximately half the displayed image or a maximum selection that is virtually the same size as the . • When you close the Print mode. (i.e. turn the camera off, change the camera mode, or disconnect the Direct Interface cable) • When you - Canon A300 | PowerShot A300 Camera User Guide - Page 92
Settings (DPOF Print Settings) You can select images on a CF card for printing and specify the number of print copies in advance using the camera. This is extremely convenient for sending the images to a photo developing service or for printing on a direct print function compatible printer (CP - Canon A300 | PowerShot A300 Camera User Guide - Page 93
marks set by your camera. The output of some digital printers or photo lab services may not reflect the specified print settings. Movies cannot be printed. Images are printed in order from oldest to newest by the shooting date. A maximum of 998 images can be set per CF card. The number of copies - Canon A300 | PowerShot A300 Camera User Guide - Page 94
Print selected images both in standard and index format. Date Include the date on the print. File No. Include the file number on the print. 1 Display the [Print Order] menu. See "Selecting from the Print Order Menu" (p. 81). 2 Press to select [Set up] and press the SET button. 3 Press to - Canon A300 | PowerShot A300 Camera User Guide - Page 95
the Print Settings The Reset feature clears all print selections, and resets Print Type to [Standard], Date to [On], and File No. to [Off]. 1 Display the [Print Order] menu. See "Selecting from the Print Order Menu" (p. 81). 2 Press to select [Reset] and press the SET button. 3 Press to - Canon A300 | PowerShot A300 Camera User Guide - Page 96
to print with an optional direct print function compliant printer (CP series), or with an optional direct print function compliant BJ printer. 1 Display the [Print Order] menu. See "Selecting from the Print Order Menu" (p. 81). 2 Press to select [Print] and press the SET button. 3 Set - Canon A300 | PowerShot A300 Camera User Guide - Page 97
a BJ printer, refer to its manual) Cancel Printing (p. 86) Restarting little free space on the CF card when the printing was cancelled. If battery charge runs out, change to an AC Adapter Kit ACK800, or to fully charged AA-size NiMH batteries before turning the camera on. Printing Errors - Canon A300 | PowerShot A300 Camera User Guide - Page 98
e-mails. (Please use the supplied software for actually transferring images.) These settings are compatible with the Digital Print Order Format (DPOF) standards. The mark will display on images that have had transfer marks set by another DPOF-compliant camera. These settings will be overwritten by - Canon A300 | PowerShot A300 Camera User Guide - Page 99
from oldest to newest by the shooting date. A maximum of 998 images can be marked per CF card. ➤ For setting all images on the CF card • Press the button to switch to index replay (3-images display). • After pressing the SET button, press to select [Mark all]. Press the SET button again to - Canon A300 | PowerShot A300 Camera User Guide - Page 100
Computer Download images taken with the camera to a computer using one of the following ways: • Connect the camera to a computer with the USB cable You can then download images directly from the camera to a computer. • Directly from a CF card Using a laptop or a card reader, you can download images - Canon A300 | PowerShot A300 Camera User Guide - Page 101
to the Troubleshooting section of the Software Starter Guide. 1 Install the driver and the software applications bundled on the Canon Digital Camera Solution Disk. Please see the Software Starter Guide for information on system requirements and installation instructions. 2 Connect the supplied USB - Canon A300 | PowerShot A300 Camera User Guide - Page 102
button. The LCD monitor displays in replay mode. When the connection to the computer is complete, the LCD monitor turns off and the green indicator comes on. USB cable For information about what to do after making the connection, please refer the Software Starter Guide. 1. Open the terminal - Canon A300 | PowerShot A300 Camera User Guide - Page 103
, please refer to the supplied For Windows® XP and Mac OS X Users leaflet. 1 Connect the supplied USB interface cable to the computer's USB port and the camera's DIGITAL terminal (Refer to step 2 of page 101). 2 Follow the onscreen instructions to download the images. It is recommended to power the - Canon A300 | PowerShot A300 Camera User Guide - Page 104
into the computer's PC card reader. 2 Double-click the icon of the drive with the CF card. 3 Copy images from the card into a folder of your choice on the hard disk. The images are stored in the [xxx CANON] folders located in the [DCIM] folder (where xxx is a three-digit number from 100 to 998 - Canon A300 | PowerShot A300 Camera User Guide - Page 105
List of Menu Options and Messages FUNC. Menu Item / Menu Screen Exposure Compensation Setting Content Sets the exposure compensation (p. 59). • -2 to 0* to +2 Item / Menu Screen Photo Effect * Default settings Setting Content Switches between photo effects (p. 63). • (Off)* / (Vivid) / (Neutral - Canon A300 | PowerShot A300 Camera User Guide - Page 106
Timer Setting Content Sets the AiAF to on (the camera automatically selects the AF frame when taking a picture) or off (AF frame is set to the middle Digital Zoom Review * Default settings Setting Content Turns the digital zoom on or off (p. 34). • On* • Off Sets the duration images display on - Canon A300 | PowerShot A300 Camera User Guide - Page 107
/ Menu Screen Sound Memo * Default settings Setting Content Adds sound memos to the image (p. 73). Rotate Rotates images 90 or 270 degrees clockwise in the display (p. 72). Erase all Erases all images from a CF card (excluding protected images) (p. 77). 107 - Canon A300 | PowerShot A300 Camera User Guide - Page 108
the other (p. 75). Item / Menu Screen Transfer Order * Default settings Setting Content Sets the images that will be transferred with your e-mail software (p. 98). Print Order Sets which images and how many copies will be printed on a direct print function compatible printer (CP series), direct - Canon A300 | PowerShot A300 Camera User Guide - Page 109
or not the beep sounds when the shutter button is pressed (p. 33). • On* • Off • Still beeps to warn of an error even when set to Off. Sets whether or not the camera automatically powers down after a specified period of time elapses without something being pressed (p. 27). • On* • Off Sets the date - Canon A300 | PowerShot A300 Camera User Guide - Page 110
● List of Menu Options and Messages ● Item / Menu Screen Start-up Vol. Setting Content Adjusts the sound volume when the camera powers up (p. 39). • Off / 1 / 2* / 3 / 4 / 5 Item / Menu Screen File No. Reset * Default settings Setting Content Sets how file numbers are assigned to images (p. 39). - Canon A300 | PowerShot A300 Camera User Guide - Page 111
you that the photo will be taken in 2 seconds (p. 41). • (Off) / * / / Start-up Sound Sets the start-up sound when you turn on the camera (p. 41). • (Off) / * / / Shutter Sound Sets the shutter sound when you depress the shutter button. There is no shutter sound in Movie mode (p. 41). • (Off - Canon A300 | PowerShot A300 Camera User Guide - Page 112
to default except for [Date / Time] and [Language]. 1 Turn on the camera. Can be performed from shooting, replay or any other mode. 2 Press the MENU reset to default settings. (p. 62) Settings cannot be reset when the camera is connected to a computer, to an optional direct print function compatible - Canon A300 | PowerShot A300 Camera User Guide - Page 113
record! : You attempted to shoot with no CF card installed. Memory card error : There is something wrong with the CF card. Memory card full : The CF card is too full to store images or accept new print settings. Naming error! : The camera cannot generate a file name for the image you have - Canon A300 | PowerShot A300 Camera User Guide - Page 114
malfunctioned. Turn off the power and turn on again, then re-shoot or replay. If the same message recurs frequently, the camera may be damaged. Note down the error number [xx] and take the camera to a Customer Support Help Desk. If this message appears immediately after you have taken a shot, the - Canon A300 | PowerShot A300 Camera User Guide - Page 115
to print with an incompatible ink cartridge type. Ink Cassette Error : There is a problem with the ink cassette. Paper and ink do not match displayed and the time printing started. Recharge the printer battery : The printer's battery is out of power. Communication Error : A communication error - Canon A300 | PowerShot A300 Camera User Guide - Page 116
Quick Start Guide. (Some BJ printers may not display a message or error code.) Printer in use Printer warming up No print head Printer cover open Media type error Paper lever error Low ink level Waste tank full Printer error : The printer is printing the data from the memory card inserted in - Canon A300 | PowerShot A300 Camera User Guide - Page 117
Appendices Replacing the Date Battery If the LCD monitor displays the Set Date / Time menu when you turn on the camera, this means that the Date battery has run down and the clock has stopped running. Please purchase a replacement battery (battery type CR2016) and install it as follows. (The date - Canon A300 | PowerShot A300 Camera User Guide - Page 118
LCD monitor (p. 23). The LCD monitor also displays the Set Date / Time menu the very first time you turn on the camera. This is normal, and you don't need to replace the date battery. If you should dispose of your camera, first remove the date battery for recycling according to the recycling system - Canon A300 | PowerShot A300 Camera User Guide - Page 119
end of their lifespan. Switch to different, unused batteries. If you are purchasing new batteries, look for Canon's AA-size NiMH batteries. Leaving batteries in the camera or charger may damage it causing battery leakage. Remove batteries from the camera or charger and store in a dry cool location - Canon A300 | PowerShot A300 Camera User Guide - Page 120
takes approximately 110 minutes (for two) and 220 minutes (for four) for the charger to fully recharge the batteries (as determined by testing at Canon facilities). Please do not charge batteries in areas where the temperature is outside the range of 0 to 35 °C (32 to 104 °F). Charging time varies - Canon A300 | PowerShot A300 Camera User Guide - Page 121
a power outlet ● Appendices ● 2 Open the Terminal cover, and connect the adapter's DC plug into the camera's DC IN terminal. • Please unplug the adapter from the power outlet when you have finished using the camera. Please do not attempt to use any AC adapter other than AC Adapter Kit ACK800 with - Canon A300 | PowerShot A300 Camera User Guide - Page 122
with a soft cloth. • Never use synthetic cleaners on the camera body or lens. If dirt remains, contact the closest Canon Customer Support Help Desk as listed on the separate Canon Customer Support leaflet. Use a lens blower brush to remove dust and dirt. If necessary gently wipe the viewfinder - Canon A300 | PowerShot A300 Camera User Guide - Page 123
Troubleshooting Problem Cause The camera doesn't The camera is turned off. function. The CF card slot / battery cover is open. Batteries are loaded in the wrong direction. Batteries are depleted. Batteries are not the right type. Batteries are not making good electrical contact with the - Canon A300 | PowerShot A300 Camera User Guide - Page 124
a CF card formatted with this camera. (p. 55) You can use the included CF card. When shooting a movie with , it is recommended to use CF card FC - 256 MH (optional). The batteries are Batteries are not the right type. consumed quickly. • Use only unused AA-size alkaline batteries or Canon AA-size - Canon A300 | PowerShot A300 Camera User Guide - Page 125
● Appendices ● Problem The batteries are consumed quickly. Batteries do not charge with an optional battery charger Cause Solution The batteries have not been used for over a year. • If batteries are rechargeable: Performance should return to normal after several charging cycles. If using - Canon A300 | PowerShot A300 Camera User Guide - Page 126
Problem Shots are blurry or unfocused. The subject comes out underexposed (too dark). Cause Solution The camera was moving when you took the shot. • Hold the camera at least 20 cm (7.9 in.) which the camera can focus. between the camera lens and subject. • Use the macro mode to shoot close-ups between - Canon A300 | PowerShot A300 Camera User Guide - Page 127
Problem Cause Solution The subject comes The subject is too close to the flash. out overexposed (too bright). • When flash is used, the distance between lens the air. the image. • This is a phenomenon that occurs with digital cameras and does not constitute a malfunction. A red bar of light The - Canon A300 | PowerShot A300 Camera User Guide - Page 128
Camera Effective Pixels Image Sensor Lens Digital Zoom Optical Viewfinder LCD Monitor Autofocus Focusing Range Shutter Shutter Speed Light Metering Method Exposure Control Exposure Compensation PowerShot A300 Approx. 3.2 million 1 / 2.7 in. CCD 1 - 1 / 6 sec. in manual mode with the flash off or in - Canon A300 | PowerShot A300 Camera User Guide - Page 129
to AUTO) Auto / manual / Stitch assist / movie Approx. 2.2 images / sec. (Large / Fine mode, LCD monitor off) Shoots after approx. 2 sec. or approx. 10 sec. Available (USB connection only. Exclusive software program "RemoteCapture" is included in the camera kit.) CompactFlash card (Type I) Design - Canon A300 | PowerShot A300 Camera User Guide - Page 130
Movies Replay Modes Display languages My Camera Settings (customizing) sound memos (up to 60 sec.) / Image output to Card Photo Printer CP-100 / CP-10 and Bubble Jet Printer camera. 2. Using downloaded data from your computer using the supplied software. Universal Serial Bus (mini-B, PTP [Picture - Canon A300 | PowerShot A300 Camera User Guide - Page 131
10 - 90% Dimensions (w x h x d) 110 x 58 x 36.6 mm (4.3 x 2.3 x 1.4 in.) (excluding protrusions) Weight Approx. 175 g (6.2 oz.) (excluding batteries and CF Card) *1 This digital camera supports Exif 2.2 (also called "Exif Print"). Exif Print is a standard for enhancing the communication between - Canon A300 | PowerShot A300 Camera User Guide - Page 132
30 sec. ( )* or 3 min. ( , ).The times shown are the maximum continuous recording times. * When used with the FC-256MH CF card (sold separately). (Large), (Medium1), (Medium2), (Small), , and indicate the recording resolution. (Superfine), (Fine) and (Normal) indicate the compression setting. The - Canon A300 | PowerShot A300 Camera User Guide - Page 133
LCD Monitor OFF Replay Time AA Alkaline Batteries (included with the camera) AA NiMH Battery NB-1AH Approx. 75 shots Approx. 200 shots Approx. 210 shots Approx. 450 shots Approx. 90 min. Approx. 120 min. • Data above depend on the test condition of Canon, and very upon shooting condition and - Canon A300 | PowerShot A300 Camera User Guide - Page 134
(2 in.) Weight Approx. 27 g (0.95 oz.) Battery Charger CB-3AH Supplied with the optional Battery and Charger Kit CBK100. Rated Input 100 - 240 × 4.1 × 1.3 in.) Weight (body) Approx. 180 g (6.4 oz.) CompactFlash™ Card Card Slot Type Dimensions Weight Type 1 36.4 × 42.8 × 3.3 mm (1.4 × 1.7 - Canon A300 | PowerShot A300 Camera User Guide - Page 135
23 DC IN Terminal 4, 121 Default 112 Default Settings 38 DIGITAL Terminal 4, 83 Digital Zoom 34 Downloading Images to a Computer Connecting the camera to a computer via the USB Cable 101 Downloading directly from a CF card .. 104 Using a PC card reader 104 DPOF 92 -- E -- Erasing Erasing All - Canon A300 | PowerShot A300 Camera User Guide - Page 136
67 Indicator 6 Infinity 51 ISO Speed 64 -- L -- LCD Monitor Information Displayed 30 Using 28 Light Metering Modes 58 136 -- M -- Macro 51 Magnifying 73 Movie Editing 69 Movie Mode 55 Sound Memos 73 Viewing 68 My Camera Settings 41 -- P -- Photo Effect 63 Play Menu 107 Power-saving - Canon A300 | PowerShot A300 Camera User Guide - Page 137
76 -- R -- Rec. Menu 106 Red-Eye Reduction 49, 50 Red-Eye Reduction Lamp 4, 49 Replacing the Date Battery 117 Replaying Auto Play 75 Displaying Images Individually 66 Rotating Images in the Display 72 Viewing Images in Sets of Nine 67 Resolution 47 ● Index ● -- S -- Self-Timer 52 Set up - Canon A300 | PowerShot A300 Camera User Guide - Page 138
● Index ● -- T -- Terminal Cover 4, 102 Time 23 Turning the Power ON / OFF 26 -- U -- Using the Optional Battery Kits Using Rechargeable Batteries 118 -- V -- Viewfinder 32 -- W -- White Balance 60 138 - Canon A300 | PowerShot A300 Camera User Guide - Page 139
due to a mistaken operation or malfunction of the camera, the software, the CompactFlash™ cards (CF cards), personal computers, peripheral devices, or use of non-Canon CF cards. Trademark Acknowledgments • Canon, PowerShot and BJ are trademarks of Canon, Inc. • CompactFlash is trademark of SanDisk - Canon A300 | PowerShot A300 Camera User Guide - Page 140
with the instructions, may off and on, the user is encouraged to try with the ferrite core provided with the digital camera must be used with this equipment in manual. If such changes or modifications should be made, you could be required to stop operation of the equipment. Canon U.S.A. Inc. One Canon - Canon A300 | PowerShot A300 Camera User Guide - Page 141
141 - Canon A300 | PowerShot A300 Camera User Guide - Page 142
in Each Shooting Mode The following chart shows the functions and settings available in each shooting mode. The camera stores settings separately for each mode. Function Reference Pages Resolution Large * / Middle 1 Middle 2 / Small Movie / * / SuperFine - p. 47 - - - - Compression - Canon A300 | PowerShot A300 Camera User Guide - Page 143
-Weighted Averaging Spot Metering White Balance Photo Effect ISO Speed AF Frame Digital Zoom AF-Assist Beam * * - 1) - * : Default settings : Available : Available only for the first image (1) The camera will automatically select the setting. : Setting is retained even after power off
-
 1
1 -
 2
2 -
 3
3 -
 4
4 -
 5
5 -
 6
6 -
 7
7 -
8
-
9
-
10
-
11
-
12
-
13
-
14
-
15
-
16
-
17
-
18
-
19
-
20
-
21
-
22
-
23
-
24
-
25
-
26
-
27
-
28
-
29
-
30
-
31
-
32
-
33
-
34
-
35
-
36
-
37
-
38
-
39
-
40
-
41
-
42
-
43
-
44
-
45
-
46
-
47
-
48
-
49
-
50
-
51
-
52
-
53
-
54
-
55
-
56
-
57
-
58
-
59
-
60
-
61
-
62
-
63
-
64
-
65
-
66
-
67
-
68
-
69
-
70
-
71
-
72
-
73
-
74
-
75
-
76
-
77
-
78
-
79
-
80
-
81
-
82
-
83
-
84
-
85
-
86
-
87
-
88
-
89
-
90
-
91
-
92
-
93
-
94
-
95
-
96
-
97
-
98
-
99
-
100
-
101
-
102
-
103
-
104
-
105
-
106
-
107
-
108
-
109
-
110
-
111
-
112
-
113
-
114
-
115
-
116
-
117
-
118
-
119
-
120
-
121
-
122
-
123
-
124
-
125
-
126
-
127
-
128
-
129
-
130
-
131
-
132
-
133
-
134
-
135
-
136
-
137
-
138
-
139
-
140
-
141
-
142
-
143
 |
 |
ENGLISH
D
I
GITAL CAMERA
Camera User Guide
Camera User Guide
•
Please read the "Read this First" section (p. 11).
•
Please refer to the
Software Starter Guide
for
information on installing the software and
downloading images.
•
Please read the "Quick Start" section on the
following page for a simple explanation of
shooting, replaying and erasing.
•
Please also read the printer user guide included
with your Canon printer.
CDI-E078-010
© 2003 CANON INC.
PRINTED IN CHINA