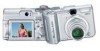
Canon A610 PowerShot A620 / A610 Camera User Guide Basic
Canon A610 - PowerShot Digital Camera Manual
 |
UPC - 013803054033
View all Canon A610 manuals
Add to My Manuals
Save this manual to your list of manuals |
Canon A610 manual content summary:
- Canon A610 | PowerShot A620 / A610 Camera User Guide Basic - Page 1
ENGLISH CDI-E189-010 © 2005 CANON INC. PRINTED IN CHINA Preparation Shooting Playback/Erasing Menus and Settings Printing Downloading Images to a Computer Basic Camera User Guide Please Read This First This guide explains how to prepare the camera and use its basic features. - Canon A610 | PowerShot A620 / A610 Camera User Guide Basic - Page 2
Advanced Camera User Guide Printing Direct Print User Guide • Installing the software • Downloading images to a computer • Using the software Basic Camera User Guide (This Guide) Software Starter Guide ZoomBrowser EX/ ImageBrowser Software User Guide • PDF manuals available on the Canon - Canon A610 | PowerShot A620 / A610 Camera User Guide Basic - Page 3
3. Close the memory card slot cover. Ensure that the memory card is correctly oriented before inserting it in the camera. It may damage the camera if inserted incorrectly. Î See the Advanced Guide: Handling the Memory Card (p. 107) Î See the Advanced Guide: Formatting Memory Cards (p. 21) 1 - Canon A610 | PowerShot A620 / A610 Camera User Guide Basic - Page 4
To Remove the Memory Card Use a finger to push the memory card in until you hear a click, then release it. You can use SD* memory cards and MultiMediaCards with this camera. These cards are collectively called memory cards in this guide. * SD stands for Secure Digital, a copyright protection system - Canon A610 | PowerShot A620 / A610 Camera User Guide Basic - Page 5
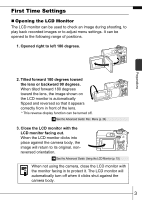
that it appears correctly from in front of the lens. * This reverse display function can be turned off. Î See the Advanced Guide: Rec. Menu (p. 24) 3. Close the LCD monitor with the LCD monitor facing out. When the LCD monitor clicks into place against the camera body, the image will return to its - Canon A610 | PowerShot A620 / A610 Camera User Guide Basic - Page 6
in it for approximately four hours or use AC Adapter Kit ACK600 (sold separately) to charge the lithium battery. It will charge even if the camera is turned off. • The date/time settings may be lost after approximately three weeks if you remove the main batteries. Reset the date/time settings - Canon A610 | PowerShot A620 / A610 Camera User Guide Basic - Page 7
Î See the Advanced Guide: Power Saving Function (p. 20) Î See the Advanced Guide: Set up Menu (p. 25) Î See the Advanced Guide: My Camera Menu (p. 27 memory card. Indicators Î See Basic Shooting Functions (p. 6). Î See the Advanced Guide: Indicators (p. 20) Î See the Advanced available. Guide - Canon A610 | PowerShot A620 / A610 Camera User Guide Basic - Page 8
displayed in the LCD monitor. To stop displaying the image, press the shutter button halfway. Î See the Advanced Guide: Review (p. 24) Basic Shooting Functions „ AUTO The camera automatically selects settings. Allows you to shoot using settings automatically selected by the camera which suit - Canon A610 | PowerShot A620 / A610 Camera User Guide Basic - Page 9
people against twilight or night backgrounds by reducing the effects of camera shake even without using a tripod. Kids&Pets Allows you Allows you to change the image colors easily with 9 modes. Î See the Advanced Guide (p. 59) Stitch Assist Allows you to shoot overlapping images that can later be - Canon A610 | PowerShot A620 / A610 Camera User Guide Basic - Page 10
you to change color effects. Î See the Advanced Guide (p. 37) You can freely select camera settings such as the exposure and Creative aperture 1 m (3.3 ft.) or more from the end of the lens. • To shoot underwater, install the camera in Waterproof Case WP-DC90 (sold separately). • We recommend you - Canon A610 | PowerShot A620 / A610 Camera User Guide Basic - Page 11
if the camera shake warning icon appears. When [Slow Synchro] is set to [On] in the Rec. menu, you can shoot at a slow shutter speed with the flash activated. This helps brighten up dark backgrounds when shooting night scenes or with indoor lighting conditions. Î See the Advanced Guide: Rec. Menu - Canon A610 | PowerShot A620 / A610 Camera User Guide Basic - Page 12
items. Image Area at Minimum Shooting Distance from End of Lens to Subject Macro • Maximum wide angle setting: 22 x shooting distance: 25 cm (9.8 in.) • Use the LCD monitor to compose close-ups in macro mode since images Advanced Mode (p. 136) Guide: Functions Available in Each Shooting 10 - Canon A610 | PowerShot A620 / A610 Camera User Guide Basic - Page 13
in the LCD monitor. 2. Use the or button to display the image you wish to view. Use the button to move to the previous image and the button to move the next image. Holding the button down advances the images more rapidly, but shows them less clearly. Î See the Advanced available. Guide for - Canon A610 | PowerShot A620 / A610 Camera User Guide Basic - Page 14
settings as the date/time and sounds are set using the FUNC., Rec., Play, Set up or My Camera menu. FUNC. Menu This menu sets many of the common shooting functions. a b e c d aSet you to adjust the settings easily. ePress the FUNC./SET button. Î See the Advanced Guide: Menu List (p. 24) 12 - Canon A610 | PowerShot A620 / A610 Camera User Guide Basic - Page 15
menus. (Rec.) Menu (Play) Menu (Set up) Menu (My Camera) Menu a e b You can switch between menus with the or button c d when this part is selected. • This example shows the Rec. menu. • In . e Press the MENU button. Î See the Advanced Guide: Menu List (p. 24) Menus and Settings 13 - Canon A610 | PowerShot A620 / A610 Camera User Guide Basic - Page 16
Photo Printers*2 PIXMA Series/ SELPHY DS Series Bubble Jet Printers *1 Since this camera uses a standard protocol (PictBridge), you can use it with other PictBridge-compliant printers in addition to Canon-brand printers. *2 You can also use card photo printers such as the CP-10/CP-100/CP-200/ CP - Canon A610 | PowerShot A620 / A610 Camera User Guide Basic - Page 17
and confirm that , or is displayed in the upper left of the LCD monitor (a). • The button will light blue. • The displayed icon will . Î See the (p. 83) Advanced Guide: Setting the DPOF Print Settings Î See the Direct Print User Guide Î See the user guide for Your Printer Printing 15 - Canon A610 | PowerShot A620 / A610 Camera User Guide Basic - Page 18
Starter Guide Connecting the Camera to a Computer • Basic Guide (p. 19) Downloading Images to • Basic Guide (p. 20, 21) a Computer • Software Starter Guide • Software Starter Guide* * Please also see the Windows XP and Mac OS X Users leaflet. „ Using a Memory Card Reader A memory card reader - Canon A610 | PowerShot A620 / A610 Camera User Guide Basic - Page 19
- ZoomBrowser EX 250 MB or more (Including the PhotoRecord printing program) - PhotoStitch 40 MB or more • Canon Camera TWAIN Driver 25 MB or more • Canon Camera WIA Driver 25 MB or more • ArcSoft PhotoStudio 50 MB or more 1,024 x 768 pixels/High Color (16 bit) or better „ Macintosh - Canon A610 | PowerShot A620 / A610 Camera User Guide Basic - Page 20
to Download Images Ensure that you install the software first before connecting the camera to the computer. „ Items to Prepare • Camera and computer • Canon Digital Camera Solution Disk supplied with the camera • Interface cable supplied with the camera 1. Install the software. 1. Place the Canon - Canon A610 | PowerShot A620 / A610 Camera User Guide Basic - Page 21
when disconnecting the interface cable from the camera's DIGITAL terminal. If the Digital Signature Not Found window appears, click [Yes]. The USB driver will automatically finish installing onto the computer when you attach the camera and open a connection. Downloading Images to a Computer 19 - Canon A610 | PowerShot A620 / A610 Camera User Guide Basic - Page 22
], followed by [Canon Utilities], [CameraWindow] and [CameraWindow]. 2. Download the images. • Download the images using the camera or the computer. • By default, the downloaded images are saved into the [My Pictures] folder. Downloading Images Using the Camera (p. 22). Downloading Images Using - Canon A610 | PowerShot A620 / A610 Camera User Guide Basic - Page 23
If it fails to appear, click the [Canon CameraWindow] icon on the Dock (the bar which appears at the bottom of the desktop). 1. Download the images. Download the images using the camera or the computer. Downloading Images Using the Camera (p. 22). Downloading Images Using a Computer. By default, all - Canon A610 | PowerShot A620 / A610 Camera User Guide Basic - Page 24
Transfer) Use this method to download images using camera operations. Install the supplied software and adjust the computer settings the computer desktop. 1. Confirm that the Direct Transfer menu is displayed on the camera's LCD monitor. • The button will light blue. • Press the MENU button if - Canon A610 | PowerShot A620 / A610 Camera User Guide Basic - Page 25
in progress. • Images can also be selected during index playback (Advanced Guide p. 73). • Press the MENU button to return to the Direct Transfer menu. button Only JPEG images can be downloaded as wallpaper for a computer. On the Windows platform, the files are automatically created as BMP images - Canon A610 | PowerShot A620 / A610 Camera User Guide Basic - Page 26
in order to prevent injury, burns or electrical shock to yourself and others. Be sure to also read the safety precautions listed in the Advanced Camera User Guide. Warnings • Do not trigger the flash in close proximity to human or animal eyes. • Store this equipment out of the reach of children and
-
 1
1 -
 2
2 -
 3
3 -
 4
4 -
 5
5 -
 6
6 -
 7
7 -
8
-
9
-
10
-
11
-
12
-
13
-
14
-
15
-
16
-
17
-
18
-
19
-
20
-
21
-
22
-
23
-
24
-
25
-
26
 |
 |

ENGLISH
Preparation
Shooting
Playback/Erasing
Menus and Settings
Printing
Downloading Images
to a Computer
Basic
CDI-E189-010
© 2005 CANON INC.
PRINTED IN CHINA
Camera User Guide
Please Read This First
This guide explains how to prepare the camera and use its basic features.