Canon A95 PowerShot A95 Quick Start Guide
Canon A95 - PowerShot Digital Camera Manual
 |
UPC - 013803043174
View all Canon A95 manuals
Add to My Manuals
Save this manual to your list of manuals |
Canon A95 manual content summary:
- Canon A95 | PowerShot A95 Quick Start Guide - Page 1
display the image you wish to see. 7. Download the images to a computer. What you can do with the software The various ways of using the software • ZoomBrowser EX Software User Guide • ImageBrowser Software User Guide These PDF format manuals are available on the Canon website. Please download - Canon A95 | PowerShot A95 Quick Start Guide - Page 2
meets the system requirements. See the Camera User Guide. B. Install the software. a. Place the Canon Digital Camera Solution Disk into your computer's CD-ROM drive. Proceed with the installation while reviewing installation settings. If the Digital Signature Not Found window appears, click
-
 1
1 -
 2
2
 |
 |
➜
Camera User Guide
3
Playback
➜
Camera User Guide
CDI-E146-010
© 2004 CANON INC.
PRINTED IN CHINA
1
Preparing the Camera
➜
Camera User Guide
➜
Camera User Guide
Quick Reference
➜
Camera User Guide
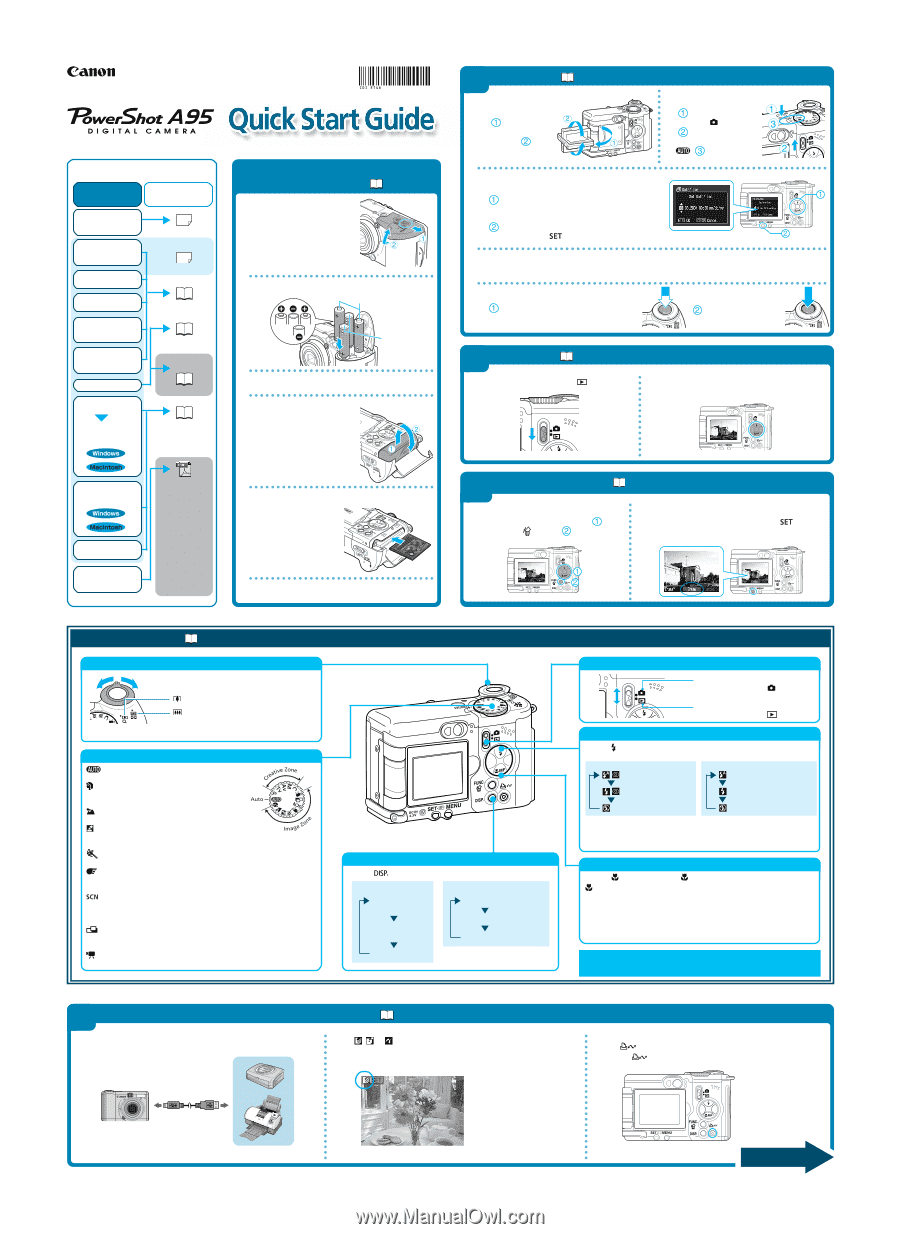
Zoom
Shooting Modes
: Auto
The camera automatically selects settings.
: Portrait
The background is blurred and the subject is in
clear focus.
: Landscape
For shooting landscape scenes.
: Night Scene
For photographing human subjects against the backdrop
of an evening sky or a night scene.
: Fast Shutter
For shooting fast moving objects.
: Slow Shutter
For shooting moving objects to make them appear blurred, such as river
rapids.
: Special Scene
For shooting with settings appropriate for certain types of scenes. Use the
left or right button to select a Scene mode. You can confirm the Scene
mode changes in the LCD monitor.
: Stitch Assist
Images shot in Stitch Assist mode can be merged together on a computer
to make a single panoramic image.
: Movie
For shooting movies.
Switching between Shooting/Playback
Flash range: 45 cm - 4.4 m (1.5 – 14 ft.) (wide angle)/45 cm - 2.5 m (1.5 – 8.2 ft.)
(telephoto)
* Red-eye reduction: This feature reduces the effect of light reflecting back from
the eyes and making them appear red.
In addition, there are functions that can be set in each shooting mode.
For details, see “Functions Available in Each Shooting Mode” at the end of
the
Camera User Guide
.
Changing the Displayed Information
Press the
button to switch the displayed information as follows.
Shooting Mode:
LCD Monitor - On
(No Information)
LCD Monitor - On
(Information View)
LCD Monitor - Off
Playback Mode:
Standard Information View
Detailed Information View
No Information
5
Printing with a Direct Print Compatible Printer
➜
Direct Print User Guide
A.
Connect the camera to the printer and turn on the printer’s
power.
B.
,
or
appears* in the upper left corner of the camera’s
LCD monitor, indicating that the printer is ready to print.
* The displayed icon may vary depending on the printer model.
A.
Slide the mode switch to
(Playback).
B.
Play back the images.
Use the left or right button to display the image you wish to
see.
A.
Use the left or right button to select
the image you wish to erase (
) and
press the
button (
).
Camera
Interface Cable
Printers
Please turn over
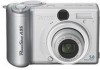
D.
Open the CF card slot cover.
B.
Insert the batteries as shown.
A.
Open the battery cover.
Positive (+) end
Negative (-) end
C.
Close the battery cover.
E.
Insert the CF card with its label facing up.
F.
Close the cover.
C.
Set the date and time (first time the camera is
powered on).
Use the left or right button to select the items you
wish to set, and use the up or down button to
change the value.
Check that the date and time shown are correct,
then press the
button.
D.
Aim the camera at the subject and adjust the zoom to achieve the desired composition (see
“Zoom” in the “Quick Reference” section).
E.
Focus and shoot.
Press the shutter button halfway to focus.
• The camera focuses and two beeps sound.
Press the shutter button
all the way to shoot.
B.
Turn the power on
(
). Slide the mode
switch to
(Shooting)
(
) and turn the
shooting mode dial to
(
).
Telephoto: Zoom in on the subject.
Wide Angle: Zoom out from the subject.
* The zoom can be adjusted from 38 to 114 mm (35mm film equivalent)
Shooting:
Slide the mode switch to
.
Playback:
Slide the mode switch to
.
Macro
Press the
button to display the
on the LCD monitor.
in Display
Use this mode to shoot close-ups of flowers or small objects.
* Recordable Area at Minimum Shooting Range <Shooting Distance>
At wide angle end: approx. 56 x 42 mm (2.2 x 1.7 in.)
<From the front of lens: 5 cm (2.0 in.)>
At telephoto end: approx. 87 x 65 mm (3.4 x 2.6 in.)
<From the front of lens: 25 cm (9.8 in.)>
Flash
Press the
button to switch between flash modes.
(Some settings are not available with certain shooting modes.)
When the red-eye reduction function is off
Auto
Flash on
Flash off
When the red-eye reduction function is on
Auto with red-eye reduction
Flash on with red-eye reduction
Flash off
Direct Print
User Guide
Printer User Guide
Supplied with a
printer
Contents of
This Guide
Included accessories and
separately sold
equipment information.
1.
Install the
batteries and the
CF card.
2.
Shoot images
with the camera.
3.
Play back the
images.
4.
Erase any
unwanted
images.
Learn the names
of camera
components.
5.
Print the images.
6.
Install the
software.
Connect the
camera to a
computer.
7.
Download the
images to a
computer.
What you can do
with the software
The various ways
of using the
software
The following manuals are supplied with your
camera. Please refer to them as need be.
Reference Guides
System Map
Quick Start Guide
This Guide
Camera User Guide
• Camera User
Guide
• Software
Starter Guide
• ZoomBrowser
EX Software
User Guide
• ImageBrowser
Software User
Guide
These PDF format
manuals are
available on the
Canon website.
Please download
them from the
following URL:
Imaging/
information-e.html
B.
When the confirmation screen appears, check
that [Erase] is selected and press the
button.
Select [Cancel] using the left or right button to cancel without
erasing.
4
Erasing an Image
C.
Choose the image you wish to print and press the
button.
The
button will blink blue and printing of the image will start.
A.
Open the LCD
monitor as shown
(
), and tilt it 180
degrees toward
the lens (
). Then
fold it back against
the camera body.
2
Shooting