Canon ACANPSS3K1 PowerShot S3 IS Camera User Guide Basic
Canon ACANPSS3K1 - PowerShot S3 IS Digital Camera Manual
 |
UPC - 689076335041
View all Canon ACANPSS3K1 manuals
Add to My Manuals
Save this manual to your list of manuals |
Canon ACANPSS3K1 manual content summary:
- Canon ACANPSS3K1 | PowerShot S3 IS Camera User Guide Basic - Page 1
the Advanced Camera User Guide. problems. CDI-E214-010 xxxxx © 2006 CANON INC. PRINTED IN JAPAN ENGLISH Preparations Shooting Basic Shooting Functions Playback/Erasing Menus and Settings Printing Basic Downloading Images to a Computer Camera User Guide Please Read This First This guide - Canon ACANPSS3K1 | PowerShot S3 IS Camera User Guide Basic - Page 2
Advanced Camera User Guide Printing Direct Print User Guide • Installing the software • Downloading images to a computer • Using the software Basic Camera User Guide (This Guide) Software Starter Guide ZoomBrowser EX/ ImageBrowser Software User Guide • PDF manuals available on the Canon - Canon ACANPSS3K1 | PowerShot S3 IS Camera User Guide Basic - Page 3
batteries. 1. Open the battery cover (a, b). 2. Insert four AA-size alkaline batteries supplied or separately sold nickel metal hydride (NiMH) batteries, then close the cover. (+) Positive end Battery cover lock (-) Negative end a b Î See the Advanced Guide: Battery Handling (p. 132) Battery - Canon ACANPSS3K1 | PowerShot S3 IS Camera User Guide Basic - Page 4
Opening the LCD Monitor Use the LCD monitor to confirm images while shooting them, navigate menus, and play back images. You can position the opened to the left 180 degrees and tilted 180 degrees toward the lens. The displayed image is automatically flipped and reversed (the Reverse Display - Canon ACANPSS3K1 | PowerShot S3 IS Camera User Guide Basic - Page 5
the clicking sound, the left and right of the image will display correctly. Î See the Advanced Guide: Using the LCD Monitor (p. 16) Always keep the LCD monitor closed with the display facing the camera body when the camera is not in use. When you push the LCD monitor until you hear the clicking - Canon ACANPSS3K1 | PowerShot S3 IS Camera User Guide Basic - Page 6
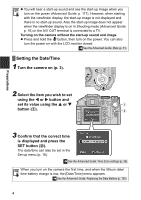
no start-up sound. Also the start-up image does not appear when the viewfinder display is on in Shooting mode (Advanced Guide: p. 16) or the A/V OUT terminal is connected to a TV. Turning on the camera without the start-up sound and image. z Press and hold the button, then turn on the power. You - Canon ACANPSS3K1 | PowerShot S3 IS Camera User Guide Basic - Page 7
down the SET button (b) and press the MENU button (c). This operation cannot be performed during movie playback, in the jump search mode (Advanced Guide: p. 94) or while connected to a printer or computer. d be c 3 Use the W, X, S or T button to select a language (d), then press the SET button - Canon ACANPSS3K1 | PowerShot S3 IS Camera User Guide Basic - Page 8
the way) to shoot. The shutter sound will play, and the image will record. The indicator will blink red while the image is recorded to the memory card. Pressing fully (Pressing all the way) Î See Basic Shooting Functions (p. 8) Î See the Advanced Guide to verify the advanced shooting method. 6 - Canon ACANPSS3K1 | PowerShot S3 IS Camera User Guide Basic - Page 9
in Stitch Assist mode). z Display the image's information (Advanced Guide: p. 22). z Display the magnified image (Advanced Guide: p. 92). z Erase individual images (Basic Guide: p. 14). z Attach sound memos (Advanced Guide: p. 102). Shooting Shooting (Movies) No matter what position the mode dial - Canon ACANPSS3K1 | PowerShot S3 IS Camera User Guide Basic - Page 10
for shooting moving subjects. (The continuous shooting settings can be changed (Advanced Guide: p. 42).) Stitch Assist Allows you to shoot overlapping images that can later be merged (stitched) to create one panoramic image on a computer. Î See the Advanced Guide (p. 51) Basic Shooting Functions - Canon ACANPSS3K1 | PowerShot S3 IS Camera User Guide Basic - Page 11
another color. Î See the Advanced Guide (p. 54) Indoor Prevents camera shake and maintains the subject's true color when shooting under fluorescent or tungsten lighting. Basic Shooting Functions z Some settings can be changed in each shooting mode (Advanced Guide: p. 167). z Results may vary - Canon ACANPSS3K1 | PowerShot S3 IS Camera User Guide Basic - Page 12
Allows you to save frequently used shooting modes and various shooting settings. Î See the Advanced Guide (p. 86) Shutter-speed priority AE When you select the shutter speed, the camera automatically sets the aperture. Î See the Advanced Guide (p. 58) Manual Use this mode to select your preferences - Canon ACANPSS3K1 | PowerShot S3 IS Camera User Guide Basic - Page 13
In this case, raise the flash before shooting. However, when shooting with the , , or mode there is no indication. z The flash cannot be used in the , mode's , and modes. z cannot be selected in the , , , and modes. Î See the Advanced Guide: Functions Available in Each Shooting Mode (p. 167) 11 - Canon ACANPSS3K1 | PowerShot S3 IS Camera User Guide Basic - Page 14
the range in which you cannot use macro mode to shoot the subject. If the zoom bar enters the yellow bar range, will turn gray. You can still shoot the image, however, the shot will be taken as if in standard shooting mode. The zoom bar disappears after approx. 2 sec. To cancel the macro mode - Canon ACANPSS3K1 | PowerShot S3 IS Camera User Guide Basic - Page 15
. wide angle Max. telephoto Out of zoom range for Macro shooting (yellow bar)* Focus range (rough guide) Basic Shooting Functions * Images will be shot in normal mode and not in Macro mode ( will appear gray). Macro Mode Shooting distance and image area when shooting as close to the subject as - Canon ACANPSS3K1 | PowerShot S3 IS Camera User Guide Basic - Page 16
exit instead of erasing, select [Cancel] using the W or X button. Protected images cannot be erased with this function b (Advanced Guide: p. 109) Î See the Advanced Guide: Erasing All Images (p. 110) Please note that erased images cannot be recovered. Exercise adequate caution before erasing an - Canon ACANPSS3K1 | PowerShot S3 IS Camera User Guide Basic - Page 17
, and sound settings are set using the FUNC., Rec., Play, Print, Set up, or My Camera menus. FUNC. Menu From this menu you can specify recording pixels, compression, and other settings for shooting. a bc When the camera is set to shooting mode, press the FUNC. button (a). To select an item (b) Press - Canon ACANPSS3K1 | PowerShot S3 IS Camera User Guide Basic - Page 18
menus: [ Rec. Menu], [ Play Menu], [ Print Menu], [ Set up Menu], and [ My Camera Menu]. From shooting mode Press the MENU button. To switch between menus (a) When the menu icon is selected, press the W or X button, or press the zoom lever. Set up a My Camera Print From playback mode Press the - Canon ACANPSS3K1 | PowerShot S3 IS Camera User Guide Basic - Page 19
printer model. 3 Select an image to print with the W or X button (b) and press the button (c). The button will blink blue and printing will start. a b c Î See the Advanced Guide: Setting the DPOF Print Settings (p. 111) Î See the Direct Print User Guide Î See the user guide for Your Printer - Canon ACANPSS3K1 | PowerShot S3 IS Camera User Guide Basic - Page 20
z z Computer System Requirements z Basic Guide (p. 19) z Software Starter Guide Connecting the Camera to a Computer z Basic Guide (p. 21) Downloading Images z Basic Guide (pp. 22, 23) to a Computer z Software Starter Guide z Windows ® XP and Mac OS X Users leaflet Using a Memory Card Reader - Canon ACANPSS3K1 | PowerShot S3 IS Camera User Guide Basic - Page 21
Downloading Images to a Computer System Requirements Please install the software on a computer meeting the following minimum requirements. OS Computer Model CPU RAM Interface Free Hard Disk Space Display Windows 98 Second Edition (SE) Windows Me Windows 2000 Service Pack 4 Windows XP (including - Canon ACANPSS3K1 | PowerShot S3 IS Camera User Guide Basic - Page 22
interface cable) 1 Install the software. 1. Place the Canon Digital Camera Solution Disk in the computer's CD-ROM drive. Double-click the [Canon Digital Camera Installer] icon in the CD-ROM window. When the installer panel appears, click [Install]. Downloading Images to a Computer 2. Click - Canon ACANPSS3K1 | PowerShot S3 IS Camera User Guide Basic - Page 23
the computer's USB port to the camera's DIGITAL terminal. With your fingernail on the upper edge of the camera's DIGITAL terminal cover, pull it forward to open from the camera's DIGITAL terminal. If the "Digital Signature Not Found" window appears, click [Yes]. The USB driver will automatically - Canon ACANPSS3K1 | PowerShot S3 IS Camera User Guide Basic - Page 24
time only). If the window to the right does not appear, click the [Start] menu and select [All Programs] or [Programs], followed by [Canon Utilities], [CameraWindow], [PowerShot - IXY - IXUS -DV 6] and [CameraWindow]. 2 Download the images. z Download the images using the camera or the computer - Canon ACANPSS3K1 | PowerShot S3 IS Camera User Guide Basic - Page 25
The following window opens when you establish a connection between the camera and computer. If it fails to appear, click the [Canon CameraWindow] icon on the Dock (the bar that displays at the bottom of the desktop). 1 Download the images. z Download the images using the camera or the computer - Canon ACANPSS3K1 | PowerShot S3 IS Camera User Guide Basic - Page 26
Downloading Images Using the Camera (Direct Transfer) Use this method to download images using camera operations. Install the supplied software and adjust the computer settings before using this method for the first time (p. 20). When communication between the camera (Advanced Guide: Setting - Canon ACANPSS3K1 | PowerShot S3 IS Camera User Guide Basic - Page 27
be selected during index playback. 3 Press the MENU button (c). The display will return to the Direct Transfer menu. Only JPEG images can be downloaded as wallpaper for a computer. On the Windows platform, the files are automatically created as BMP images. The option selected with the button is
-
 1
1 -
 2
2 -
 3
3 -
 4
4 -
 5
5 -
 6
6 -
 7
7 -
8
-
9
-
10
-
11
-
12
-
13
-
14
-
15
-
16
-
17
-
18
-
19
-
20
-
21
-
22
-
23
-
24
-
25
-
26
-
27
 |
 |

Safety Precautions
Be sure to read, understand and follow the safety precautions below when
using the camera, in order to prevent injury, burns or electrical shock to yourself
and others.
Be sure to also read the safety precautions listed in the
Advanced Camera User Guide
.
Warnings
•
Do not trigger the flash in close proximity to human or animal eyes.
•
Store this equipment out of the reach of children and infants.
•
Avoid dropping or subjecting the camera to severe impacts. Do not touch
the flash portion of the camera if it has been damaged.
•
Stop operating the equipment immediately if it emits smoke or noxious
fumes.
•
Do not handle the power cord if your hands are wet.
•
Only use batteries recommended in this manual.
•
The output terminal for the compact power adaptor is made specifically for
this camera. Do not use it with any other device.
Caution
•
Never rub or press strongly on the LCD monitor. These actions may
damage it or lead to other problems.
CDI-E214-010
Camera User Guide
Please Read This First
This guide explains how to prepare the camera and use its basic features.
© 2006 CANON INC.
ENGLISH
Basic
PRINTED IN JAPAN
Preparations
Shooting
Basic Shooting Functions
Playback/Erasing
Menus and Settings
Printing
Downloading Images to a
Computer
xxxxx