Canon CanoScan 5600F Quick Start Guide
Canon CanoScan 5600F Manual
 |
UPC - 013803094619
View all Canon CanoScan 5600F manuals
Add to My Manuals
Save this manual to your list of manuals |
Canon CanoScan 5600F manual content summary:
- Canon CanoScan 5600F | Quick Start Guide - Page 1
read this guide before operating this scanner. After you finish reading this guide, store it in a safe place for future reference. Table of Contents Package Contents 1 Scanning with MP Navigator EX......... 7 Installing the Software 2 Scanning Film 8 Preparing the Scanner 4 Specifications 11 - Canon CanoScan 5600F | Quick Start Guide - Page 2
installation. This equipment generates, uses and can radiate radio frequency energy and, if not installed and used in accordance with the instructions the manual. If such changes or modifications should be made, you could be required to stop operation of the equipment. Canon U.S.A., Inc. One Canon - Canon CanoScan 5600F | Quick Start Guide - Page 3
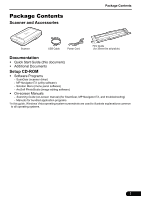
CD-ROM • Software Programs - ScanGear (scanner driver) - MP Navigator EX (utility software) - Solution Menu (menu panel software) - ArcSoft PhotoStudio (image editing software) • On-screen Manuals - Scanning Guide (on-screen manual) (for ScanGear, MP Navigator EX, and troubleshooting) - Manuals for - Canon CanoScan 5600F | Quick Start Guide - Page 4
may close automatically when the USB cable is unplugged. • Quit all running applications before installation. • To upgrade from Windows XP to Windows Vista, first uninstall software bundled with the Canon scanner. • Log in as an administrator to install the software. • Do not switch users during - Canon CanoScan 5600F | Quick Start Guide - Page 5
[Yes] to proceed. Installing the Software 6 Follow the on-screen instructions to perform the installation. 7 When the User Registration screen appears, follow the on-screen instructions to ensure product support. For Macintosh, skip step 8 and go to step 9. 8 For Windows, when the Extended Survey - Canon CanoScan 5600F | Quick Start Guide - Page 6
before plugging into the electrical outlet. Reversing this order may lead to malfunctions. • When the scanner is connected to the USB 1.1 port and "HI-SPEED USB Device Plugged into non-HI-SPEED USB Hub" message appears, ignore the message. The scanner operates in this condition without problems. 4 - Canon CanoScan 5600F | Quick Start Guide - Page 7
[Save] to save the images and close MP Navigator EX. • For more information on scanning using MP Navigator EX, bundled applications, and troubleshooting, see the Scanning Guide (on-screen manual). To open the Scanning Guide (on-screen manual), double-click the on-screen manual icon on the desktop - Canon CanoScan 5600F | Quick Start Guide - Page 8
CD-ROM. See "Setup CD-ROM" on page 1. If the scanner buttons do not work properly, see "Troubleshooting" in the Scanning Guide (on-screen manual). • For Mac OS X v.10.3.9: Before using the scanner buttons, you need to set Image Capture (in [Applications] folder) to open MP Navigator EX automatically - Canon CanoScan 5600F | Quick Start Guide - Page 9
the scanner driver (ScanGear), and correcting/editing scanned images, as well as simply scanning. Starting MP Navigator EX 1 Click [Scan/import photos or documents.] in the Solution Menu. You can also start it by following procedure. For Windows: Select [Start] - [(All) Programs] - [Canon Utilities - Canon CanoScan 5600F | Quick Start Guide - Page 10
brush to remove any dust from the film, which will affect the image quality, and take care to hold the film by its edges to avoid transferring dirt or fingerprints to it. • Do not block the Calibration Slot on the Film Guide when scanning film. Colors will not be scanned correctly if the Calibration - Canon CanoScan 5600F | Quick Start Guide - Page 11
order (1) and (2) as shown in the figure on the right. With the Film Holder being opened and (2) lifted, remove the film strip frame. d Align the Film Guide's tab with the FILM symbol on the document glass of the scanner. e Place a slide or slides face down (correctly viewed from below) in the - Canon CanoScan 5600F | Quick Start Guide - Page 12
then click [Scan] to start scanning. Do not move the scanner while it is operating. 8 When prompted that the scanning completed, click [Exit]. 9 Click [Save] to save the images and close MP Navigator EX. • Do not leave the film strip in the Film Guide for an extended period of time as heat from the - Canon CanoScan 5600F | Quick Start Guide - Page 13
CanoScan 5600F Scanner Type Flatbed Sensor Type CCD 6-line color Light Source White LED/Cold cathode fluorescent lamp Optical Resolution *1 4800 x 9600 dpi Selectable Resolution 25-19200 dpi (ScanGear) Scanning Bit Depth Color Grayscale 48 bit input (16 bit input for each color - Canon CanoScan 5600F | Quick Start Guide - Page 14
. WARNING Indicates a warning concerning operations that may lead to death or injury to persons if not performed correctly. In order to use the scanner safely, always pay attention to these warnings. CAUTION Indicates a caution concerning operations that may lead to injury to persons or damage to - Canon CanoScan 5600F | Quick Start Guide - Page 15
. If anything enters the scanner, immediately unplug the power cord. Then contact your retailer or Canon Customer Support Help Desk. CAUTION • do not move the scanner from low-temperature areas to high-temperature areas. Condensation may cause image errors. Leave the scanner enough time to gradually - Canon CanoScan 5600F | Quick Start Guide - Page 16
The socket-outlet shall be installed near the equipment and shall be easily accessible. LAMP(S) INSIDE THIS PRODUCT CONTAIN MERCURY AND MUST BE RECYCLED OR DISPOSED OF ACCORDING TO LOCAL, STATE OR FEDERAL LAWS. As an ENERGY STAR® Partner, Canon Inc. has determined that this product meets the ENERGY
-
 1
1 -
 2
2 -
 3
3 -
 4
4 -
 5
5 -
 6
6 -
 7
7 -
8
-
9
-
10
-
11
-
12
-
13
-
14
-
15
-
16
 |
 |

Quick Start Guide
Quick Start Guide
Please read this guide before operating this scanner. After you finish reading this guide,
store it in a safe place for future reference.
Table of Contents
Package Contents
...............................
1
Scanning with MP Navigator EX
.........
7
Installing the Software
.........................
2
Scanning Film
.....................................
8
Preparing the Scanner
........................
4
Specifications
......................................
11
Try Scanning
.......................................
5
Safety Precautions
..............................
12
Using the Scanner Buttons
.................
6