Canon CanoScan LiDE 30 CanoScan LiDE20/30 Quick Start Guide
Canon CanoScan LiDE 30 Manual
 |
View all Canon CanoScan LiDE 30 manuals
Add to My Manuals
Save this manual to your list of manuals |
Canon CanoScan LiDE 30 manual content summary:
- Canon CanoScan LiDE 30 | CanoScan LiDE20/30 Quick Start Guide - Page 1
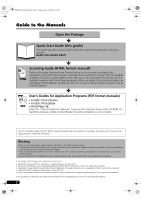
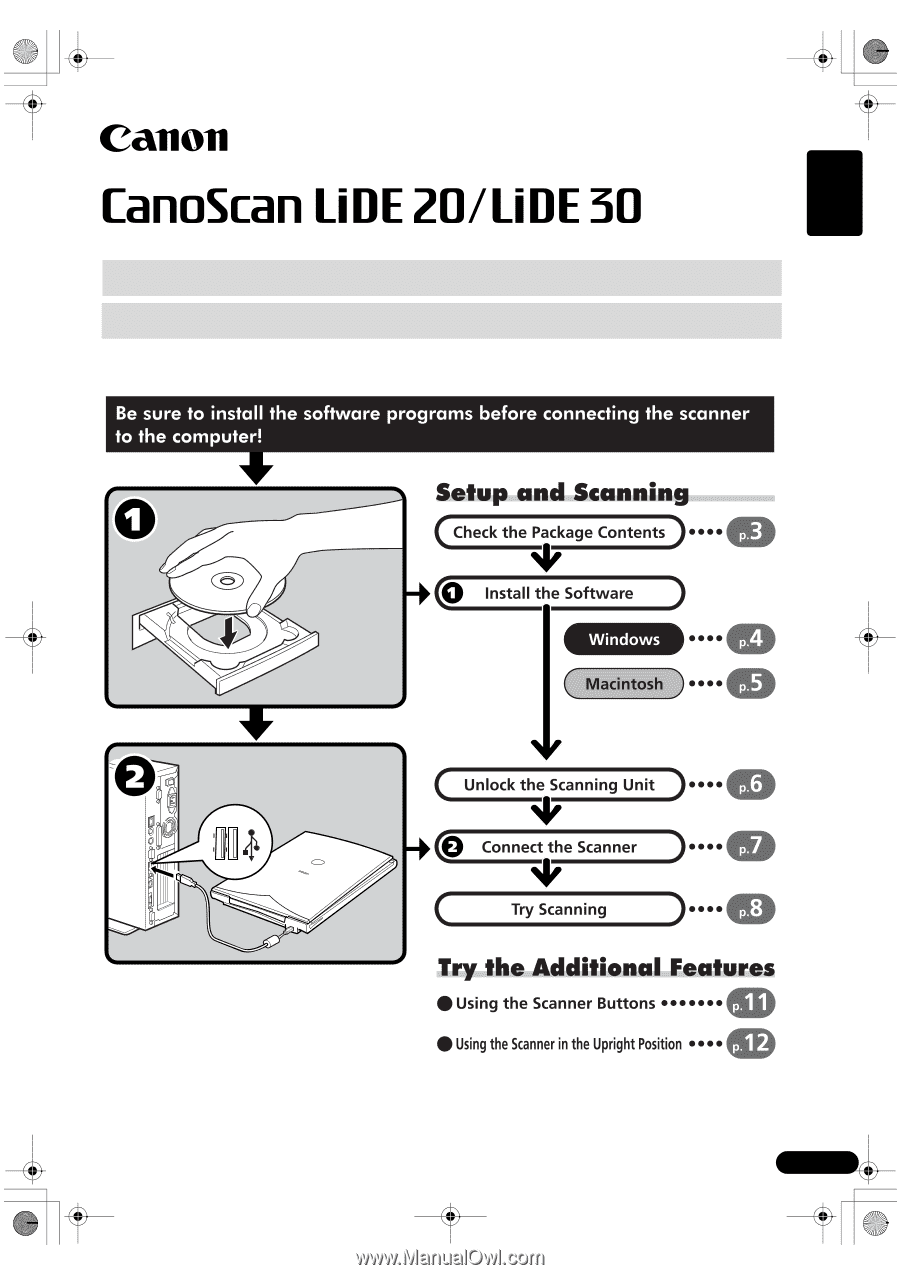
Page 1 Friday, May 10, 2002 6:31 PM English Quick Start Guide Be sure to install the software programs before connecting the scanner to the computer! Setup and Scanning Check the Package Contents 3 p. Install the Software Windows Macintosh 4 p. 5 p. Unlock the Scanning Unit 6 p. Connect - Canon CanoScan LiDE 30 | CanoScan LiDE20/30 Quick Start Guide - Page 2
the procedures in the Quick Start Guide. It describes how to utilize the scanner with the bundled software, and how to solve problems when they occur. You can install this manual onto the hard disk together with the software programs. When you install it, the Scanning Guide icon will appear on the - Canon CanoScan LiDE 30 | CanoScan LiDE20/30 Quick Start Guide - Page 3
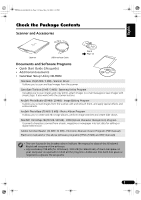
Stand Page 12 Documents and Software Programs • Quick Start Guide (this guide) • Additional documents • CanoScan Setup Utility CD-ROM ScanGear CS (25 MB / 5 MB) - Scanner Driver It allows you to scan and load images from the scanner. CanoScan Toolbox (5 MB / 3 MB) - Scanning Utility Program It - Canon CanoScan LiDE 30 | CanoScan LiDE20/30 Quick Start Guide - Page 4
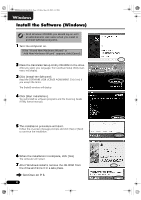
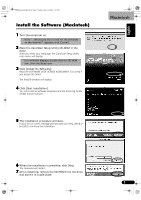
USER LICENSE AGREEMENT. Click [Yes] if you accept the terms. The [Install] window will display. 4 Click [Start Installation]. You will install six software programs and the Scanning Guide (HTML format manual). 5 The installation procedure will start. Follow the on-screen message prompts and click - Canon CanoScan LiDE 30 | CanoScan LiDE20/30 Quick Start Guide - Page 5
USER LICENSE AGREEMENT. Click [Yes] if you accept the terms. The [Install] window will display. 4 Click [Start Installation]. You will install six software programs and the Scanning Guide (HTML format manual). 5 The installation procedure will start. Follow the on-screen message prompts and click - Canon CanoScan LiDE 30 | CanoScan LiDE20/30 Quick Start Guide - Page 6
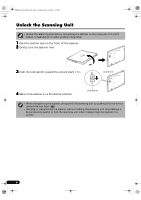
.fm Page 6 Friday, May 10, 2002 6:31 PM Unlock the Scanning Unit • Unlock the Scanning Unit before connecting the scanner to the computer. If it is left locked, a malfunction or other problem may occur. 1 Peel the caution seal on the front of the scanner. 2 Gently turn the scanner over. 3 Push the - Canon CanoScan LiDE 30 | CanoScan LiDE20/30 Quick Start Guide - Page 7
.fm Page 7 Friday, May 10, 2002 6:31 PM Connect the Scanner • Confirm that the Scanning Unit is unlocked. (P.6) 1 Peel the caution seal on the back of the scanner. 2 Connect the scanner to the computer with the supplied USB interface cable. Windows USB Interface Cable Macintosh Wide Flat - Canon CanoScan LiDE 30 | CanoScan LiDE20/30 Quick Start Guide - Page 8
.fm Page 8 Friday, May 10, 2002 6:31 PM Try Scanning The following steps explain how to scan with ArcSoft PhotoStudio. 1 Place a photo or a picture on the glass by aligning its top edge with the alignment mark, and close the document cover. Bottom Top Windows 2 Select [Start], [Programs] or - Canon CanoScan LiDE 30 | CanoScan LiDE20/30 Quick Start Guide - Page 9
Friday, May 10, 2002 6:31 PM Windows 4 Click the Acquire icon or click the [File] menu and select [Acquire]. Try Scanning Macintosh 4 : Black and White, 300 dpi • Document: Grayscale, 300 dpi 6 Click [Preview]. After calibration, the preview scan will start and gradually display the image. - Canon CanoScan LiDE 30 | CanoScan LiDE20/30 Quick Start Guide - Page 10
PhotoStudio window to close it. • If the scanner does not perform as described above, read the "Troubleshooting" section of the Scanning Guide. • For details about the bundled software, read the Scanning Guide or the User's Guide (PDF format manual) for each software program on the CanoScan Setup - Canon CanoScan LiDE 30 | CanoScan LiDE20/30 Quick Start Guide - Page 11
, you should enable MAPI function (for Windows). • While scanning, you can change the default settings for scanning by clicking the [Cancel] button. For changing settings or arranging the scanner button assignments, refer to the CanoScan Toolbox section of Scanning Guide (HTML format manual). 11 - Canon CanoScan LiDE 30 | CanoScan LiDE20/30 Quick Start Guide - Page 12
00-QSG_E_M_MAIN.fm Page 12 Friday, May 10, 2002 6:31 PM Using the Scanner in the Upright Position Installing the Stand Positioning an Item Removing the Stand Press the hook. 12 - Canon CanoScan LiDE 30 | CanoScan LiDE20/30 Quick Start Guide - Page 13
: Scanner Model: CanoScan LiDE 20 Serial Number (on the back of the equipment): LiDE 30 • About the Computer Used Manufacturer: Model: CPU: Clock Speed: Memory Capacity (RAM): Hard Disk Capacity: MB MB Space Available: OS: Windows XP Me 2000 98 Macintosh OS 9.0 OS 9.1 OS 9.2 OS - Canon CanoScan LiDE 30 | CanoScan LiDE20/30 Quick Start Guide - Page 14
scanner may not work if you upgrade to Windows XP with these programs still installed. After upgrading to Windows XP, reinstall ScanGear CS and CanoScan Toolbox according to the steps on page 4. For details, please read the "Troubleshooting" section of the Scanning Guide (HTML format manual). 14
-
 1
1 -
 2
2 -
 3
3 -
 4
4 -
 5
5 -
 6
6 -
 7
7 -
8
-
9
-
10
-
11
-
12
-
13
-
14
 |
 |
1
English
Quick Start Guide
Quick Start Guide
00-QSG_E_M_MAIN.fm
Page 1
Friday, May 10, 2002
6:31 PM