Canon CanoScan LiDE 500F CanoScan LiDE500F Quick Start Guide
Canon CanoScan LiDE 500F Manual
 |
View all Canon CanoScan LiDE 500F manuals
Add to My Manuals
Save this manual to your list of manuals |
Canon CanoScan LiDE 500F manual content summary:
- Canon CanoScan LiDE 500F | CanoScan LiDE500F Quick Start Guide - Page 1
the Software Windows 4 p. Macintosh 5 p. Unlocking the Scanning Unit 6 p. Positioning the Scanner 6 p. Connecting the Scanner 8 p. Positioning Items 9 p. Try Scanning p.12 Using the Scanner Buttons p.15 Scanning Film p.16 Please read this guide before operating this scanner. After - Canon CanoScan LiDE 500F | CanoScan LiDE500F Quick Start Guide - Page 2
the scanner. READ THIS GUIDE FIRST! Scanning Guide (HTML format manual) HTML Refer to this guide when you have finished setting up the scanner according to the procedures in the Quick Start Guide. It describes how to utilize the scanner with the bundled software, and how to solve problems when - Canon CanoScan LiDE 500F | CanoScan LiDE500F Quick Start Guide - Page 3
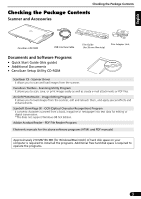
CanoScan LiDE 500F USB Interface Cable Film Guide (for 35 mm film strip) Film Adapter Unit Documents and Software Programs • Quick Start Guide (this guide) • Additional Documents • CanoScan Setup Utility CD-ROM ScanGear CS - Scanner Driver It allows you to scan and load images from the scanner - Canon CanoScan LiDE 500F | CanoScan LiDE500F Quick Start Guide - Page 4
Installation" and click [Next]. The [Install] window will display. 4 Click [Install]. Read the Software User License Agreement. Click [Yes] if you accept the terms. You will install five software programs and the Scanning Guide (HTML format manual). 5 Follow the on-screen message prompts and - Canon CanoScan LiDE 500F | CanoScan LiDE500F Quick Start Guide - Page 5
Installation" and click [Next]. The [Install] window will display. 6 Click [Install]. Read the Software User License Agreement. Click [Yes] if you accept the terms. You will install five software programs and the Scanning Guide (HTML format manual). 7 Follow the on-screen message prompts and - Canon CanoScan LiDE 500F | CanoScan LiDE500F Quick Start Guide - Page 6
the back. It is possible to scan thick or large items, and also films can be scanned. Portrait Position (b) (b) This position is to set the scanner so that the document cover opens from the left to the right. It is possible to scan thick or large items, and also films can - Canon CanoScan LiDE 500F | CanoScan LiDE500F Quick Start Guide - Page 7
the stand, make sure that there isn't a space between the document cover and the surface of the document glass (p. 11, Step 3). 1 Turn the scanner upside down. 2 Lift the stand on the scanner back in the direction of arrow c and then arrow d. 3 Place the stand's end around the front side of the - Canon CanoScan LiDE 500F | CanoScan LiDE500F Quick Start Guide - Page 8
may lead to a malfunction. • When the scanner is connected to the USB 1.1 port on Windows XP and "HI-SPEED USB Device Plugged into non-HI-SPEED USB Hub" message appears, ignore the message. The scanner operates in this condition without problems. • The scanner does not have a power switch. The power - Canon CanoScan LiDE 500F | CanoScan LiDE500F Quick Start Guide - Page 9
. The following procedures explain how to position items for each method. • When opening the document cover, support it with your hand until it stops. • Do not place items that weigh 2.0 kg or more on the scanner. In addition, do not press heavily on the document cover or the item while it is - Canon CanoScan LiDE 500F | CanoScan LiDE500F Quick Start Guide - Page 10
as shown on the right. Repeat the procedure from Step 2. Antislip Grip 4 Position the item on the document glass. Top Alignment Mark Bottom • Cover the scanner with a black cloth if the external light enters around the scanned item - Canon CanoScan LiDE 500F | CanoScan LiDE500F Quick Start Guide - Page 11
to scan items positioning the scanner upright on the stand. 1 cover contains a magnet to help it stick to the scanner body. • If there is space between the joint of reposition the joint as shown in the right figure. Use the scanner in the landscape or portrait position to perform the following. • - Canon CanoScan LiDE 500F | CanoScan LiDE500F Quick Start Guide - Page 12
procedures using the image editing program, ArcSoft PhotoStudio, and the scanner driver, ScanGear CS. To scan without using an application program such as ArcSoft PhotoStudio, refer to "Scanning with ScanGear CS (ScanGear Starter)" in the Scanning Guide (HTML format manual). Alignment Mark 1 Place - Canon CanoScan LiDE 500F | CanoScan LiDE500F Quick Start Guide - Page 13
in ScanGear CS, you can scan in three easy steps: (Step 5) Select Source, (Step 6) Preview and (Step 8) Scan. 5 Select a Select Source option. Select [Photo (Color)]. 6 Click [Preview]. After calibration, the preview scan will start and gradually display the image. • Do not touch the scanner while - Canon CanoScan LiDE 500F | CanoScan LiDE500F Quick Start Guide - Page 14
the scanner does not perform as described above, read the "Troubleshooting" section of the Scanning Guide (HTML format manual). • For details about the bundled software programs, read the Scanning Guide or the user guides (PDF format manuals) for each software program on the CanoScan Setup Utility - Canon CanoScan LiDE 500F | CanoScan LiDE500F Quick Start Guide - Page 15
these buttons, make sure that ScanGear CS, CanoScan Toolbox, ArcSoft PhotoStudio and Adobe Acrobat Reader should be installed from the CanoScan Setup Utility CD-ROM. COPY Button Prints (copies) the scanned image with a printer. To use this button, the printer driver should be installed and the - Canon CanoScan LiDE 500F | CanoScan LiDE500F Quick Start Guide - Page 16
scanner. Fit the two tabs on the film guide into the document glass slots. • When opening the document cover, support it with your hand until it stops. Calibration Calibration is required when film is first scanned. Calibration is the process ScanGear CS uses to adjust to the correct color balance - Canon CanoScan LiDE 500F | CanoScan LiDE500F Quick Start Guide - Page 17
CS. Refer to step 4 on page 13. ScanGear CS will start. 5 Select a Select Source option. You can select from the following options for films. Negative Film (Color) / Positive Film (Color) 6 Click [Preview]. The "Executes calibration." message will display. 7 Click the [OK] button. The calibration - Canon CanoScan LiDE 500F | CanoScan LiDE500F Quick Start Guide - Page 18
ArcSoft PhotoStudio. Refer to step 2 on page 12. 5 Start ScanGear CS. Refer to step 4 on page 13. 6 Select a Select Source option. You can select from the following options for films. Negative Film (Color) / Positive Film (Color) • Use ScanGear CS's Advanced Mode to scan monochrome films (See the - Canon CanoScan LiDE 500F | CanoScan LiDE500F Quick Start Guide - Page 19
[Preview]. ScanGear CS will display the preview image. • Do not touch the scanner while it is operating. Scanning Film 8 If necessary, perform the following step. Select a Destination option. Select an option according to how the scanned image will be used: [Print (300 dpi)] or [Image Display - Canon CanoScan LiDE 500F | CanoScan LiDE500F Quick Start Guide - Page 20
window to • If the scanner does not perform as described above, read the "Troubleshooting" section of the Scanning Guide (HTML format manual). • For details about the bundled software programs, read the Scanning Guide or the user guides (PDF format manuals) for each software program on the CanoScan - Canon CanoScan LiDE 500F | CanoScan LiDE500F Quick Start Guide - Page 21
interface expansion cards are not supported. • Specifications are subject to change without notice. Optional Accessory Kit • You can purchase the following Accessory. Accessory Kit CSAK-LiDE 500F : film guide, cap for film adapter unit Upgrading to USB 2.0 (Windows Only) To upgrade a computer to - Canon CanoScan LiDE 500F | CanoScan LiDE500F Quick Start Guide - Page 22
scanner. If any problems occur with the scanner, you will need this information when you contact our Customer Support Help servicing for this equipment will expire five years after production ceases. Date of Purchase: Dealer Name/Dealer Tel: Dealer Address: Scanner Model: CanoScan LiDE 500F
-
 1
1 -
 2
2 -
 3
3 -
 4
4 -
 5
5 -
 6
6 -
 7
7 -
8
-
9
-
10
-
11
-
12
-
13
-
14
-
15
-
16
-
17
-
18
-
19
-
20
-
21
-
22
 |
 |

1
English
Quick Start Guide
Quick Start Guide
Please read this guide before operating this scanner. After you finish reading this guide, store it in
a safe place for future reference.
Setup and Scanning
Checking the Package Contents
Installing the Software
Windows
Macintosh
Unlocking
the
Scanning
Unit
Connecting the Scanner
Positioning Items
p.
3
p.
4
p.
5
p.
6
p.
8
p.
9
Using the Scanner Buttons
p.
15
Scanning Film
p.
16
Positioning the Scanner
p.
6
Try Scanning
p.
12
Be sure to install the software programs before connecting the scanner
to the computer!