Canon CanoScan LiDE 80 CanoScan LiDE80 Quick Start Guide
Canon CanoScan LiDE 80 Manual
 |
View all Canon CanoScan LiDE 80 manuals
Add to My Manuals
Save this manual to your list of manuals |
Canon CanoScan LiDE 80 manual content summary:
- Canon CanoScan LiDE 80 | CanoScan LiDE80 Quick Start Guide - Page 1
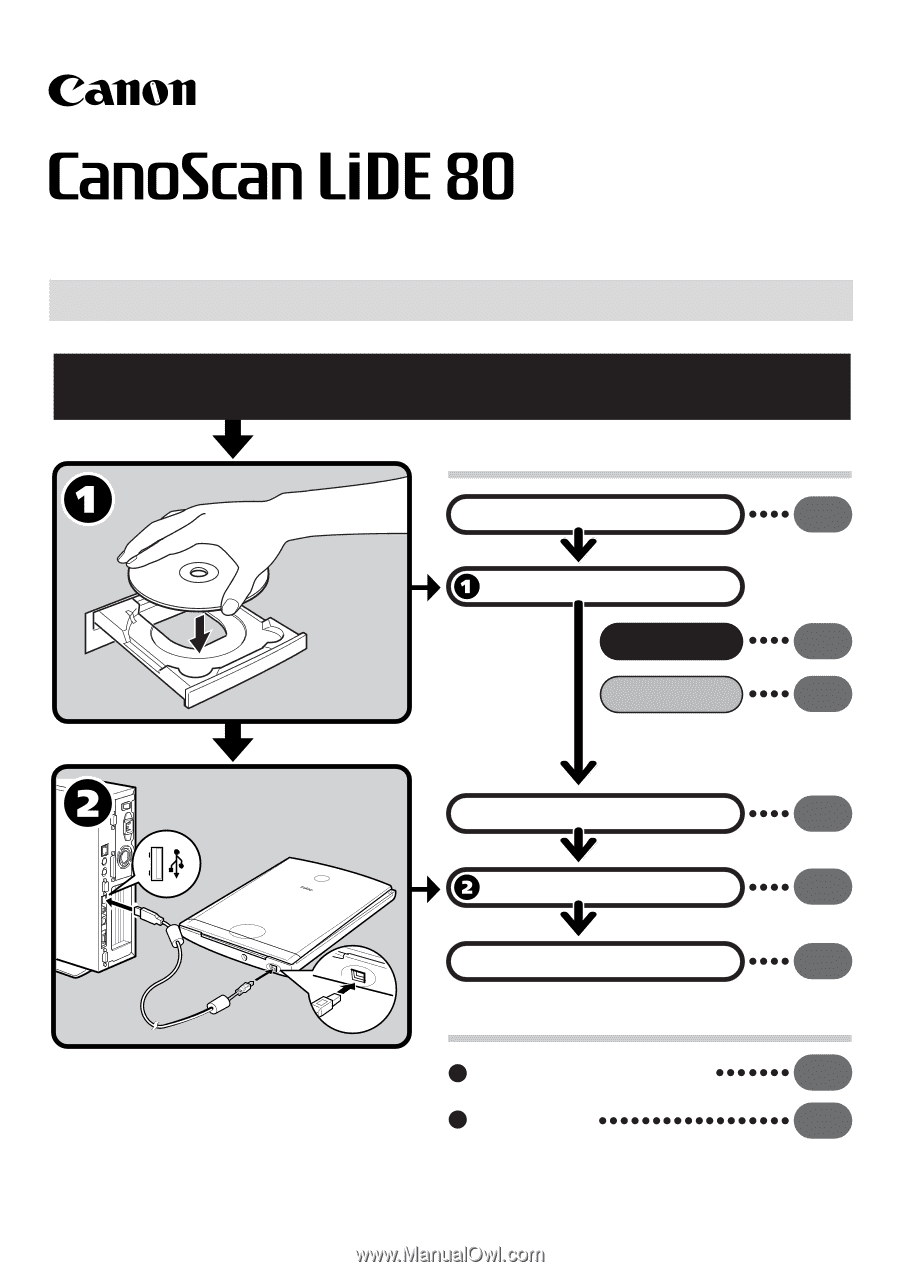
Quick Start Guide Be sure to install the software programs before connecting the scanner to the computer! Setup and Scanning Check the Package Contents 2 p. Install the Software Windows 3 p. Macintosh 4 p. Unlock the Scanning Unit 5 p. Connect the Scanner 6 p. Try Scanning 7 p. Try - Canon CanoScan LiDE 80 | CanoScan LiDE80 Quick Start Guide - Page 2
Color Image Scanner Models F917000: (CanoScan LiDE 80 instructions Canon Inc. • Adobe®, Acrobat® and Photoshop® are trademarks of Adobe Systems Incorporated. • Microsoft and Windows are registered trademarks of Microsoft Corporation in the U.S. and other countries. • Macintosh, Power Macintosh and Mac - Canon CanoScan LiDE 80 | CanoScan LiDE80 Quick Start Guide - Page 3
. It describes how to utilize the scanner with the bundled software, and how to solve problems when they occur. You can install this manual onto the hard disk together with the software programs. When you install it, the Scanning Guide icon will appear on the desktop. Double-click the icon to view - Canon CanoScan LiDE 80 | CanoScan LiDE80 Quick Start Guide - Page 4
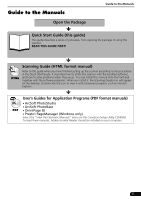
Check the Package Contents Check the Package Contents Scanner and Accessories CanoScan LiDE 80 USB Interface Cable Stand Film Adapter Unit Film Guide Documents and Software Programs • Quick Start Guide (this guide) • Additional Documents • CanoScan Setup Utility CD-ROM • The two figures in the - Canon CanoScan LiDE 80 | CanoScan LiDE80 Quick Start Guide - Page 5
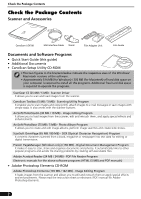
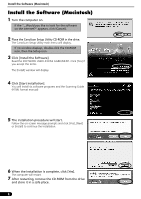
USER LICENSE AGREEMENT. Click [Yes] if you accept the terms. The [Install] window will display. 4 Click [Start Installation]. You will install seven software programs and the Scanning Guide (HTML format manual). 5 The installation procedure will start. Follow the on-screen message prompts and click - Canon CanoScan LiDE 80 | CanoScan LiDE80 Quick Start Guide - Page 6
USER LICENSE AGREEMENT. Click [Yes] if you accept the terms. The [Install] window will display. 4 Click [Start Installation]. You will install six software programs and the Scanning Guide (HTML format manual). 5 The installation procedure will start. Follow the on-screen message prompts and click - Canon CanoScan LiDE 80 | CanoScan LiDE80 Quick Start Guide - Page 7
to the computer. If it is left locked, a malfunction or other problem may occur. 1 Peel the caution seal from the scanner. 2 Gently turn the scanner over. 3 Push the lock switch toward the unlock mark ( ). 4 Return the scanner to a horizontal position. Lock Switch Unlock Mark • When carrying or - Canon CanoScan LiDE 80 | CanoScan LiDE80 Quick Start Guide - Page 8
is unlocked. (P.5) 1 Peel the caution seals from the scanner. 2 Connect the scanner to the computer with the supplied USB interface cable. Wide Flat Connector USB Interface Cable Small Square Connector • Only use the USB interface cable provided with the scanner. Use of other cables may lead to - Canon CanoScan LiDE 80 | CanoScan LiDE80 Quick Start Guide - Page 9
of the scanner by aligning its top edge with the alignment mark, and close the document cover. Top Bottom Try Scanning Alignment Mark Windows 2 Select [Start], [Programs] or [All Programs], [ArcSoft PhotoStudio] and [PhotoStudio 5]. Macintosh 2 Double-click the [Applications (Mac - Canon CanoScan LiDE 80 | CanoScan LiDE80 Quick Start Guide - Page 10
dpi •Magazine: Color, 150 dpi •Newspaper: Black and White, 300 dpi •Document: Grayscale, 300 dpi 6 Click [Preview]. After calibration, the preview scan will start and gradually display the image. The image is automatically cropped at its original size. If you want to trim the image further, drag - Canon CanoScan LiDE 80 | CanoScan LiDE80 Quick Start Guide - Page 11
the scanner does not perform as described above, read the "Troubleshooting" section of the Scanning Guide (HTML format manual). • For details about the bundled software programs, read the Scanning Guide or the User's Guide (PDF format manual) for each software program on the CanoScan Setup Utility - Canon CanoScan LiDE 80 | CanoScan LiDE80 Quick Start Guide - Page 12
enable the MAPI function (for Windows). • If you press the [Cancel] button while scanning, you can change the default settings for scanning. For changing settings or arranging the scanner button assignments, refer to the "CanoScan Toolbox" section of the Scanning Guide (HTML format manual). 10 - Canon CanoScan LiDE 80 | CanoScan LiDE80 Quick Start Guide - Page 13
procedures to place the Film Adapter Unit and the Film Guide on the document glass to scan film. • Clean the document glass before placing the Film Guide on it, otherwise dirt and dust can affect image quality or damage the film. • You cannot scan film with the scanner in the upright position - Canon CanoScan LiDE 80 | CanoScan LiDE80 Quick Start Guide - Page 14
(Mac OS 9)] and [PhotoStudio] folders and the [PhotoStudio] icon. • If ScanGear CS is already running, click the close box ( Windows, [Select source] category, select [Color Negative Film] or [Color Positive Film]. The "No calibration data exists to perform film scanning." message will display. 6 - Canon CanoScan LiDE 80 | CanoScan LiDE80 Quick Start Guide - Page 15
your film, follow the Scanning Film steps. Scanning Film Put the CAP back on the Film Adapter Unit. Scanning Film The following steps explain how to scan films with ArcSoft PhotoStudio and ScanGear CS. 1 Place the film in the Film Guide. Place the film face up in the Film Guide (images and - Canon CanoScan LiDE 80 | CanoScan LiDE80 Quick Start Guide - Page 16
the [Select source] category, select [Color Negative Film] or [Color Positive Film]. • Use the Advanced Mode to scan monochrome film (See the Scanning Guide). 7 Confirm that the [Select Frame] Click or (close box) in the ScanGear CS window to close it. The scanned image will appear in the PhotoStudio - Canon CanoScan LiDE 80 | CanoScan LiDE80 Quick Start Guide - Page 17
image. • If the scanner does not perform as described above, read the "Troubleshooting" section of the Scanning Guide (HTML format manual). • For details about the bundled software programs, read the Scanning Guide or the User's Guide (PDF format manual) for each software program on the CanoScan - Canon CanoScan LiDE 80 | CanoScan LiDE80 Quick Start Guide - Page 18
Specifications CanoScan LiDE 80 Scanner Type Flatbed Scanning Element CIS (Color Contact Image Sensor) Light Source 3-color (RGB) LED Optical Resolution 2400 x 4800 dpi Selectable Resolution 25 - 9600 dpi (ScanGear CS) Scanning Bit Depth Color Grayscale 16 bit input / 16 bit or 8 bit - Canon CanoScan LiDE 80 | CanoScan LiDE80 Quick Start Guide - Page 19
the purchased scanner. If any problems occur with the scanner, you will need this information when you contact our Customer Support Help Desk servicing for this equipment will expire five years after production ceases. Date of Purchase: Dealer Tel: Dealer Address: Scanner Model: CanoScan LiDE 80 - Canon CanoScan LiDE 80 | CanoScan LiDE80 Quick Start Guide - Page 20
RH2 8BF, United Kingdom For technical support, please contact Canon Help Desk. P.O. Box 431, Wallington, Surrey SM6 0XU, UK Tel: (08705) 143 723 (Calls may be recorded) Fax: (08705) 143 340 For sales enquiries, please call 08705 143723 CANON COMMUNICATION & IMAGE FRANCE S.A. 102 Avenue du Général de
-
 1
1 -
 2
2 -
 3
3 -
 4
4 -
 5
5 -
 6
6 -
 7
7 -
8
-
9
-
10
-
11
-
12
-
13
-
14
-
15
-
16
-
17
-
18
-
19
-
20
 |
 |
1
Setup and Scanning
Try the Additional Features
Check the Package Contents
Install the Software
Windows
Macintosh
Unlock the Scanning Unit
Connect the Scanner
Try Scanning
p.
2
p.
3
p.
4
p.
5
p.
6
p.
7
Using the Scanner Buttons
p.
10
Scanning Film
p.
11
Be sure to install the software programs before connecting the scanner
to the computer!
Quick Start Guide
Quick Start Guide