Canon CanoScan LiDE90 LiDE 90 Quick Start Guide Instructions
Canon CanoScan LiDE90 Manual
 |
View all Canon CanoScan LiDE90 manuals
Add to My Manuals
Save this manual to your list of manuals |
Canon CanoScan LiDE90 manual content summary:
- Canon CanoScan LiDE90 | LiDE 90 Quick Start Guide Instructions - Page 1
Wizard appears, unplug the USB cable from the computer, and then click [Cancel]. • Quit all running applications before installation, including anti-virus software. • To upgrade from Windows® XP to Windows Vista™ operating system, first uninstall software bundled with the Canon scanner. • Log in as - Canon CanoScan LiDE90 | LiDE 90 Quick Start Guide Instructions - Page 2
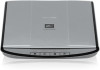
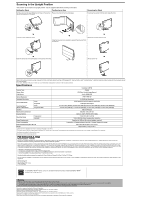
-click the on-screen manual icon on the desktop. In this guide, Windows Vista screen shots are used to illustrate explanations common to all operating systems. Specifications Scanner Type Sensor Type Light Source CanoScan LiDE 90 Flatbed CIS (Color Contact Image Sensor) 3-color (RGB) LED Optical
-
 1
1 -
 2
2
 |
 |

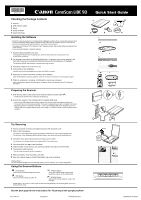
Checking the Package Contents
1
Scanner
2
USB Interface Cable
3
Stand
4
Setup CD-ROM
5
Quick Start Guide
Installing the Software
•
Do NOT connect the scanner to a computer before installing the software. If you connect the scanner and the
Found New Hardware Wizard appears, unplug the USB cable from the computer, and then click [Cancel].
• Quit all running applications before installation, including anti-virus software.
•
To upgrade from Windows
®
XP to Windows Vista
™
operating system, first uninstall software bundled with the
Canon scanner.
• Log in as an administrator to install the software.
1
Place the Setup CD-ROM in the drive.
For Macintosh
®
: Double-click the [Setup] icon. Enter the administrator ID and password on the
authentication dialog box.
2
For Windows Vista, when the [AutoPlay] dialog box (*1) appears, run the setup program, and
then click [Continue] to proceed when the [User Account Control] dialog box (*2) appears.
For Windows 2000/XP and Macintosh, skip this step and go to step 3.
3
Click [Easy Install] on the main menu (*3).
4
Click [Install] to start installation.
Carefully read the License Agreement, and then click [Yes] to proceed.
5
Follow the on-screen instructions to perform the installation.
When the Registration dialog box appears, follow the on-screen instructions to ensure product support.
6
When the installation is complete, click [Restart] to restart your computer.
After restarting the computer, "Solution Menu" will appear. Refer to the last part of the "Try Scanning"
description.
Preparing the Scanner
1
Slide the lock switch on the bottom of the scanner toward the unlock mark (
).
•
Always lock the scanner when carrying or transporting it.
2
Connect the scanner to the computer with the supplied USB cable.
•
Only use the USB cable provided with the scanner. Use of other cables may lead to a malfunction.
•
The scanner does not have a power switch. The power is activated as soon as the computer is turned on.
•
When the scanner is connected to the USB 1.1 port and "HI-SPEED USB Device Plugged into non-HI-
SPEED USB Hub" message appears, ignore the message. The scanner operates in this condition without
problems.
Try Scanning
1
Place a document on the document glass and close the document cover.
2
Start ArcSoft PhotoStudio.
For Windows: Select [Start]-[(All) Programs]-[ArcSoft PhotoStudio 5.5], then click [PhotoStudio 5.5].
For Macintosh: Open [Applications]-[PhotoStudio] folders, then double-click the [PhotoStudio] icon.
3
Click [File] menu, [Select Source] and select the scanner model.
For Windows: Do not select the one that includes [WIA] in the model name.
4
Click the acquire icon
to start ScanGear.
5
Select the type of document you are scanning in [Select Source] and click [Preview].
6
Click [Scan] to start scanning.
•
Do not move the scanner while it is operating.
7
When prompted to close ScanGear, click [OK].
8
Save the scanned image in ArcSoft PhotoStudio and close the window.
<Solution Menu>
You can select MP Navigator EX, the Scanning Guide (on-screen manual), or the Online Registration.
Using the Scanner Buttons
See the back page for the instructions for "Scanning in the upright position".
Quick Start Guide
*1
*2
*3
Bottom
Top
COPY Button
Prints (copies) the scanned image with a printer.
PDF Button
Saves the scanned image as a PDF file.
PHOTO Button
Opens the scanned image in the bundled
application program, ArcSoft PhotoStudio.
E-MAIL Button
Attaches the scanned image to a new e-mail
message.
•
For Mac OS X v.10.3.x/10.2.8 or later: Refer to Other Scanning Methods in the Scanning Guide (on-screen
manual) before using.
QT5-1318-V01
XXXXXXXX
©CANON INC. 2007
PRINTED IN VIETNAM