Canon D340 imageCLASS D340 Set-Up Sheet
Canon D340 - ImageCLASS B/W Laser Manual
 |
UPC - 013803082364
View all Canon D340 manuals
Add to My Manuals
Save this manual to your list of manuals |
Canon D340 manual content summary:
- Canon D340 | imageCLASS D340 Set-Up Sheet - Page 1
the instructions in this Setup Sheet before referring to any other documentation. Unpack the machine and its components. Check that you have the following: ● Machine ● Cassette/Multi-purpose tray ● Document feeder tray ● Canon S35 Cartridge ● POWER CORD ● DOCUMENTATION (Setup Sheet, Basic Guide - Canon D340 | imageCLASS D340 Set-Up Sheet - Page 2
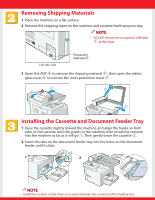
open the platen glass cover to remove the inner protection sheet . Installing the Cassette and Document Feeder Tray 1 Raise the cassette slightly toward the machine, and align the hooks on both sides of the cassette with the guides in the machine, then install the cassette into the machine as far - Canon D340 | imageCLASS D340 Set-Up Sheet - Page 3
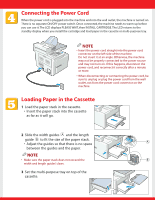
the machine needs to warm up before you can use it. The LCD displays PLEASE WAIT, then INSTALL CARTRIDGE. The LCD returns to the standby display when you install the cartridge and load paper in the cassette or multi-purpose tray. NOTE • Insert the power cord straight into the power cord connector on - Canon D340 | imageCLASS D340 Set-Up Sheet - Page 4
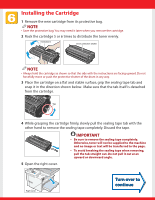
Installing the Cartridge 1 Remove the new cartridge from its protective bag. NOTE • Save the protective bag. You may need it later when you remove the cartridge. 2 Rock the cartridge 5 or 6 times to distribute the toner evenly. Instructions Drum protective shutter NOTE • Always hold the - Canon D340 | imageCLASS D340 Set-Up Sheet - Page 5
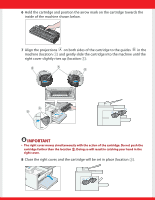
towards the inside of the machine shown below. 7 Align the projections on both sides of the cartridge to the guides in the machine (location 1) and gently slide the cartridge into the machine until the right cover slightly rises up (location 2). IMPORTANT • The right cover moves simultaneously - Canon D340 | imageCLASS D340 Set-Up Sheet - Page 6
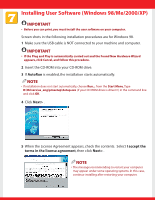
98/Me/2000/XP) IMPORTANT • Before you can print, you must install the user software on your computer. Screen shots in the following installation procedures are for Windows 98. 1 Make sure the USB cable is NOT connected to your machine and computer. IMPORTANT • If the Plug and Play is automatically - Canon D340 | imageCLASS D340 Set-Up Sheet - Page 7
6 Check Install Printer Driver through a USB Connection, then click Next> . When the screen (on the upper right) appears, follow the procedure below 6-1 Be sure to remove the transparent USB label . 6-2 Connect the USB cable to the machine and computer. The program will start installing the Printer - Canon D340 | imageCLASS D340 Set-Up Sheet - Page 8
CD-ROM into your CD-ROM drive. 2 On the Windows desktop, click Start, and then Click Run... 3 In the Run dialog box, type D:\Manuals and click OK ( where D: is the CD-ROM drive containing the installation disk ). The Printer Guide is available in the manuals folder. NOTE • If you do not have Adobe
-
 1
1 -
 2
2 -
 3
3 -
 4
4 -
 5
5 -
 6
6 -
 7
7 -
8
 |
 |

Setup Sheet
Setup Sheet
Thank you for purchasing the Canon imageCLASS D340.
To get your machine ready for use,please follow the instructions in this Setup Sheet before referring to any
other documentation.
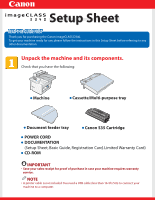
Unpack the machine and its components.
Check that you have the following:
IMPORTANT
•
Save your sales receipt for proof of purchase in case your machine requires warranty
service.
NOTE
• A printer cable is not included.You need a USB cable (less than 16.4ft./5m) to connect your
machine to a computer.
●
Machine
●
Document feeder tray
●
Canon S35 Cartridge
●
Cassette/Multi-purpose tray
●
POWER CORD
●
DOCUMENTATION
(Setup Sheet, Basic Guide, Registration Card, Limited Warranty Card)
●
CD-ROM