Canon D340 imageCLASS D320/D340 Basic Guide
Canon D340 - ImageCLASS B/W Laser Manual
 |
UPC - 013803082364
View all Canon D340 manuals
Add to My Manuals
Save this manual to your list of manuals |
Canon D340 manual content summary:
- Canon D340 | imageCLASS D320/D340 Basic Guide - Page 1
Basic Guide Please read this guide before operating this equipment. After you finish reading this guide, store it in a safe place for future reference. ENG - Canon D340 | imageCLASS D320/D340 Basic Guide - Page 2
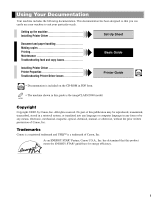
Installing Printer Driver Printer Properties Troubleshooting Printer Driver issues Printer Guide • Documentation is included on the CD-ROM in PDF form. • The machine shown in this guide is the imageCLASS D340 model. NOTE Copyright Copyright ©2003 by Canon, Inc. All rights reserved. No part of - Canon D340 | imageCLASS D320/D340 Basic Guide - Page 3
1 Subchapter J as a Class 1 laser product under the U.S. Department of Health and Human Services (DHHS) Radiation Performance Standard according to specified in this user's CAUTION guide may result in hazardous radiation exposure. This label is attached to the laser scanner unit inside the fax and is - Canon D340 | imageCLASS D320/D340 Basic Guide - Page 4
Users in the USA FCC NOTICE imageCLASS D320 : H12255 imageCLASS D340 : H12256 This device complies with Part 15 of the FCC Rules. Operation is the equipment. Canon U.S.A. Inc. One Canon Plaza, Lake Success, NY 11042, U.S.A. Tel No. (516) 328-5000 Users in Canada • This Class B digital apparatus meets - Canon D340 | imageCLASS D320/D340 Basic Guide - Page 5
(Ex. Windows 98 5-1 Canceling Printing 5-2 Changing Print Settings 5-2 Chapter 6: Status Monitor Checking the Status of Copy, Print and Report Jobs 6-1 Chapter 7: Maintenance Periodic Cleaning 7-1 Cleaning the Exterior 7-1 Cleaning the Scanning Area 7-1 When to Replace the Cartridge 7-3 Copy - Canon D340 | imageCLASS D320/D340 Basic Guide - Page 6
Troubleshooting Clearing Jams 8-1 Removing Jammed Paper from Inside the Main Unit 8-1 Removing Jammed Paper from the ADF (Only for the imageCLASS D340 model 8-4 LCD Messages 8-5 Paper Feeding Problems 8-7 Copying Problems 8-8 Print Quality Problems 8-9 Printing Problems 8-11 General Problems - Canon D340 | imageCLASS D320/D340 Basic Guide - Page 7
Indicates a caution concerning operations that may lead to injury to persons or damage to CAUTION property if not performed correctly. In order . Refer to the Printer Guide for details on the topic of the previous sentence. The word "machine" refers to the imageCLASS D340/D320 models. A setting that - Canon D340 | imageCLASS D320/D340 Basic Guide - Page 8
: In This Guide See Chapter 8, Troubleshooting, for common problems. On Your CD-ROM See the Printer Guide for help with the printer driver (CARPS). Customer Care Center For e-mail support, the latest driver downloads and answers to frequently asked questions, visit: www.usa.canon.com/consumer For - Canon D340 | imageCLASS D320/D340 Basic Guide - Page 9
. This list is intended to be a guide only. If you are uncertain about the legality of using your product to scan, print or otherwise reproduce any particular document, • Internal Revenue Stamps (canceled or uncanceled) • Selective Service or Draft Papers • Bonds or Other Certificates of Indebtedness - Canon D340 | imageCLASS D320/D340 Basic Guide - Page 10
provide trouble-free operation. If you encounter a problem with the machine's operation, try to solve it by using the information in Chapter 8. If you cannot solve the problem or if you think your machine needs servicing, contact your service representative. (→ p. vii) Important Safety Instructions - Canon D340 | imageCLASS D320/D340 Basic Guide - Page 11
a clean, dry cloth. • Do not plug the machine into the same circuit with appliances such as an air conditioner, television or copier. the instructions in the guides included with your machine. Adjust only those controls that are covered by the instructions in the guides since a need for servicing. 1-2 - Canon D340 | imageCLASS D320/D340 Basic Guide - Page 12
Do not place the cartridge in fire. Toner powder is flammable. WARNING • Keep the machine clean. Dust accumulation may prevent the machine from operating properly. • Do not service the machine yourself except as specifically described in this guide. If further WARNING servicing is required, contact - Canon D340 | imageCLASS D320/D340 Basic Guide - Page 13
scanning unit. LEFT COVER Open it when you output paper face up or remove jammed paper. DOCUMENT FEEDER TRAY Place documents for copying. DOCUMENT OUTPUT TRAY Documents come out here. SLIDE GUIDE Adjust to the width of the document. POWER CORD CONNECTOR USB INTERFACE CONNECTOR I imageCLASS D320 - Canon D340 | imageCLASS D320/D340 Basic Guide - Page 14
Right Side View I imageCLASS D340 I imageCLASS D320 PLATEN GLASS COVER Open it when you place documents on the platen glass for copying. PLATEN GLASS Place documents for copying. 1 OUTPUT TRAY Outputs printed pages. RIGHT COVER Open it when you install the cartridge, or remove jammed paper. MULTI- - Canon D340 | imageCLASS D320/D340 Basic Guide - Page 15
Determines the contents you set or register. Also, if the document being scanned stops in the ADF, pressing this key makes the document come out has a problem such as a paper jam. (The error message is displayed in the LCD.) Energy Saver key Sets or cancels the energy saver mode manually. The key - Canon D340 | imageCLASS D320/D340 Basic Guide - Page 16
Standby Display The standby display is as follows: Copy Ratio Paper Size Exposure Image Quality Copy Quantity 1 • When the machine is plugged in, the LCD displays PLEASE WAIT for a while, then the standby display NOTE appears. Introduction 1-7 - Canon D340 | imageCLASS D320/D340 Basic Guide - Page 17
jams occur - When no paper is loaded in the cassette or multi-purpose tray - When PRESS SET KEY is displayed Setting the Energy Saver Mode Manually 1 Press Energy Saver. • The LCD is turned off and the Energy Saver key lights up. • Right after the machine is restored from the energy saver - Canon D340 | imageCLASS D320/D340 Basic Guide - Page 18
your dealer or Canon Customer Relations. copiers or printers • Paper which has already been copied using a digital full-color copier copier malfunction. IMPORTANT Acceptable Paper Paper size Cassette/Multi-purpose Tray Letter, Legal, Executive, A4, B5, A5 Envelope : COM10, MONARCH, DL, ISO-C5 Free - Canon D340 | imageCLASS D320/D340 Basic Guide - Page 19
area where the machine can technically print from your computer. Printing area (light shade) : Canon recommends that you print within this area. I Paper 13/64" (5 mm) 15/64" mm) DL 13/32" (10 mm) • The scanning areas when you copy are a little larger than printing areas. (→ p. 3-2) NOTE 2-2 - Canon D340 | imageCLASS D320/D340 Basic Guide - Page 20
to fit the size of the on a flat surface to even the stack. paper stack. • Adjust the slide guides so that there is no space 2 between the slide guides and the edge of the paper stack. Paper Handling 2 Remove the multi-purpose tray. 3 Load the paper stack in the cassette. • Insert the - Canon D340 | imageCLASS D320/D340 Basic Guide - Page 21
quality of the copy image. 1 Arrange the stack of envelopes on a firm, clean surface, and press down firmly on the edges to make the folds crisp. • Adjust the slide guides to fit the size of the envelopes. • Adjust the slide guides so that there is no space between the slide guides and the edge of - Canon D340 | imageCLASS D320/D340 Basic Guide - Page 22
cassette. NOTE 1 Set the multi-purpose tray on the top of cassette. 4 Adjust the slide guides to fit the size of the paper. • Adjust the slide guides so that there is no space between the slide guides and the edge of the paper. 2 Paper Handling 2 Insert the paper with the print side up - Canon D340 | imageCLASS D320/D340 Basic Guide - Page 23
tray has priority over the cassette. NOTE 1 Set the multi-purpose tray. 3 Adjust the slide guides to fit the size of the envelope. • Adjust the slide guides so that there is no space between the slide guides and the edge of the envelope. 2 Insert an envelope with the print side up (a flap should - Canon D340 | imageCLASS D320/D340 Basic Guide - Page 24
the document in the ADF (only for the imageCLASS D340), the orientation of the document and . Document Paper ABC Copy • If the slide guides are not adjusted correctly IMPORTANT for the paper size sure to use the paper and transparencies recommended by Canon. (→ p. 2-1) • When making copies of - Canon D340 | imageCLASS D320/D340 Basic Guide - Page 25
Selecting the Paper Output Area Face down paper output delivers paper with the printed side down. Face up paper output delivers paper with the printed side up. Select the output area depending on your purpose by opening or closing the left cover. Open the left cover for face up paper output or close - Canon D340 | imageCLASS D320/D340 Basic Guide - Page 26
Paper Handling Face Down Paper Output Area The paper is delivered with the printed side down on the output tray. Paper is stacked in printed order. With left cover, closed. 2 • Do not place the output paper back on the output tray. • Do not place things other than paper on the output tray. - Canon D340 | imageCLASS D320/D340 Basic Guide - Page 27
2-10 - Canon D340 | imageCLASS D320/D340 Basic Guide - Page 28
) documents.) - Special types of paper (e.g. tracing paper*1, transparencies*1, etc.) - Book 3 Document Handling Size (W × L) imageCLASS D340 Max.: Letter size (8 1/2" × 11") (216 mm × 279 mm) imageCLASS D320 Max.: Legal size (8 1/2" × 14") (216 mm × 356 mm) Max. 8 1/2 × 14 in. (Max. 216 - Canon D340 | imageCLASS D320/D340 Basic Guide - Page 29
Problem ADF, do not use any of the following: * Only for the imageCLASS D340 model Wrinkled or creased paper Curled or rolled paper Torn paper Perforated are still wet Writing pad Scanned Area of a Document The shaded area in the illustration below shows the scanned area of a document. Make - Canon D340 | imageCLASS D320/D340 Basic Guide - Page 30
Setting Up Documents For scanning, place your documents on the platen glass or load them into the ADF*. Where you set up your documents depends on the size and type of documents you have. (→ p. 3-1) * Only for the imageCLASS D340 model 1 Open the platen glass cover. 2 Place your document face - Canon D340 | imageCLASS D320/D340 Basic Guide - Page 31
on a flat surface to even the stack. 4 Load the documents face up in the ADF. 1 2 3 3 Adjust the slide guides to the width of the document. DOCUMENT READY • The document is now ready for scanning. • For multiple page documents, the pages are NOTE fed one by one from the top of the stack - Canon D340 | imageCLASS D320/D340 Basic Guide - Page 32
The Paper Path of the Automatic Document Feeder (Only for the imageCLASS D340 model) 1 2 3 4 Scanning unit The machine scans documents from the first page. • When documents are set in the ADF, the scanning unit moves to the position shown in the figure above NOTE and it is fixed there. When - Canon D340 | imageCLASS D320/D340 Basic Guide - Page 33
3-6 - Canon D340 | imageCLASS D320/D340 Basic Guide - Page 34
ADF* or place it face down on the platen glass. * Only for the imageCLASS D340 model 2 Set copy features if you wish. You can set the features you cannot change settings NOTE during copying. 3 Press Start to begin copying. SCANNING Ex: COPY NO. 0001 • If the paper in the cassette or multi- - Canon D340 | imageCLASS D320/D340 Basic Guide - Page 35
Canceling the Copy Job I While Scanning Documents in the ADF (Only for the imageCLASS D340 model) 1 Press Stop/Reset. STOP KEY PRESSED PRESS SET KEY 2 Press Set. • The document that has stopped in the ADF will come out. I After Scanning Documents 1 Press Stop/Reset. CANCEL COPYING? - Canon D340 | imageCLASS D320/D340 Basic Guide - Page 36
slower than usual. * The paper type should be selected in the Additional Functions. • If you intend to make a copy and print with a thermal transfer printer on one sheet of paper, make the copy first. Failure to do so may make copies dirty or cause a paper jam. • When copying onto transparencies - Canon D340 | imageCLASS D320/D340 Basic Guide - Page 37
* When FREESIZE is selected, specify the horizontal and vertical size of the paper in millimeter (mm). Available setting range in horizontal size : 5" (127 mm) to 14" (356 mm) Available setting range in vertical size : 3" (76 mm) to 8 1/2" (216 mm) Refer to the following conversion table for inches - Canon D340 | imageCLASS D320/D340 Basic Guide - Page 38
Setting Enlarging/Reducing You can enlarge or reduce the copy size using preset copy ratios or using custom copy ratios. I Enlarging/Reducing Using Preset Copy Ratios 1 Press Enlarge/Reduce. 3 Press Set. PRESET RATIO Ex: - 100% + 78% Ex: 01 LTR TEXT 2 Use 4 (-) or e (+) to select the copy - Canon D340 | imageCLASS D320/D340 Basic Guide - Page 39
containing half-tones (i.e. printed photos). - PHOTO Suitable for making copies from photos printed on photographic paper. • Copy exposure automatically changes to NOTE manual mode when TEXT/PHOTO or PHOTO is set. • To sharpen the black and white contrast of an image, adjust the image as follows - Canon D340 | imageCLASS D320/D340 Basic Guide - Page 40
4 4 sets of copies Making Copies I When Loading Documents in the ADF (Only for the imageCLASS D340 model) 1 Load documents face up in the ADF. 2 Press Collate/2 on 1. 01 scanning from the first page of the document. After scanning, the scanned documents will come out in order. • When scanning - Canon D340 | imageCLASS D320/D340 Basic Guide - Page 41
COL. LTR TEXT • COL. appears in the LCD. 3 Use the numeric keys to set the copy quantity. (→ p. 4-3) 03 100% COL. LTR Ex: TEXT 4 Press Start. SCANNING Ex: COPY NO. 0015 • The machine begins scanning. 5 Place the next page of the document on the platen glass. NEXT PAGE :[START] FINISH - Canon D340 | imageCLASS D320/D340 Basic Guide - Page 42
4 1 2 2 Making Copies I When Loading Documents in the ADF (Only for the imageCLASS D340 model) 1 Press Collate/2 on 1 twice. 2ON1 Ex: 01 LTR TEXT • the scanning begins again automatically. • If MEMORY FULL and PRESS SET KEY appear in the LCD while scanning, the document being scanned stops - Canon D340 | imageCLASS D320/D340 Basic Guide - Page 43
in the LCD. 2 Use the numeric keys to set the copy quantity. (→ p. 4-3) 3 Place the first page of a document on the platen glass. 4 Press Start. SCANNING Ex: COPY NO. 0015 • The machine begins scanning. 5 Place the next page of the document on the platen glass. NEXT PAGE :[START] FINISH - Canon D340 | imageCLASS D320/D340 Basic Guide - Page 44
out automatically. All of the scanned documents will be erased if MEMORY FULL appears, so divide the document and copy each part separately, or select a the scanning begins again automatically. Also, check that the cassette or multi-purpose tray is not empty. * Only for the imageCLASS D340 - Canon D340 | imageCLASS D320/D340 Basic Guide - Page 45
I Deleting the Copy Job You Reserved 1 Press Stop/Reset while the machine is printing out. SELECT JOB TO CANCEL Ex: A0044 02 × 30 2 Use 4 (-) or e (+) to display the job to be deleted. SELECT JOB TO CANCEL Ex: 0045 01 × 20 3 Press Set. CANCEL COPYING? 4 Press 4 (-) for YES. • - Canon D340 | imageCLASS D320/D340 Basic Guide - Page 46
File menu, click [Set as Default] point to [Settings], then click [Printers]. or [Set as Default Printer]. 2 In the Printers window, click the machine icon. 5 Printing (Ex. Windows 98) 1 With your document open in the Windows 3 Click [OK] to print your document. 98 application, click the [Print - Canon D340 | imageCLASS D320/D340 Basic Guide - Page 47
profile, your settings are available only for the current print job. For details, on print profiles, refer to the Printer Guide. 1 With your document open in the Windows 98 application, click the [Print] command. 2 In the Print dialog box, click [Properties]. 3 In the Properties dialog box, define - Canon D340 | imageCLASS D320/D340 Basic Guide - Page 48
Chapter 6 Status Monitor Checking the Status of Copy, Print and Report Jobs Use Status Monitor to confirm or delete the following jobs. - Copy jobs - Print jobs - Report jobs I Confirming or Deleting a Copy Job 1 Press Status Monitor. 3 If you want to delete the copy job, press COPY STATUS Ex: - Canon D340 | imageCLASS D320/D340 Basic Guide - Page 49
I Confirming or Deleting Report Jobs 1 Press Status Monitor three times. REPORT STATUS Ex: A00 USER DATA LIST • If there is no job, NO REPORT JOBS NOTE EXIST is displayed. 2 If there are report jobs and if you want to delete them, press Set. CANCEL REPORT? 3 If you decide to delete - Canon D340 | imageCLASS D320/D340 Basic Guide - Page 50
cloth moistened with water or diluted dishwashing detergent solution. 7 Cleaning the Scanning Area Wipe the scanning area (shaded areas) with a clean, soft, lint-free cloth moistened with water, then wipe with a clean, soft, dry, lint-free cloth. Maintenance Platen Glass Cover Platen Glass 7-1 - Canon D340 | imageCLASS D320/D340 Basic Guide - Page 51
in the read area of the platen glass (shaded area). Use a clean soft cloth to wipe the read area clean. Take particular care to clean the locations where the black lines are appearing on copies. If you have trouble getting the glass clean, wipe with a cloth moistened with water or a mild neutral - Canon D340 | imageCLASS D320/D340 Basic Guide - Page 52
as shown so that the side with the written instructions Instructions facing upward. Do not forcefully move or push the protective shutter of the drum in any way. Rock the cartridge 5 or 6 times to distribute the toner evenly. 7 Re-install the cartridge in the machine. Then, make a few test - Canon D340 | imageCLASS D320/D340 Basic Guide - Page 53
cartridge depends in part on the copy exposure setting, room temperature and humidity. • If you copy a large number of originals which contain heavy print or many photographs, toner . • Always hold the cartridge as shown so that the side with the instructions are facing upward. Do not forcefully move or - Canon D340 | imageCLASS D320/D340 Basic Guide - Page 54
you do not have the protective bag or shipping box for the cartridge, store the cartridge in a dark location. Recycling Used Cartridges Canon has instituted a worldwide recycling program for cartridges called "The Clean Earth Campaign." This program preserves precious natural resources by utilizing - Canon D340 | imageCLASS D320/D340 Basic Guide - Page 55
, be sure to read the section "When to Replace the Cartridge". (→ p. 7-3) 1 Open the right cover. 4 Rock the cartridge 5 or 6 times to distribute the toner evenly. Instructions 2 Remove the cartridge from the machine. 5 Place the cartridge on a flat and stable surface. Grip the sealing tape tab - Canon D340 | imageCLASS D320/D340 Basic Guide - Page 56
towards the inside of the machine shown below. 8 Align the projections on both sides of the cartridge to the guides in the machine (location x) and gently slide the cartridge into the machine until the right cover slightly rises up (location y). • The right cover moves simultaneously with - Canon D340 | imageCLASS D320/D340 Basic Guide - Page 57
conserving an array of resources. Becoming a part of this worthwhile program is easy. When your cartridge is of no further use, simply follow the instructions detailed for U.S. or Canadian residents. We appreciate your support of The Canon Cartridge Recycling Program. Working together we can make - Canon D340 | imageCLASS D320/D340 Basic Guide - Page 58
encourage you to use this option as a more efficient way to ship cartridges. • Place as many cartridges as possible into one box. Carefully seal the box with tape; or • Call 1-800-OK-CANON to receive your free eight cartridges collection box. Option A-2: Multiple Box Return We encourage you to use - Canon D340 | imageCLASS D320/D340 Basic Guide - Page 59
. For location, please call 1-800-949-6660. By using either of the above methods of shipment, your used cartridge(s) will be forwarded to the Canon Cartridge Collection Center at no charge to you. For further information about the Clean Earth Campaign in the United States, please call: 1-800-OK - Canon D340 | imageCLASS D320/D340 Basic Guide - Page 60
cartridges) We encourage you to use this option as a more efficient way to ship cartridges. • Call 1-800-667-2666 to receive your free Canon For further information about The Clean Earth Campaign in Canada, please call or write to Canon. 1-800-667-2666 Canon Canada Inc. Corporate Customer - Canon D340 | imageCLASS D320/D340 Basic Guide - Page 61
tray. 3 Open the right cover. 4 Grip the end of the cartridge, and remove it from the machine. In order to avoid direct sunlight, put the removed cartridge in the protective bag that the cartridge was in when you purchased it. 7 Close the right cover. * Only for the imageCLASS D340 model 7-12 - Canon D340 | imageCLASS D320/D340 Basic Guide - Page 62
up the machine, as shown in the illustration above. * Only for the imageCLASS D340 model • When carrying this machine, be sure to hold it in the places as shown in the CAUTION illustration. Dropping the machine can cause personal injury. Transporting the Machine by Car 7 Pack the machine, using the - Canon D340 | imageCLASS D320/D340 Basic Guide - Page 63
7-14 - Canon D340 | imageCLASS D320/D340 Basic Guide - Page 64
warm water will set the toner and make it impossible to remove the toner stains. 1 Open the cartridge. • Remove watches and any bracelets or rings IMPORTANT when touching the inside of the machine. These items might be damaged if they come into contact with parts of inside the 8 Troubleshooting - Canon D340 | imageCLASS D320/D340 Basic Guide - Page 65
but has not entered the imaging area, pull out. the paper forwards and roll it inwards. • Do not pull the jammed paper upward; the IMPORTANT toner on the paper will stain the printer and cause a permanent reduction in print quality. • Do not pull the jammed paper upward; the IMPORTANT - Canon D340 | imageCLASS D320/D340 Basic Guide - Page 66
cartridge and close the IMPORTANT right cover, the machine should be ready for operating. If the machine returns to the ready state for operating, troubleshooting , ease the jammed paper loose and then pull it out of the printer. 12 For jams in the multi-purpose tray, remove the multi-purpose - Canon D340 | imageCLASS D320/D340 Basic Guide - Page 67
Removing Jammed Paper from the ADF (Only for the imageCLASS D340 model) When print media jams in the paper from the document output tray. 2 Widen the slide guides until they stop, remove the paper so as not to be caught by the slide guides. Open the ADF and gently remove the jammed paper from the - Canon D340 | imageCLASS D320/D340 Basic Guide - Page 68
Functions. it. Troubleshooting INSTALL CARTRIDGE The cartridge is not installed or not Install the cartridge correctly. installed correctly and copy each part separately. If MEMORY FULL and PRESS SET KEY appear while scanning documents using the ADF, the document being scanned stops in the - Canon D340 | imageCLASS D320/D340 Basic Guide - Page 69
can shift to the next job. If you use PRINTER RESET of the Additional Functions, all the print the scanning resumes automatically The paper in the cassette has run out, the toner problem, unplug the machine and call your service representative. *1 Only for the imageCLASS D340 model. *2 xxx stands - Canon D340 | imageCLASS D320/D340 Basic Guide - Page 70
Problems the cassette is loaded properly, and that the slide guides are adjusted correctly. (→ pp. 2-3 to 2-7) Sheets the machine. (→ Chapter 2) 8 Troubleshooting ❚ Transparencies do not feed correctly. color copiers. They will cause a paper jam. Please use transparencies recommended by Canon. ❚ - Canon D340 | imageCLASS D320/D340 Basic Guide - Page 71
the requirements for the machine. • Envelopes must be COM10, MONARCH, DL, ISO-C5. (→ p. 2-6) Copying Problems ❚ The machine will not make a copy. The cartridge may not be installed properly. • Make sure the cartridge is installed properly. (→ Set-Up Sheet) The sealing tape may not be removed from - Canon D340 | imageCLASS D320/D340 Basic Guide - Page 72
feed them in the ADF. The read area of the platen glass is dirty. • Clean the read area of the platen glass. (→ p. 7-2) • For additional troubleshooting → Print Quality Problems. NOTE Print Quality Problems ❚ The print quality is not clear, has missing dots or white streaks. The size, thickness - Canon D340 | imageCLASS D320/D340 Basic Guide - Page 73
❚ The copy images are partly missing or shaded when you make copies on thick paper. PAPER TYPE of PAPER SETTINGS of the Additional Functions may not be set correctly. • Select - Canon D340 | imageCLASS D320/D340 Basic Guide - Page 74
machine and wait approx. 3-5 minutes, then plug it in again. If the problem is fixed, the Alarm indicator will turn off, and the LCD will return to the LCD remains blank, unplug the machine, and call your service representative. Troubleshooting The Energy Saver key lights up. • The energy saver - Canon D340 | imageCLASS D320/D340 Basic Guide - Page 75
call your service representative, make sure you have the following information: • Product name imageCLASS D340/D320 • Serial number The serial number is on the label located at the back of the machine. • Printer driver version number (→ Printer Guide) • Place of purchase • Nature of problem • Steps - Canon D340 | imageCLASS D320/D340 Basic Guide - Page 76
. IMAGEQUALITY 4 Use 4 (-) or e (+) to select the sub menu you want to change. COPY SETTINGS Ex: 2.STANDARD EXPOSURE 5 Press Set. STANDARD EXPOSURE Ex: MANUAL • Details for sub menus, → pp. 9-2 to 9-4. NOTE • After selecting the item or value with 4 (-) or e (+), press Set to enter the setting - Canon D340 | imageCLASS D320/D340 Basic Guide - Page 77
PAPER SIZE Name PAPER TYPE COMMON SETTINGS Name PRINT EXPOSURE TONER SAVER MODE ON OFF DISPLAY LANGUAGE Descriptions Selects the paper to one of five levels. (center) Sets the toner saver mode. The toner saver mode is turned on. The toner saver mode is turned off. Select the message language - Canon D340 | imageCLASS D320/D340 Basic Guide - Page 78
Select the auto or manual mode of exposure setting. The exposure is adjusted automatically. The exposure is adjusted manually. The exposure can setting is in bold face.) *1 STANDARD EXPOSURE automatically changes to MANUAL when TEXT/PHOTO or PHOTO is selected. *2 STD. IMAGEQUALITY automatically - Canon D340 | imageCLASS D320/D340 Basic Guide - Page 79
PRINT LISTS Name USER DATA Descriptions Sets the standard number of pages of the printer function. 01 to 99 (01) Sets either printing with skipping an error error skip is off. Skip the error and shift to the next job manually. Sets the length of time before the machine returns an error when no - Canon D340 | imageCLASS D320/D340 Basic Guide - Page 80
) (including cartridge) imageCLASS D320: Approx. 31.9 lb (14.5 kg) (including cartridge) * Only for the imageCLASS D340 model Features are subject to change without notice due to product improvements. For high-quality copies, we recommended using paper and transparencies recommended by Canon. Some - Canon D340 | imageCLASS D320/D340 Basic Guide - Page 81
A-2 - Canon D340 | imageCLASS D320/D340 Basic Guide - Page 82
PRINTING? message 6-1 CANCEL REPORT? message 6-2 Cartridge handling 7-4 replacing 7-3, 7-6, 7-7 storage 7-5 Cassette 1-5, 2-3 CHECK DOCUMENT message 8-5 CHECK PRINTER message 8-5 Cleaning machine' exterior 7-1 periodic 7-1 scanning area 7-1 Collate copy 4-7 key 1-6 COMMON SETTINGS - Canon D340 | imageCLASS D320/D340 Basic Guide - Page 83
9-4 Exposure automatically 4-6 key 1-6 manually 4-6 F Feeder 1-4 G Guides document 1-4, 3-4 H Handling, safety instructions 1-3 I Image Quality key 1-6, 4-6 Image Quality, setting 4-6 INCORRECT PAPER SIZE message 8-5 Indicator Memory/Alarm 1-6 INSTALL CARTRIDGE message 8-5 J Jams clearing - Canon D340 | imageCLASS D320/D340 Basic Guide - Page 84
print problems 8-9 Quantity document 3-1 setting 4-3 R REC. PAPER JAM message 8-6 Replacing cartridge 7-3, 7-6, 7-7 Reserve Copy 4-11 I Right cover 1-5, 7-6, 8-1 S Safety instructions handling 1-3 location 1-1 maintenance 1-3 power supply 1-2 Scan area 3-2 SCANNING message 8-6 Set - Canon D340 | imageCLASS D320/D340 Basic Guide - Page 85
PRESS SET KEY message 8-6 Stop/Reset key 1-6, 4-1 SUPPLY REC. PAPER message 8-6 SYSTEM ERROR message 8-6 T TIMER SETTINGS 9-4 Toner in the cartridge 7-3 TONER SAVER MODE setting 9-2 Transparencies 2-1, 3-1 Tray multi-purpose 1-5 output 1-5 U USB interface connector 1-4 USER DATA setting - Canon D340 | imageCLASS D320/D340 Basic Guide - Page 86
N.V. Bovenkerkerweg 59-61 P.O. Box 2262, 1180 EG Amstelveen, The Netherlands CANON FRANCE S.A. 17, quai du Pr sident Paul Doumer 92414 Courbevoie Cedex, France CANON COMMUNICATION & IMAGE FRANCE S.A. (Pour les utilisateurs de l'imprimante laser uniquement) 102, avenue de G n ral de Gaulle 92257 La
-
 1
1 -
 2
2 -
 3
3 -
 4
4 -
 5
5 -
 6
6 -
 7
7 -
8
-
9
-
10
-
11
-
12
-
13
-
14
-
15
-
16
-
17
-
18
-
19
-
20
-
21
-
22
-
23
-
24
-
25
-
26
-
27
-
28
-
29
-
30
-
31
-
32
-
33
-
34
-
35
-
36
-
37
-
38
-
39
-
40
-
41
-
42
-
43
-
44
-
45
-
46
-
47
-
48
-
49
-
50
-
51
-
52
-
53
-
54
-
55
-
56
-
57
-
58
-
59
-
60
-
61
-
62
-
63
-
64
-
65
-
66
-
67
-
68
-
69
-
70
-
71
-
72
-
73
-
74
-
75
-
76
-
77
-
78
-
79
-
80
-
81
-
82
-
83
-
84
-
85
-
86
 |
 |

ENG
Please read this guide before operating this equipment.
After you finish reading this guide, store it in a safe place for future reference.
Basic Guide
Basic Guide