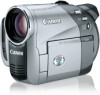
Canon DC50 DC220 DC230 Instruction Manual
Canon DC50 Manual
 |
UPC - 013803079487
View all Canon DC50 manuals
Add to My Manuals
Save this manual to your list of manuals |
Canon DC50 manual content summary:
- Canon DC50 | DC220 DC230 Instruction Manual - Page 1
Pour d'autres détails référezvous au guide d'installation. Lea también el siguiente manual de instrucciones (versión electrónica en archivo PDF). Para mayores detalles, refiérase a la guía de instalación. • Digital Video Software Digital Video Software Instruction Manual Version 25 English NTSC - Canon DC50 | DC220 DC230 Instruction Manual - Page 2
INTERFERENCE, USE THE RECOMMENDED ACCESSORIES ONLY. COPYRIGHT WARNING: Unauthorized recording of copyrighted materials may infringe on the rights of copyright owners and be contrary to copyright laws. DVD Camcorder, DC50/DC220/DC230 A systems This device complies with Part 15 of the FCC Rules - Canon DC50 | DC220 DC230 Instruction Manual - Page 3
the word "product" refers to the Canon DVD Camcorder DC50/ DC220/DC230 A and all its accessories. 1 Read Instructions - All the safety and operating instructions should be read before the product is operated. 2 Retain Instructions - The safety and operating instructions should be retained for future - Canon DC50 | DC220 DC230 Instruction Manual - Page 4
) GROUND CLAMPS POWER SERVICE GROUNDING ELECTRODE SYSTEM (NEC ART 250. PART H) 14 Lightning power supply between 100 and 240 V AC. For areas where 120 V AC power is not used, you will need a special plug adapter. Contact your nearest Canon Service Center for further information. This Class B digital - Canon DC50 | DC220 DC230 Instruction Manual - Page 5
first insert a brand new DVD-RW disc, the camcorder will automatically display the initialization screen where you can select the disc specification for the disc. VIDEO mode: Once finalized2, discs recorded in VIDEO mode can be played back in most common DVD players offering the best compatibility - Canon DC50 | DC220 DC230 Instruction Manual - Page 6
duallayered discs using Canon DVD-R DL54 discs and Verbatim DVD-R DL discs. For further details, contact directly the manufacturer's customer support center. Note that attempting to record or play with this camcorder DVD discs that were recorded, initialized or finalized with other digital devices - Canon DC50 | DC220 DC230 Instruction Manual - Page 7
finalize a DVD-R DL disc, the camcorder has to process both layers. Therefore, and depending on the amount of free space on the disc, this process may be lengthy. 3 Playback cannot be guaranteed with all external DVD devices. 4 You will need to unfinalize the disc first. 5 The MyDVD for Canon - Canon DC50 | DC220 DC230 Instruction Manual - Page 8
DVD disc 5 About this Manual About the Joystick and the Joystick Guide 11 About the Power Switch 12 About the Operating Modes 12 Getting to Know the Camcorder Supplied Accessories 14 Components Guide 15 Components Guide 17 Screen Displays 20 Preparations Getting Started Charging the Battery - Canon DC50 | DC220 DC230 Instruction Manual - Page 9
Manual Exposure Adjustment 55 Manual Focus Video Light 65 Self Timer ...66 Digital Playing Back the Disc on an External Device Finalizing the Disc 77 Playing Back your Disc on a DVD Player or a Computer's DVD Drive .........78 Unfinalizing the Disc - Additional Recordings on a Finalized Disc - Canon DC50 | DC220 DC230 Instruction Manual - Page 10
or Digital Video Recorder 81 Video Input Recording 82 Connecting to a Computer PC Connection Diagrams 83 Transferring Recordings 83 Transferring Recordings Using Windows Explorer 83 Transferring Recordings Using MyDVD for Canon 84 Transferring Still Images - Direct Transfer 89 Transfer Orders - Canon DC50 | DC220 DC230 Instruction Manual - Page 11
Manual 11 About this Manual About this Manual Thank you for purchasing the Canon DC50/DC220/DC230. Please read this manual carefully before you use the camcorder and retain it for future reference. Should your camcorder fail to operate correctly, refer to the Troubleshooting Joystick Guide Push the - Canon DC50 | DC220 DC230 Instruction Manual - Page 12
. NEXT When the joystick guide contains multiple 'pages', [NEXT] and the page number icon ( ) will appear at the bottom position PLAY - green indicator). About the Operating Modes The camcorder's operating mode is determined by the positions of the power switch and the / switch. In the manual - Canon DC50 | DC220 DC230 Instruction Manual - Page 13
Manual 13 Trademark Acknowledgements • miniSD™ is a trademark of SD Card Association. • Windows® is a registered trademark of Microsoft Corporation in the United States and/or other countries. • Macintosh and Mac THE MPEG-2 STANDARD FOR ENCODING VIDEO INFORMATION FOR PACKAGED MEDIA IS EXPRESSLY - Canon DC50 | DC220 DC230 Instruction Manual - Page 14
Battery CR2025 for Wireless Controller STV-250N Stereo Video IFC-300PCU Cable USB Cable Blank DVD-R Disc (8 cm Mini DVD) DIGITAL VIDEO SOLUTION DISK Software CD-ROM* Roxio MyDVD for Canon Software CD-ROM * Includes the electronic version of the Digital Video Software instruction manual on PDF - Canon DC50 | DC220 DC230 Instruction Manual - Page 15
Introduction Getting to Know the Camcorder 15 Components Guide Left side view Right Side View FUNC. button . (battery release) switch ( 23) RESET button ( 98) Serial number Battery attachment unit ( 23) Disc compartment cover ( 26) Grip belt ( 28) DC IN terminal ( 23) Flash ( 64) Mini video light - Canon DC50 | DC220 DC230 Instruction Manual - Page 16
16 Getting to Know the Camcorder Back view Top view Bottom view PLAY mode indicator (green) ( 12) Joystick ( 11) CAMERA mode /still images) switch ( 12) DISC access indicator ( 34, 36) / CHG (charge) indicator ( 23) Start/stop button ( 34) Power switch ( 12) OPEN (disc cover) switch ( 26) Grip belt - Canon DC50 | DC220 DC230 Instruction Manual - Page 17
card slot cover/Terminal cover USB terminal ( 83) BATT. (battery release) switch ( 23) RESET button ( 98) Serial number Battery attachment unit ( 23) Lens cover switch ( 34, 36) ( open, closed) Disc compartment cover ( 26) Grip belt ( 28) DC IN terminal ( 23) Remote sensor ( 29) Stereo microphone - Canon DC50 | DC220 DC230 Instruction Manual - Page 18
18 Getting to Know the Camcorder Back view Top view Bottom view PLAY mode indicator (green) ( 12) Joystick ( 11) CAMERA mode /still images) switch ( 12) DISC access indicator ( 34, 36) / CHG (charge) indicator ( 23) Start/stop button ( 34) Power switch ( 12) OPEN (disc cover) switch ( 26) Grip belt - Canon DC50 | DC220 DC230 Instruction Manual - Page 19
Getting to Know the Camcorder 19 Introduction Wireless Controller WL-D86 START/STOP button ( 34) FUNC. )/ Index screen page up/down ( 39) Reverse SEARCH button ( 40) / Reverse SLOW button ( 40) PLAY button ( 39) PAUSE button ( 39) STOP button ( 39) PHOTO button ( 36) Zoom buttons ( - Canon DC50 | DC220 DC230 Instruction Manual - Page 20
Image effect ( 58) Digital effects ( 66) Recording mode ( 44) Still image quality/size (simultaneous recording) ( 60) Remote sensor off** ( 50) Self timer ( 66) Disc type DVD-R, DVD-RW ( 5) DVD-R DL, Disc specification (VIDEO mode, VR mode) ( 5) Finalized disc mark ( 77) Manual focus ( 56 - Canon DC50 | DC220 DC230 Instruction Manual - Page 21
next to the number of images available while the camcorder is writing on the memory card or disc. Remaining battery charge estimate • When " " starts flashing in red replace the battery pack with a fully charged one. • When you attach an empty battery pack, the power may turn off without displaying - Canon DC50 | DC220 DC230 Instruction Manual - Page 22
to Know the Camcorder Playing Movies (During Playback) Disc operation Playback time (hours : minutes : seconds) Scene number Data code ( 64) Viewing Still Images Image number ( 50) Current image / Total number of images recorded on the card, recorded on the disc Histogram ( 64) Image - Canon DC50 | DC220 DC230 Instruction Manual - Page 23
Preparations Getting Started Getting Started Charging the Battery Pack The camcorder can be powered with a battery pack or directly using the compact power adapter. Charge the battery pack before use. Getting Started 23 CHG (charge) indicator Preparations DC IN terminal BATT. switch BATT. switch - Canon DC50 | DC220 DC230 Instruction Manual - Page 24
the battery pack, and pull out the battery pack holding it from the ridge on its bottom part. IMPORTANT Turn off the camcorder before connecting or disconnecting the compact power adapter. After you turn off the power switch to , important file allocation data is updated on the disc. Be - Canon DC50 | DC220 DC230 Instruction Manual - Page 25
Typical* 135 min. 65 min. 130 min. 65 min. 125 min. 60 min. 165 min. Preparations Battery Pack BP-208 Recording Mode XP SP LP Recording Times Maximum Typical* Maximum Typical* Maximum Typical* Viewfinder 115 min. recording with repeated operations such as start/stop, zooming, power on/off. - Canon DC50 | DC220 DC230 Instruction Manual - Page 26
once the record pause indication appears. Select ( ) the desired disc specification and press ( ). For a comparison between the [VIDEO] and [VR] specifications, see How to select a DVD disc ( 5). You will be asked to confirm the disc specification you selected. Select ( ) [YES] and press ( ) to - Canon DC50 | DC220 DC230 Instruction Manual - Page 27
When you slide OPEN after making a recording, important file allocation data is updated on the disc before the disc cover opens. While the DISC access indicator is on or flashing do not subject the camcorder to shocks such as forcefully laying it on a table. Preparations 1 Slide OPEN fully in the - Canon DC50 | DC220 DC230 Instruction Manual - Page 28
card once to release it, and then pull the card out. IMPORTANT Make sure to initialize all memory cards before using them with this camcorder ( 76). Memory cards have front and back sides that are not interchangeable. Inserting a memory card facing the wrong direction can cause a malfunction of the - Canon DC50 | DC220 DC230 Instruction Manual - Page 29
Tab 1 Press the tab in the direction of the arrow and pull out the battery holder. 2 Place the lithium button battery with the + side facing up. 3 Insert the battery holder. Point the controller at the camcorder's remote sensor when you press the buttons. NOTES The wireless controller may not - Canon DC50 | DC220 DC230 Instruction Manual - Page 30
between the normal and bright settings. NOTES This setting does not affect the brightness of the recording or the viewfinder screen. Using the bright setting will shorten the effective usage time of the battery. - Canon DC50 | DC220 DC230 Instruction Manual - Page 31
Follow the additional operation guides that will appear on the screen (such as the icon, small arrows, etc.). 4 Press FUNC. to save the settings and close the menu. You can press FUNC. to close the menu at any time. 1 Press FUNC. . During the playback of a disc recorded in VIDEO mode, pressing FUNC - Canon DC50 | DC220 DC230 Instruction Manual - Page 32
to the menu item to change the setting. The displays and that appear in some menu screens refer to the name of buttons on the camcorder and will not change, regardless of the language selected. - Canon DC50 | DC220 DC230 Instruction Manual - Page 33
to close the menu. IMPORTANT When you do not use the camcorder for about 3 months, the built-in rechargeable lithium battery may discharge completely and the date and time setting may be lost. In such case, recharge the built-in lithium battery ( 109) and set the time zone, date and time again. You - Canon DC50 | DC220 DC230 Instruction Manual - Page 34
34 Recording BRaesciocrdFiunngctions Recording Shooting Video Before You Begin Recording Make a test recording first to check if the camcorder operates correctly. Since recordings made on a DVD-R or DVD-R DL disc cannot be deleted, we recommend you use a DVD-RW disc to make the test recordings. ( - Canon DC50 | DC220 DC230 Instruction Manual - Page 35
set to AUTO, only one joystick guide will appear. • The camcorder plays back the last scene (but without sound) and returns to record pause mode. • While reviewing the scene, select ( ) the icon and press ( ) to return to the recording mode. • If you are using a DVD-RW disc, you can also delete the - Canon DC50 | DC220 DC230 Instruction Manual - Page 36
to [ OFF] ( 46), you can have a wider view angle. Playing back a widescreen recording: TV sets compatible with the Video ID-1 system will automatically switch to wide (16:9) mode. Otherwise, change the aspect ratio of the TV manually. To play back on a TV with normal aspect ratio (4:3) change the - Canon DC50 | DC220 DC230 Instruction Manual - Page 37
on the media selected. In playback mode, the operating mode symbol will change to (DISC stills) or (CARD stills), respectively. NOTES If the subject is not suitable for autofocus, turns yellow. Adjust the focus manually ( 56). When the subject is too bright, "OVEREXP." starts flashing. In - Canon DC50 | DC220 DC230 Instruction Manual - Page 38
digital zoom is also available ( 46). Optical zoom Digital zoom* 10x 200x * only. 35x 1,000x Zoom out [ SPEED 3] (when [ VARIABLE] is selected). When set to [ VARIABLE], the zoom speed will a picture or record video. When you press QUICK START instead of turning off the camcorder, you can get - Canon DC50 | DC220 DC230 Instruction Manual - Page 39
focus (AF). - Manual exposure adjustment returns to automatic exposure. - Zoom position returns to full wide angle W. In standby mode, the camcorder consumes only half the power used in record pause mode. Using this mode you can save energy when using a battery pack. The camcorder will shut off if - Canon DC50 | DC220 DC230 Instruction Manual - Page 40
previous scene. TO ADJUST THE VOLUME The camcorder plays the sound with the built-in speaker. The sound will be muted when you close the LCD panel or connect the stereo video cable to the AV terminal. During the playback of a scene: 1 If the joystick guide does not appear on screen, press ( ) to - Canon DC50 | DC220 DC230 Instruction Manual - Page 41
the disc or memory card. - Do not disconnect the power source or turn off the camcorder. - Do not change the position of the / switch or the operating mode. Slideshow SLIDESHOW 1 Move the power switch to ON, then slide it down toward MODE and release it to set the camcorder in PLAY mode - Canon DC50 | DC220 DC230 Instruction Manual - Page 42
screen and display the image. You can press ( ) again to hide the joystick guide. Joystick 1 Move the zoom lever toward T. • The image is magnified by will appear for images that cannot be enlarged. 2 Select the part of the image to be magnified with the joystick. • Move ( , ) the frame to the part - Canon DC50 | DC220 DC230 Instruction Manual - Page 43
SKIN DETAIL], [ CUSTOM]* * Available only with the . Drive mode ( 62) Mode switch: P [ SINGLE], [ CONT.SHOOT.], [ HISPEED CONT.SHOOT.], [ AEB] Digital effects ( 66) Light metering mode ( 61) Mode switch: P [ EVALUATIVE], [ CENT.WEIGHT.AVERAGE], [ SPOT] White balance ( 57) Mode switch - Canon DC50 | DC220 DC230 Instruction Manual - Page 44
PLAY], [ LONG PLAY] The table below gives the approximate recording times with a brand new DVD disc (on a single recording side). Recording Mode Disc Type DVD-R, DVD-RW DVD The camcorder uses a variable bit rate (VBR) when encoding the video data so the actual recording times will vary depending - Canon DC50 | DC220 DC230 Instruction Manual - Page 45
can continue to select the still images you want to mark with a transfer order. COPY [ ] ( 74) Copy a single still image from the disc to the memory card. SLIDESHOW ( 41) Setup Menus Camera Setup (Digital Zoom, Image Stabilizer, etc.) CAMERA SETUP A.SL SHUTTER [CANCEL], [START] Mode switch - Canon DC50 | DC220 DC230 Instruction Manual - Page 46
processed, so the image resolution will deteriorate the more you zoom in. About the color of the zoom indicator: Optical Digital Zoom Zoom Zoom Indicator White Light blue Dark blue DC50 10x 10x - 40x 40x 200x DC220/DC230 35x 35x - 105x 105x 1000x The digital zoom cannot be used with the - Canon DC50 | DC220 DC230 Instruction Manual - Page 47
auto exposure bracketing). Disc Operations (Photomovie, Finalize, etc.) DISC OPERATIONS DISC INFO Displays a screen where you can verify the details regarding the disc. The disc information includes the disc title, the disc type (DVD-R, DVD-R DL or DVD-RW), the disc specification (VIDEO mode or VR - Canon DC50 | DC220 DC230 Instruction Manual - Page 48
NO], [YES] UNFINALIZE ( 79) Still Image Operations (Card Initialization, Disc-Card Copy, etc.) STILL IMG OPER. ORD.ALL ERASE ( 72) ( 97) Disc type: • VIDEO mode • Finalized [NO], [YES] MOVIES ALL DEL ( 70) [NO], [YES] ORD.ALL ERASE Disc type: • VR mode [NO], [YES] This option is available - Canon DC50 | DC220 DC230 Instruction Manual - Page 49
or gray. Use the markers as a reference to make sure your subject is framed correctly (vertically and/ or horizontally). Using the markers will not affect the recordings on the disc or memory card. [ ON], [ OFF] When the LCD panel is rotated 180 degrees to face the subject, most screen displays - Canon DC50 | DC220 DC230 Instruction Manual - Page 50
[ OFF] In order to save power when the camcorder is powered by a battery pack, it will automatically shut off if left without any operation for 5 minutes. [ RESET], [ CONTINUOUS] Select the image numbering method to be used on a new memory card or disc. Images are automatically assigned consecutive - Canon DC50 | DC220 DC230 Instruction Manual - Page 51
to the type of television to which you will connect the camcorder. [ NORMAL TV]: TV sets with 4:3 if you play back a recording made in widescreen (16:9) the picture displayed on the LCD screen will be smaller camcorder's firmware. This menu option is usually grayed out. Press ( ) to enter - Canon DC50 | DC220 DC230 Instruction Manual - Page 52
Flexible Recording Programs [ PROGRAM AE] ( 53) [ SHUTTER-PRIO. AE] ( 53) [ APERTURE-PRIO. AE]* ( 53) Special Scene Recording Programs: [ PORTRAIT] The camcorder uses a large aperture, achieving a focus on the subject while blurring other distracting details. [ SNOW] Use this mode to record in - Canon DC50 | DC220 DC230 Instruction Manual - Page 53
a landscape. TO SET THE SHUTTER SPEED OR APERTURE VALUE When you select [ SHUTTERPRIO.AE] or [ APERTUREPRIO.AE], a numeric value will appear next to the recording program icon. 1 If the joystick guide appears on the screen, press ( ) to hide it. When the numeric value can be adjusted, small arrows - Canon DC50 | DC220 DC230 Instruction Manual - Page 54
250 second, etc. Available Aperture Values The actual range of values available for selection will vary depending on the initial zoom position. [1.8], [2.0], [2.4], [2.8], [3.4], [4.0], [4.8], [5.6], [6.7], [8.0] [2.8], [3.4], [4.0], [4.8], [5.6], [6.7], [8.0] Special Scene: Recording Programs to - Canon DC50 | DC220 DC230 Instruction Manual - Page 55
other modes. In such case, adjust the focus manually. [ SNOW]/[ BEACH] - The subject may become overexposed the screen. [ FIREWORKS] - To avoid camcorder shake, we recommend using a tripod. Make on the joystick guide, repeatedly push the joystick ( ) toward [NEXT] to display the joystick guide in the - Canon DC50 | DC220 DC230 Instruction Manual - Page 56
case, focus manually. Reflective surfaces will return the camcorder to autofocus. Subjects with low contrast or without vertical lines Fast Moving Subjects Through wet windows Night Scenes NOTES The camcorder will switch: P FOCUS NEXT 1 If the joystick guide does not appear on screen, press ( ) - Canon DC50 | DC220 DC230 Instruction Manual - Page 57
white balance function helps you accurately reproduce colors under different lighting conditions so that white objects will always look truly white balance when the lighting condition changes. - Turn off the digital zoom. The camcorder retains the custom white balance setting even if you turn it - Canon DC50 | DC220 DC230 Instruction Manual - Page 58
58 Adjusting the Picture: Exposure, Focus and Color Image Effects You can use the image effects to change the color saturation and contrast to record images with special color effects. POINTS TO CHECK ( 12) Mode switch: P Options Default value [ IMAGE EFFECT OFF] Records with no image - Canon DC50 | DC220 DC230 Instruction Manual - Page 59
number of still images on a disc Disc Type/ Disc Specification DVD-R or DVD-RW VIDEO mode DVD-R DL VIDEO mode Image Quality1 → Image Size images that can be recorded on the disc. However, the maximum number of remaining still images displayed on the screen will be 9999. Advanced Functions - Canon DC50 | DC220 DC230 Instruction Manual - Page 60
the memory card or disc (Windows: more than 1,800 images; Macintosh: more than 1,000 images), you may not be able to download images to a computer. Try using a card reader to download the still images recorded on the memory card. Connection to a PictBridge compatible printer will not work when the - Canon DC50 | DC220 DC230 Instruction Manual - Page 61
recording program. FUNC. ( 31) NOTES In the [ FIREWORKS] recording program the focus priority is automatically set to [ OFF]. Light Metering Mode The camcorder measures the light reflected from the subject in order to calculate the optimal exposure settings. Depending on the subject, you may want - Canon DC50 | DC220 DC230 Instruction Manual - Page 62
High speed 5 frames S 640x480 60 images These figures are approximate and vary with the recording conditions and subjects. The actual number of frames per second will be lower when " " (camcorder shake warning) is displayed on the screen. - Canon DC50 | DC220 DC230 Instruction Manual - Page 63
as long as you hold PHOTO pressed down. For the number of frames per second, refer to the table below. [ AEB] (Auto Exposure Bracketing) The camcorder records a still image in three different exposures (dark, normal, light in 1/2 EV steps), allowing you to choose the shot you like the best. Other - Canon DC50 | DC220 DC230 Instruction Manual - Page 64
the disc type icon and the and icons will select the data code to be displayed when playing back movies. Reading the Histogram Display When will appear also after recording a still image, while reviewing it within the time set for the [REVIEW] option (or immediately after recording it, if [REVIEW - Canon DC50 | DC220 DC230 Instruction Manual - Page 65
the distance and on each individual. The flash will not fire in the following cases: - When you manually adjust the exposure in (auto) or (red- Mini Video Light You can turn on the mini video light (assist lamp) at any time regardless of the recording program. ( 12) NEXT 1 If the joystick guide does - Canon DC50 | DC220 DC230 Instruction Manual - Page 66
video light while the optional Wide-converter is attached; its shadow can appear on the screen. NOTES Once the countdown has begun, you can press Start/Stop (when recording movies) or press PHOTO fully (when recording still images) to cancel the self timer. The self timer will the digital effects. - Canon DC50 | DC220 DC230 Instruction Manual - Page 67
will fade in or out. When you apply an effect, the sound will be recorded normally. The camcorder retains the setting last used even if you turn off the digital effect appears. Applying Advanced Functions NEXT 1 If the joystick guide does not appear on screen, press ( ) to display it. - Canon DC50 | DC220 DC230 Instruction Manual - Page 68
order in which they will be played back, without affecting your original recordings. After you add scenes to the playlist you will have two types . ADD TO PLAYLIST Disc type: ( 12) DVD-RW • VR mode Desired option YES When the operation is completed "ADDED TO PLAYLIST" will be displayed. Press - Canon DC50 | DC220 DC230 Instruction Manual - Page 69
delete scenes shorter than 5 seconds. YES Deleting a Scene Just After Recording POINTS TO CHECK ( 12) Disc type: DVD-RW • VIDEO or VR mode NEXT Immediately after recording a scene: 1 If the joystick guide does not appear on screen, press ( ) to display it. 2 Push the joystick ( ) toward . If does - Canon DC50 | DC220 DC230 Instruction Manual - Page 70
off the camcorder or removed the disc. Dividing a Scene You can divide your recordings in order to leave only the best parts and later cut are deleting the playlist, this menu option will be replaced by [PLAYLST ALL DEL]. POINTS TO CHECK Disc type: ( 12) DVD-RW • VR mode From the original index - Canon DC50 | DC220 DC230 Instruction Manual - Page 71
CHECK FUNC. ( 31) FUNC. MENU DISC OPERATIONS DISC PROTECT FUNC. YES ( 12) Disc type: DVD-RW • VIDEO or VR mode Options [VIDEO] mode Most DVD players will play the disc, but except for the disc title, the recordings cannot be edited with the camcorder. [VR] mode You will have the option to edit - Canon DC50 | DC220 DC230 Instruction Manual - Page 72
VIDEO or VR YES FUNC. * YES * Close the menu only after the screen display returns to the [DISC OPERATIONS] menu. Changing the Disc Title Before you finalize your disc*, you can give it a title. The disc title will be displayed on the index screen when playing the finalized disc in most DVD - Canon DC50 | DC220 DC230 Instruction Manual - Page 73
erase all the non-protected still images from the currently selected media (will not erase ( 12) images with the mark). Disc type: DVD-RW • VR mode POINTS TO CHECK Disc type: ( 12) DVD-RW • VR mode 1 If the joystick guide does not appear on screen, press ( ) to display it. 2 Push the joystick - Canon DC50 | DC220 DC230 Instruction Manual - Page 74
are recorded using JPEG compression, but a DVD player only recognizes the MPEG standard. Thus, to play back your still images with your DVD player, first you need to create a Photomovie scene - a slide show of all still images on the disc, where each image will be displayed for approx. 3 seconds - Canon DC50 | DC220 DC230 Instruction Manual - Page 75
initialized in VR mode, you will not be able to transfer any recordings to the computer using MyDVD for Canon. FUNC. CONVERT TO SCENE the memory card, copy them to the disc in advance ( 74). IMPORTANT Initializing the memory card ( 76) will permanently erase all recorded still images, even the - Canon DC50 | DC220 DC230 Instruction Manual - Page 76
instead the complete initialization option [COMPL.INIT.]. IMPORTANT Initializing the memory card will erase all still images, even the protected ones. The original still images is in progress. All the image files will be erased and the memory card can be used without any problem. ( 12) FUNC. ( 31) - Canon DC50 | DC220 DC230 Instruction Manual - Page 77
77 Playing Back the Disc on an External Device Finalizing the Disc To play the disc you recorded on a DVD player, a computer's DVD drive or other digital device, you need to finalize it first. You do not need to finalize the disc to play back your recordings with the camcorder connected to the TV. - Canon DC50 | DC220 DC230 Instruction Manual - Page 78
and DVD player. 2 Insert a finalized disc in the DVD player. 3 Select the scene you want to play from the index screen. ON A cOMPUTER'S DVD DRIVE 1 Insert a finalized disc in the DVD drive. 2 Run the DVD playback software. • Refer also to the instruction manual and help modules of your DVD playback - Canon DC50 | DC220 DC230 Instruction Manual - Page 79
79 Unfinalizing the Disc Additional Recordings on a Finalized Disc Unfinalize a disc to allow recording additional movies on the disc even after it was finalized. POINTS TO CHECK ( 12) Power the camcorder using the compact power adapter. Disc type: DVD-RW • VIDEO mode IMPORTANT Be sure to - Canon DC50 | DC220 DC230 Instruction Manual - Page 80
VCR Connection Diagrams AV Terminal Sound from the built-in speaker will be muted while the STV-250N stereo video cable is connected to the camcorder. Open the terminal cover to access Terminal on the Camcorder Connecting Cable Terminal on the Connected Device 1 Output connection (Signal Flow - Canon DC50 | DC220 DC230 Instruction Manual - Page 81
your recordings by connecting the camcorder to a VCR or a digital video device. ( 12) Connecting Connect the camcorder to the VCR following the connection diagram shown in the previous section Connection Diagrams ( 80). Recording 1 Connected device: Load a blank cassette or disc and set the device - Canon DC50 | DC220 DC230 Instruction Manual - Page 82
31) FUNC. MENU* LINE-IN MODE Press ( ) to display the video input screen. * Only when using a DVD-RW recorded in VR mode. With discs recorded in VIDEO mode, pressing FUNC. will open the menu directly on the setup menus screen. FROM THE VIDEO INPUT SCREEN The following icons are displayed at the - Canon DC50 | DC220 DC230 Instruction Manual - Page 83
(Preinstalled) Can Transfer Recordings from... Windows 2000, Windows Me, Windows XP Discs recorded in VIDEO mode* (all disc types) Windows XP SP2 All disc types VIDEO or VR mode * After installing MyDVD for Canon, you will be able to transfer recordings also from DVD- RW discs recorded in - Canon DC50 | DC220 DC230 Instruction Manual - Page 84
DVD-R DL discs, but the software does not support writing on duallayered discs (neither with an external DL drive nor with the camcorder itself). For further details about using MyDVD for Canon, refer also to the software's tutorial and help modules. MyDVD for Canon One-touch dubbing (Windows XP - Canon DC50 | DC220 DC230 Instruction Manual - Page 85
(20 GB or greater, recommended) Video adapter and display supporting at least 1024 x 768 resolution, 16 bit color • Software Requirements: Microsoft Windows Media Player 9 or later • Internet connection (for user registration). IMPORTANT After installing MyDVD for Canon you will need an Internet - Canon DC50 | DC220 DC230 Instruction Manual - Page 86
for Canon Software CD-ROM into the computer's CD or DVD drive. • The Setup Wizard will launch automatically. • If you do not have Windows Media Player 9 or later installed, click "OK" on the setup window that appears and install the latest version of Windows Media Player following the instructions - Canon DC50 | DC220 DC230 Instruction Manual - Page 87
One-Touch Dubbing (Windows XP only) POINTS TO CHECK This function requires a computer equipped with a DVD drive with writing capabilities. If MyDVD for Canon is running, close the program first. 1 Insert the finalized disc you wish to copy into the camcorder. IMPORTANT DVD-R/RW discs can be copied - Canon DC50 | DC220 DC230 Instruction Manual - Page 88
" section in the software's help modules. Photomovie scenes created on a disc initialized in VIDEO mode cannot be transferred to the computer using MyDVD for Canon. If you create Photomovie scenes on a DVD- RW initialized in VR mode, you will not be able to transfer any recordings to the - Canon DC50 | DC220 DC230 Instruction Manual - Page 89
(Windows) or Auto-downloading (Macintosh) in the Digital Video Software instruction manual (electronic version on PDF file). • The direct transfer menu appears on the camcorder screen and the button lights up. IMPORTANT Correct performance cannot be guaranteed for discs recorded on another digital - Canon DC50 | DC220 DC230 Instruction Manual - Page 90
instruction manual. Users of Windows XP and Mac OS X: Your camcorder is equipped with the standard Picture Transfer Protocol (PTP) allowing you to download still images (JPEG only) by simply connecting the camcorder to a computer via USB cable without installing the software from the DIGITAL VIDEO - Canon DC50 | DC220 DC230 Instruction Manual - Page 91
screen is displayed, press FUNC. to return to the transfer menu. Even when still images recorded on the disc are correctly transferred to the computer, they will still be marked as images not yet transferred ("NEW IMAGES"). Transfer Orders From the still images on the memory card, you - Canon DC50 | DC220 DC230 Instruction Manual - Page 92
number of copies as a print order ( 96). Canon printers: SELPHY printers of the CP, DS and ES series and PIXMA printers marked with the PictBridge logo. FUNC. YES Connecting the Camcorder to the Printer ( 12) 1 Insert the memory card or disc containing the still images you want to print - Canon DC50 | DC220 DC230 Instruction Manual - Page 93
when printing images from a disc recorded on another digital device and inserted in this camcorder. NOTES will appear for images that cannot be printed. We recommend powering the camcorder using the compact power adapter. Refer also to the printer's instruction manual. Printing with the Share - Canon DC50 | DC220 DC230 Instruction Manual - Page 94
NOTES Print setting options and [DEFAULT] settings vary depending on the printer model. For details, refer to the printer's instruction manual. Printing Multiple Images on the Same Sheet When using Canon printers you can print the same still image multiple times on the same sheet of paper. Use the - Canon DC50 | DC220 DC230 Instruction Manual - Page 95
instruction manual for details. - If the error still persists and printing does not restart, disconnect the USB cable and turn off the camcorder and card to the disc. - Images not recorded with this camcorder. Observe the following precautions during printing: - Do not turn off the camcorder or the - Canon DC50 | DC220 DC230 Instruction Manual - Page 96
not be able to set the trimming settings for a still image not recorded with this camcorder. 2 Change the size of the trimming frame. • Move the zoom lever toward a print order. These print order settings are compatible with the Digital Print Order Format (DPOF) standards and can be used for - Canon DC50 | DC220 DC230 Instruction Manual - Page 97
print settings menu, select [RESUME] and press ( ). The remaining images will be printed. Printing cannot be restarted when the print order settings have been ( 31) 1 Connect the camcorder to the printer using the supplied USB cable. Refer to PC Connection Diagrams ( 83). External Connections - Canon DC50 | DC220 DC230 Instruction Manual - Page 98
Information Trouble? Troubleshooting If you have a problem with your camcorder, refer to this checklist. Consult your dealer or a Canon Service Center if the problem persists. Power Source Problem Solution • Camcorder will not turn on. Battery pack is exhausted. Replace or charge the battery pack - Canon DC50 | DC220 DC230 Instruction Manual - Page 99
the battery pack. Restore the power supply and try again. The camcorder has exceeded its operational temperature. Turn off the camcorder and let it cool down before resuming use. The disc cannot be recognized. The disc is dirty. Clean the disc with a soft lens-cleaning cloth. If 108 the problem - Canon DC50 | DC220 DC230 Instruction Manual - Page 100
Problem Solution Pressing the playback button Load a disc. 26 does not start playback. Set the camcorder to . 39 You may not be able to play with this camcorder, discs recorded - or edited with other DVD recorders or computer DVD drives. If using a single-sided disc, check that the disc - Canon DC50 | DC220 DC230 Instruction Manual - Page 101
. Or, even though the disc is read, cannot play The disc has not been finalized. 77 back the disc or the picture is DVD-RW discs in VR mode can only be played back with VR - distorted. mode-compatible DVD players. Refer to the instruction manual of your DVD device. Cannot edit my recordings - Canon DC50 | DC220 DC230 Instruction Manual - Page 102
Trouble? Memory Card Operation Problem cannot be played Insert a memory card. 28 back. Set the camcorder to . 41 power on until you set the time zone, date and time. CHANGE THE BATTERY Battery pack is exhausted. Replace or charge the battery pack. 23 PACK CANNOT ENTER THE The camcorder - Canon DC50 | DC220 DC230 Instruction Manual - Page 103
with this 6 RECOMMENDED DISCS camcorder. DISC IS FINALIZED You cannot record additional scenes on a finalized DVD-R/ - CANNOT RECORD DVD-R DL disc. You cannot record additional scenes or unfinalize a DVD-RW disc - in VIDEO mode that was finalized with another digital device. UNFINALIZE THE - Canon DC50 | DC220 DC230 Instruction Manual - Page 104
some 26 recordings (DVD-RW in VR mode) to free some space or replace 69 the disc. TASK IN PROGRESS DO NOT DISCONNECT THE POWER SOURCE The camcorder is updating important file allocation data on the disc. - Do not disconnect the compact power adapter or remove the battery pack. NO CARD Memory - Canon DC50 | DC220 DC230 Instruction Manual - Page 105
analog video input. Direct Print Related Messages NOTES About Canon PIXMA/SELPHY DS Printers: If the printer's error indicator flashes or an error message appears on the printer's operation panel, refer to the printer's instruction manual. Message Explanation PAPER ERROR There is a problem - Canon DC50 | DC220 DC230 Instruction Manual - Page 106
Trouble , replace the battery and turn it back on. COMMUNICATION ERROR The printer is experiencing a data transfer error. Cancel INCOMPATIBLE PAPER SIZE The paper settings of the camcorder conflict with the printer's settings. PRINTER IN installed in the printer or the print head is defective. - Canon DC50 | DC220 DC230 Instruction Manual - Page 107
's and Don'ts 107 Do's and Don'ts Handling Precautions Battery Pack Camcorder Do not subject the camcorder to vibrations or strong impacts while the DISC access indicator is on or flashing. The data may not be correctly recorded on the disc, and the recording may be permanently lost. Do not touch - Canon DC50 | DC220 DC230 Instruction Manual - Page 108
the battery pack if the usable time after full charge diminishes substantially at normal temperatures. Mini DVD Disc The recording surface of DVD discs is extremely delicate. If handled or stored in an incorrect manner, the camcorder may stop recognizing or may not be able to play back the disc. Be - Canon DC50 | DC220 DC230 Instruction Manual - Page 109
settings. The built-in lithium battery is recharged while you use the camcorder, however, it will become totally discharged if you do not use the camcorder for about 3 months. To recharge the built-in lithium battery: Connect the compact power adapter to the camcorder and leave it connected for 24 - Canon DC50 | DC220 DC230 Instruction Manual - Page 110
cold temperatures may cause condensation (water droplets) to form on its internal surfaces. Stop using the camcorder if condensation is detected. Continued use may damage the camcorder. Condensation may form in the following cases: When the camcorder is moved from an air-conditioned room to a warm - Canon DC50 | DC220 DC230 Instruction Manual - Page 111
use the compact power adapter to operate the camcorder and to charge battery packs in any country with power supply between 100 and 240 V AC, 50/60 Hz. Consult the Canon Service Center for information on plug adapters for overseas use. Playback on a TV Screen You can only play back your recordings - Canon DC50 | DC220 DC230 Instruction Manual - Page 112
Disc DVD-R/DVD-RW/ DVD-R DL (Canon DVD-R DL54) CG-300 Battery Charger BP-208, BP-214* Battery Pack BP-208, BP-214* Battery Pack CA-570 Compact Power Adapter WL-D86 Wireless Controller WD-H37C Wide Converter STV-250N Stereo Video Cable TV VCR DVD player/ recorder TL-H37 Tele Converter FS-H37U - Canon DC50 | DC220 DC230 Instruction Manual - Page 113
of non-genuine Canon accessories, although you may request such repairs on a chargeable basis. Battery Packs When you need extra battery packs, select one of the following models: BP-208 or BP-214. BP-208 only. CG-300 Battery Charger Use the battery charger for charging the battery packs. It plugs - Canon DC50 | DC220 DC230 Instruction Manual - Page 114
with flash or assist lamp. FS-H37U Filter Set Neutral density and MC protector filters help you to control difficult lighting conditions. Shoulder Strap You can attach a shoulder strap for shooting. SC-2000 Soft Carrying Case A handy camcorder bag with padded compartments and plenty of space for - Canon DC50 | DC220 DC230 Instruction Manual - Page 115
Information 115 This mark identifies genuine Canon video accessories. When you use Canon video equipment, we recommend Canon-brand accessories or products bearing the same mark. Product Codes Provided Accessories CA-570 Compact Power Adapter BP-208 Battery Pack WL-D86 Wireless Controller STV-250N - Canon DC50 | DC220 DC230 Instruction Manual - Page 116
DVD-VIDEO (VIDEO mode) DVD-VR (VR mode) only with 8 cm DVD-RW Video Compression: MPEG2 Audio Compression: Dolby Digital 2ch Exif 2.2** compliant with JPEG compression EIA standard (525 lines, 60 fields) NTSC color signal 8 cm (3 in.) mini DVD discs marked with the DVD-R, DVD-R DL or DVD 35x power - Canon DC50 | DC220 DC230 Instruction Manual - Page 117
Video: 1 Vp-p / 75 ohms unbalanced Audio: Output: -10 dBV (47 kohm load) / 3 kohm or less Input: -10 dBV / 40 kohm or more mini-B Power/Others Power supply (rated) Power consumption (SP mode, AF on) Operating temperature Dimensions (W x H x D) Weight (camcorder body only) 7.4 V DC (battery pack - Canon DC50 | DC220 DC230 Instruction Manual - Page 118
0 - 40 °C (32 - 104 °F) 52 x 29 x 90 mm (2.1 x 1.1 x 3.5 in.) 135 g (4.8 oz.) BP-208 Battery Pack Battery type Rated voltage Operating temperature Battery capacity Dimensions Weight Rechargeable Lithium Ion Battery 7.4 V DC 0 - 40 °C (32 - 104 °F) 850 mAh 39 x 8 x 63 mm (1.5 x 0.31 x 2.5 in.) 40 - Canon DC50 | DC220 DC230 Instruction Manual - Page 119
33 Daylight saving time 32 Digital effects 66 Digital zoom 45 Direct print 92 Direct transfer 89 Disc title 72 Disc types (DVD-R, DVD-R DL, DVD-RW 5 Drive mode 62 E Erasing still images 73 Error messages 102 F File numbers 50 Finalizing the disc 77 Fireworks (recording program 52 - Canon DC50 | DC220 DC230 Instruction Manual - Page 120
Playback - Still images 41 Playlist 68 Portrait (recording program 52 Power save 50 Print order 96 Print/share button 87, 90, Transfer order 91 Transferring still images 89 Tripod 35 Troubleshooting 98 Tv (recording program 53 U USB terminal 83 V Video input recording 82 VIDEO mode (disc - Canon DC50 | DC220 DC230 Instruction Manual - Page 121
limited warranty for use of Canon DVD Camcorders in conjunction with incompatible peripheral equipment and incompatible software. In order to obtain warranty service, contact the authorized Canon retail dealer from whom you purchased the DVD Camcorder or call the CANON INFORMATION CENTER AT 1-800 - Canon DC50 | DC220 DC230 Instruction Manual - Page 122
in the instruction manual; ii) the use of accessories, attachments, products, supplies, parts or devices with this Canon product that do not conform to Canon specifications or that cause abnormally frequent service problems; iii) repairs or services performed by any party other than a Canon Service - Canon DC50 | DC220 DC230 Instruction Manual - Page 123
LATIN AMERICA, INC. 703 Waterford Way Suite 400 Miami, FL 33126 USA CANON HONGKONG COMPANY LTD. 19/F, The Metropolis Tower, 10 Metropolis Drive, Hunghom, Kowloon, Hong Kong The information on this manual is verified as of January 1st, 2007. Les informations contenues dans ce manuel ont été vérifi
-
 1
1 -
 2
2 -
 3
3 -
 4
4 -
 5
5 -
 6
6 -
 7
7 -
8
-
9
-
10
-
11
-
12
-
13
-
14
-
15
-
16
-
17
-
18
-
19
-
20
-
21
-
22
-
23
-
24
-
25
-
26
-
27
-
28
-
29
-
30
-
31
-
32
-
33
-
34
-
35
-
36
-
37
-
38
-
39
-
40
-
41
-
42
-
43
-
44
-
45
-
46
-
47
-
48
-
49
-
50
-
51
-
52
-
53
-
54
-
55
-
56
-
57
-
58
-
59
-
60
-
61
-
62
-
63
-
64
-
65
-
66
-
67
-
68
-
69
-
70
-
71
-
72
-
73
-
74
-
75
-
76
-
77
-
78
-
79
-
80
-
81
-
82
-
83
-
84
-
85
-
86
-
87
-
88
-
89
-
90
-
91
-
92
-
93
-
94
-
95
-
96
-
97
-
98
-
99
-
100
-
101
-
102
-
103
-
104
-
105
-
106
-
107
-
108
-
109
-
110
-
111
-
112
-
113
-
114
-
115
-
116
-
117
-
118
-
119
-
120
-
121
-
122
-
123
 |
 |

DVD Camcorder
Instruction Manual
Caméscope DVD
Manuel d’instruction
Cámara DVD
Manual de Instrucciones
Please read also the following instruction manual
(electronic version on PDF file). For further details refer to
the installation guide.
Veuillez lire aussi le manuel d’instruction suivant (version
électronique sur fichier PDF). Pour d’autres détails référez-
vous au guide d’installation.
Lea también el siguiente manual de instrucciones (versión
electrónica en archivo PDF). Para mayores detalles,
refiérase a la guía de instalación.
• Digital Video Software
English
Digital Video Software
Version 25
Instruction Manual
PUB.DIM-795
NTSC
English
Français
Español