Canon EOS C300 Mark II CINEMA RAW DEVELOPMENT INSTRUCTION MANUAL Version 1.4 M
Canon EOS C300 Mark II Manual
 |
View all Canon EOS C300 Mark II manuals
Add to My Manuals
Save this manual to your list of manuals |
Canon EOS C300 Mark II manual content summary:
- Canon EOS C300 Mark II | CINEMA RAW DEVELOPMENT INSTRUCTION MANUAL Version 1.4 M - Page 1
PUB. DIE-0428-000D 1 Instruction Manual Version 1.4 Mac OS - Canon EOS C300 Mark II | CINEMA RAW DEVELOPMENT INSTRUCTION MANUAL Version 1.4 M - Page 2
Cinema RAW Development 03 Conventions in the Manual 21 Adjusting the Export Settings 22 Settings for Full-quality Clips 23 Settings for Proxy Clips 25 Developing and Exporting RAW Clips 04 Running Cinema bar 33 Contextual menus 35 Troubleshooting Error Messages 12 Playing Back Using SDI Output - Canon EOS C300 Mark II | CINEMA RAW DEVELOPMENT INSTRUCTION MANUAL Version 1.4 M - Page 3
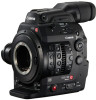
main procedure. 0 Reference page number in this instruction manual. File > Open This font is used to indicate menu options and commands, as camera may not support all of the features and functions described in this manual. Screens show clips recorded using a Canon EOS C500 digital cinema camera - Canon EOS C300 Mark II | CINEMA RAW DEVELOPMENT INSTRUCTION MANUAL Version 1.4 M - Page 4
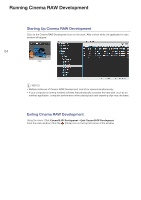
hard disk, such as an antivirus application, computer performance when playing back and exporting clips may decrease. Exiting Cinema RAW Development Using the menu: Click Cinema RAW Development > Quit Cinema RAW Development. From the main window: Click the (Close) icon on the top left corner of the - Canon EOS C300 Mark II | CINEMA RAW DEVELOPMENT INSTRUCTION MANUAL Version 1.4 M - Page 5
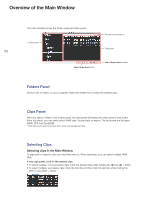
Overview of the Main Window 05 Overview of the Main Window The main window shows the folders panel and clips panel. Folders panel File view format buttons Clips panel Add to Media Pool button Add to Export Queue button Folders Panel Shows a list of folders on your computer. Select the folder - Canon EOS C300 Mark II | CINEMA RAW DEVELOPMENT INSTRUCTION MANUAL Version 1.4 M - Page 6
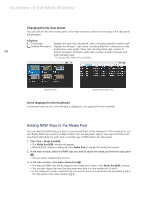
is displayed to the upper left of the thumbnail. Adding RAW Clips to the Media Pool You can select the RAW clips you plan to use and add them to the media pool. In the media pool, you can display RAW clips saved in multiple folders. You can play back, export - Canon EOS C300 Mark II | CINEMA RAW DEVELOPMENT INSTRUCTION MANUAL Version 1.4 M - Page 7
Overview of the Main Window ³ 07 ᕢ Adding clips with the contextual menu • In the main window, move the mouse pointer over a folder and then open the contextual menu. Select Add to Media Pool > Clips in Selected Folder or Clips in Selected Folder and Subfolders. The RAW clips in the selected folder - Canon EOS C300 Mark II | CINEMA RAW DEVELOPMENT INSTRUCTION MANUAL Version 1.4 M - Page 8
Overview of the Main Window Removing clips from the media pool Follow the steps below to remove a RAW clip from the media pool. 1. In the media pool, select the desired RAW clip. • You can select multiple clips at once. 2. Move the mouse pointer over the selected RAW clip and then open the - Canon EOS C300 Mark II | CINEMA RAW DEVELOPMENT INSTRUCTION MANUAL Version 1.4 M - Page 9
in the FPS list (frame rate mismatch) was found. Move the mouse pointer over the icon to display which warning it is. (green with check mark): Conflict resolved. You selected one clip from the multiple clips that were found. Clip Name RAW clip name. Thumbnail Shows the first frame of the - Canon EOS C300 Mark II | CINEMA RAW DEVELOPMENT INSTRUCTION MANUAL Version 1.4 M - Page 10
Overview of the Main Window 1. Click Cinema RAW Development > Preferences. • The Preferences dialog box will appear. 2. Select the desired margin. • To select the margin in seconds, select a value from the sec. list (ᕡ). - Canon EOS C300 Mark II | CINEMA RAW DEVELOPMENT INSTRUCTION MANUAL Version 1.4 M - Page 11
during a clip conflict When multiple RAW clips are found in the EDL search that result in a clip conflict, you can select the RAW clip to use for the event. 1. In the EDL display, select an event whose status is (conflict). 2. Move the mouse pointer over the selected event and then open - Canon EOS C300 Mark II | CINEMA RAW DEVELOPMENT INSTRUCTION MANUAL Version 1.4 M - Page 12
the clips panel or media pool screen and display it in the preview panel. During playback, you can use the playback controls under the video display area. RAW clips will be played back using quick development (0 16). 1. In the clips panel or media pool screen, select the clip you want to play - Canon EOS C300 Mark II | CINEMA RAW DEVELOPMENT INSTRUCTION MANUAL Version 1.4 M - Page 13
longer to be refreshed. NOTES • You can play back RAW clips shot with Canon digital cinema cameras. • When the input focus* is on the playback position slider in the preview , only a portion of the video will be displayed. The mark inside the display area graphic to the right of the playback position slider - Canon EOS C300 Mark II | CINEMA RAW DEVELOPMENT INSTRUCTION MANUAL Version 1.4 M - Page 14
Playing Back and Developing Clips Display area graphic Part of the picture currently visible 14 Adjusting the volume Drag the volume slider to adjust the playback volume. You can click ( ). Click to mute the audio Volume slider to temporarily mute the sound Changing the playback position You can - Canon EOS C300 Mark II | CINEMA RAW DEVELOPMENT INSTRUCTION MANUAL Version 1.4 M - Page 15
Playing Back and Developing Clips Mouse operation Keyboard shortcut* Action home Move to the in point. Move to the first frame if the current frame position is before the in point. end Move to the out point. Move to the last frame if the current frame position is after the out point. 15 Ô - Canon EOS C300 Mark II | CINEMA RAW DEVELOPMENT INSTRUCTION MANUAL Version 1.4 M - Page 16
the clips panel that was exported with this software, you can display a desired frame. Use the playback position slider, and the Ô (go back one frame) and Ó ( played back or exported. You can adjust various development settings using the development settings panel. 1. Select the desired RAW clip - Canon EOS C300 Mark II | CINEMA RAW DEVELOPMENT INSTRUCTION MANUAL Version 1.4 M - Page 17
video display area to adjust the white balance by using the color of the location clicked as the white default value. Preview Settings: Gamma BT.709, Canon Log/Canon Log 2, Wide DR Preview Settings: Color Space Quick Development Off, On When a check mark is placed in the box, processing is - Canon EOS C300 Mark II | CINEMA RAW DEVELOPMENT INSTRUCTION MANUAL Version 1.4 M - Page 18
, Wide DR, DCI Cinema Gamut, DCI-P3+ DCI-P3 Canon Log / Canon Log 2, DCI BT.709 Canon Log / Canon Log 2, BT.709, Wide DR BT.2020 Canon Log / Canon Log 2, - BT.2020, Wide DR BT.709 Canon Log / Canon Log 2, - BT.709, Wide DR NOTES • Use a computer with a GPU supported by this software - Canon EOS C300 Mark II | CINEMA RAW DEVELOPMENT INSTRUCTION MANUAL Version 1.4 M - Page 19
to set the in or out point, respectively. • The corresponding mark will appear above the selected position on the playback slider. NOTES you can use this software to play back clips on an external monitor using your computer in the instruction manual of the expansion card. 2. Click Cinema RAW - Canon EOS C300 Mark II | CINEMA RAW DEVELOPMENT INSTRUCTION MANUAL Version 1.4 M - Page 20
Playing Back and Developing Clips „ To play back without reducing the size Place a check in the 100% box. • During playback pause, you can use the mouse to drag the picture on the output area graphic to change what is being displayed. 20 ³ Output area graphic ᕣ ᕢ Preferences dialog box SDI - Canon EOS C300 Mark II | CINEMA RAW DEVELOPMENT INSTRUCTION MANUAL Version 1.4 M - Page 21
with the RAW file].[file extension] For MOV clips: [metadata clip name].MOV Use same file name as RAW file For clips other than MOV clips: [RAW name that was given to the clip recorded on a recording media in the camera/camcorder at the same time the RAW clip was recorded. If no clip was recorded - Canon EOS C300 Mark II | CINEMA RAW DEVELOPMENT INSTRUCTION MANUAL Version 1.4 M - Page 22
desired gamma settings for each of the color space options that could be used for recording. You can select the following for the gamma setting. However, you cannot select the gamma setting if the file type is OpenEXR (ACES). Canon Log / Canon Log 2 BT.709 BT.2020 Wide DR DCI • When the file type - Canon EOS C300 Mark II | CINEMA RAW DEVELOPMENT INSTRUCTION MANUAL Version 1.4 M - Page 23
. • The output file type screen will appear. 2. Select the file type (ᕢ), color space (ᕣ) and gamma setting (ᕤ). • Refer to the Available Settings by Color Space Used While Recording table (A 18). • You can select the following for the file type. DPX RGB 10-bit 720x480 DPX RGB 10-bit 1920x1080 Apple - Canon EOS C300 Mark II | CINEMA RAW DEVELOPMENT INSTRUCTION MANUAL Version 1.4 M - Page 24
Exporting Clips • You can select the following for the gamma setting. Canon Log / Canon Log 2 BT.709 BT.2020 Wide DR DCI • You can also place a check in the Same as Full-Quality Files box (ᕥ), to use the same color space and gamma settings selected with the previous procedure. 24 3. Click - Canon EOS C300 Mark II | CINEMA RAW DEVELOPMENT INSTRUCTION MANUAL Version 1.4 M - Page 25
already exported. • You can click Delete All (ᕣ) to clear the export result list. • You can develop full-quality files using quick development. Proxy files will always use quick development regardless of the Quick Development setting (A 17). • When all the RAW clips in the export queue have been - Canon EOS C300 Mark II | CINEMA RAW DEVELOPMENT INSTRUCTION MANUAL Version 1.4 M - Page 26
Exporting Clips Export queue 26 Export result list ᕢ ³ ᕣ Export status area Items displayed in the export queue and export result list Item Description Clip Name Shows the name of the RAW clips. Frame Shows the frame currently being processed on the left and the total number of frames on - Canon EOS C300 Mark II | CINEMA RAW DEVELOPMENT INSTRUCTION MANUAL Version 1.4 M - Page 27
destination folder does not have enough available space. Select a different drive for the destination folder. Read Error The RAW clip is corrupted. Use backup data. Write Error Cannot Create a Folder Could not write to the destination folder. Check that the folder permissions allow for writing - Canon EOS C300 Mark II | CINEMA RAW DEVELOPMENT INSTRUCTION MANUAL Version 1.4 M - Page 28
queue with their previous settings. 28 • If necessary, you can also change the destination folder. ᕢ ᕡ ᕣ Saving the export log 1. Click Cinema RAW Development > Preferences. • The Preferences dialog box will appear. 2. Place a check in the Save Export History box (ᕡ). 3. Click Browse (ᕢ) and - Canon EOS C300 Mark II | CINEMA RAW DEVELOPMENT INSTRUCTION MANUAL Version 1.4 M - Page 29
Exporting Clips Data recorded in the export log file Item Description Status Shows the result of the export process. Date Shows the date in which the file was exported. Time Shows the time in which the file was exported. Source 29 Destination Shows the file path of the RAW clip. Shows - Canon EOS C300 Mark II | CINEMA RAW DEVELOPMENT INSTRUCTION MANUAL Version 1.4 M - Page 30
Displaying and Editing Metadata Displaying Clip Information DisplayingandEditingMetadata When you display the clip information window, you can display the clip information in the metadata associated with the RAW clip that is selected in the clips panel or media pool screen. Click View > Clip - Canon EOS C300 Mark II | CINEMA RAW DEVELOPMENT INSTRUCTION MANUAL Version 1.4 M - Page 31
Displaying and Editing Metadata Displaying Frame Information When you display the frame information window, you can display the frame information (information on each frame in the RAW clip) recorded in the metadata of the frame that currently appears in the preview window. During playback, the - Canon EOS C300 Mark II | CINEMA RAW DEVELOPMENT INSTRUCTION MANUAL Version 1.4 M - Page 32
and the number of GPUs, if more than - one is detected. Preferences 2 + , Opens the Preferences dialog box. 19 Services - Standard option for Mac OS. - Hide Cinema 2 + H Standard option for Mac OS. RAW - Development Hide Others 1 + 2 + H Standard option for Mac OS. - Show All - Canon EOS C300 Mark II | CINEMA RAW DEVELOPMENT INSTRUCTION MANUAL Version 1.4 M - Page 33
. - Bring All to Front - Standard option for Mac OS. - Cinema RAW Development - Brings Cinema RAW Development to the front. - Help View Instruction Manual - Open's Cinema RAW Development's instruction manual (this PDF file). - Contextual menus Following is a list of menus that appear - Canon EOS C300 Mark II | CINEMA RAW DEVELOPMENT INSTRUCTION MANUAL Version 1.4 M - Page 34
Reference and General Information Contextual menu in the media pool screen Menu Function 0 Add to Export Queue Remove from Media Pool Adds the currently selected clip to the export 25 queue. Removes the currently selected clip from the 8 media pool. 34 Contextual menu in the EDL screen - Canon EOS C300 Mark II | CINEMA RAW DEVELOPMENT INSTRUCTION MANUAL Version 1.4 M - Page 35
Troubleshooting Error Messages Following is a partial list of error messages in alphabetical order. A clip conflict has occurred. Resolve to continue. • The EDL search resulted in multiple clips being found. Select the clip to use was recorded using a color space that is not supported by the - Canon EOS C300 Mark II | CINEMA RAW DEVELOPMENT INSTRUCTION MANUAL Version 1.4 M - Page 36
or registered trademarks of their respective companies. 36 For support concerning this software, please contact a Canon Service Center. For details see the back cover of your camera's Instruction Manual. The information in this manual is verified as of July 2015. Subject to change without
-
 1
1 -
 2
2 -
 3
3 -
 4
4 -
 5
5 -
 6
6 -
 7
7 -
8
-
9
-
10
-
11
-
12
-
13
-
14
-
15
-
16
-
17
-
18
-
19
-
20
-
21
-
22
-
23
-
24
-
25
-
26
-
27
-
28
-
29
-
30
-
31
-
32
-
33
-
34
-
35
-
36
 |
 |

Instruction Manual
Mac OS
Version 1.4
PUB. DIE-0428-000D