Canon EOS Digital Rebel XTi EF-S 18-55 Kit User Manual - Page 121
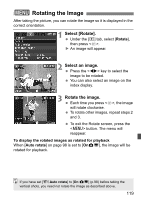
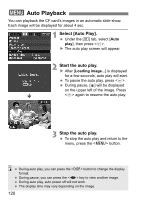
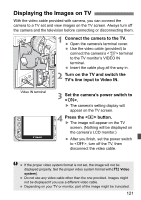
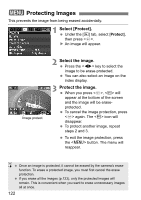
Displaying the Images on TV
 |
View all Canon EOS Digital Rebel XTi EF-S 18-55 Kit manuals
Add to My Manuals
Save this manual to your list of manuals |
Page 121 highlights
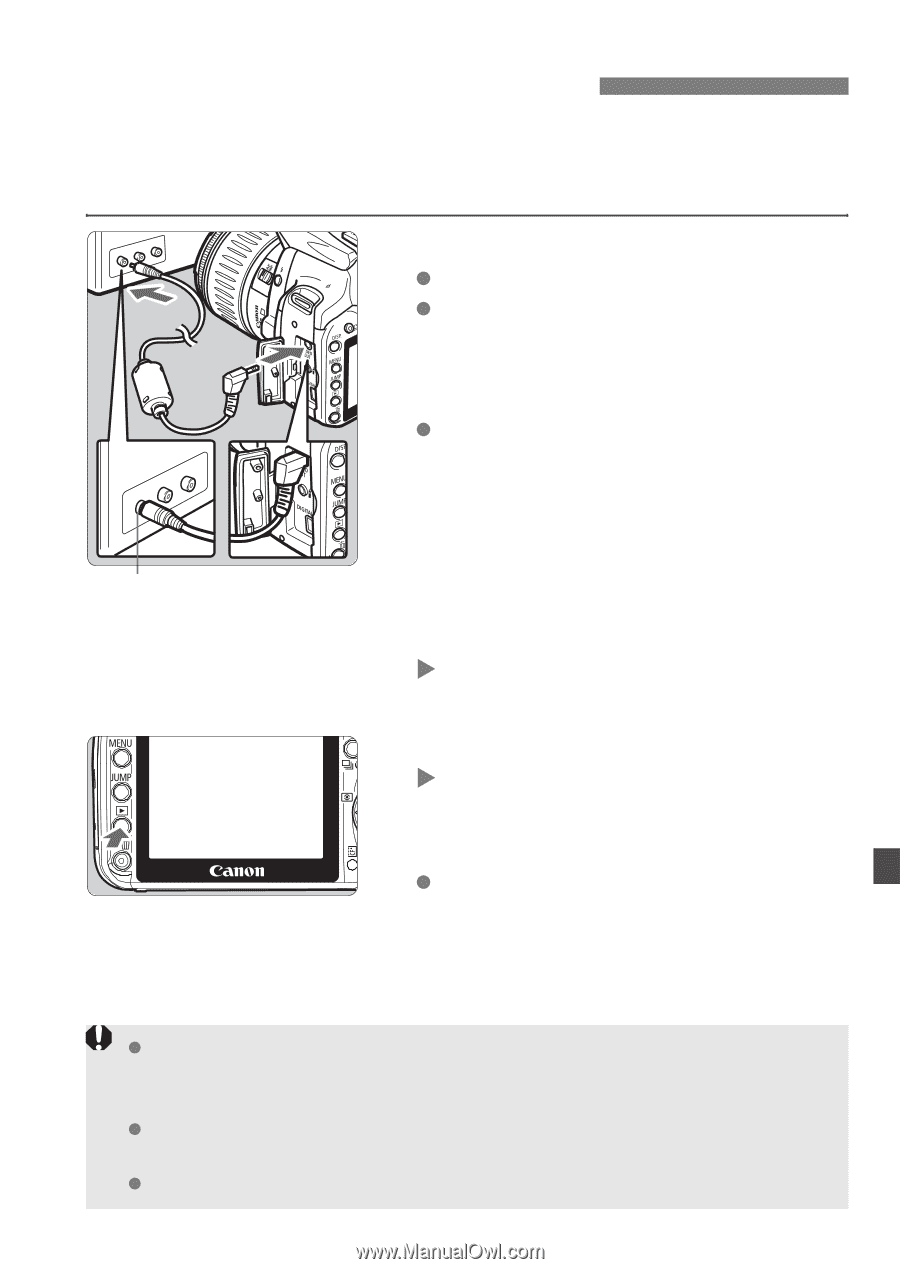
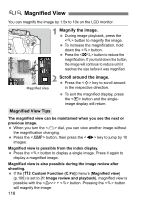
Displaying the Images on TV With the video cable provided with camera, you can connect the camera to a TV set and view images on the TV screen. Always turn off the camera and the television before connecting or disconnecting them. 1 Connect the camera to the TV. Open the camera's terminal cover. Use the video cable (provided) to connect the camera's terminal to the TV monitor's VIDEO IN terminal. Insert the cable plug all the way in. 2 Turn on the TV and switch the TV's line input to Video IN. Video IN terminal 3 Set the camera's power switch to . X The camera's setting display will appear on the TV screen. 4 Press the button. X The image will appear on the TV screen. (Nothing will be displayed on the camera's LCD monitor.) After you finish, set the power switch to , turn off the TV, then disconnect the video cable. If the proper video system format is not set, the image will not be displayed properly. Set the proper video system format with [b Video system]. Do not use any video cable other than the one provided. Images might not be displayed if you use a different video cable. Depending on your TV or monitor, part of the image might be truncated. 121
-
 1
1 -
2
-
3
-
4
-
5
-
6
-
7
-
8
-
9
-
10
-
11
-
12
-
13
-
14
-
15
-
16
-
17
-
18
-
19
-
20
-
21
-
22
-
23
-
24
-
25
-
26
-
27
-
28
-
29
-
30
-
31
-
32
-
33
-
34
-
35
-
36
-
37
-
38
-
39
-
40
-
41
-
42
-
43
-
44
-
45
-
46
-
47
-
48
-
49
-
50
-
51
-
52
-
53
-
54
-
55
-
56
-
57
-
58
-
59
-
60
-
61
-
62
-
63
-
64
-
65
-
66
-
67
-
68
-
69
-
70
-
71
-
72
-
73
-
74
-
75
-
76
-
77
-
78
-
79
-
80
-
81
-
82
-
83
-
84
-
85
-
86
-
87
-
88
-
89
-
90
-
91
-
92
-
93
-
94
-
95
-
96
-
97
-
98
-
99
-
100
-
101
-
102
-
103
-
104
-
105
-
106
-
107
-
108
-
109
-
110
-
111
-
112
-
113
-
114
-
115
-
 116
116 -
 117
117 -
 118
118 -
 119
119 -
 120
120 -
 121
121 -
 122
122 -
 123
123 -
 124
124 -
 125
125 -
 126
126 -
127
-
128
-
129
-
130
-
131
-
132
-
133
-
134
-
135
-
136
-
137
-
138
-
139
-
140
-
141
-
142
-
143
-
144
-
145
-
146
-
147
-
148
-
149
-
150
-
151
-
152
-
153
-
154
-
155
-
156
-
157
-
158
-
159
-
160
-
161
-
162
-
163
-
164
-
165
-
166
-
167
-
168
-
169
-
170
-
171
-
172
-
173
-
174
-
175
-
176
-
177
-
178
-
179
-
180
 |
 |