Canon EOS Digital Rebel XTi EF-S 18-55 Kit User Manual - Page 135
Adjustment of Printing Effects
 |
View all Canon EOS Digital Rebel XTi EF-S 18-55 Kit manuals
Add to My Manuals
Save this manual to your list of manuals |
Page 135 highlights
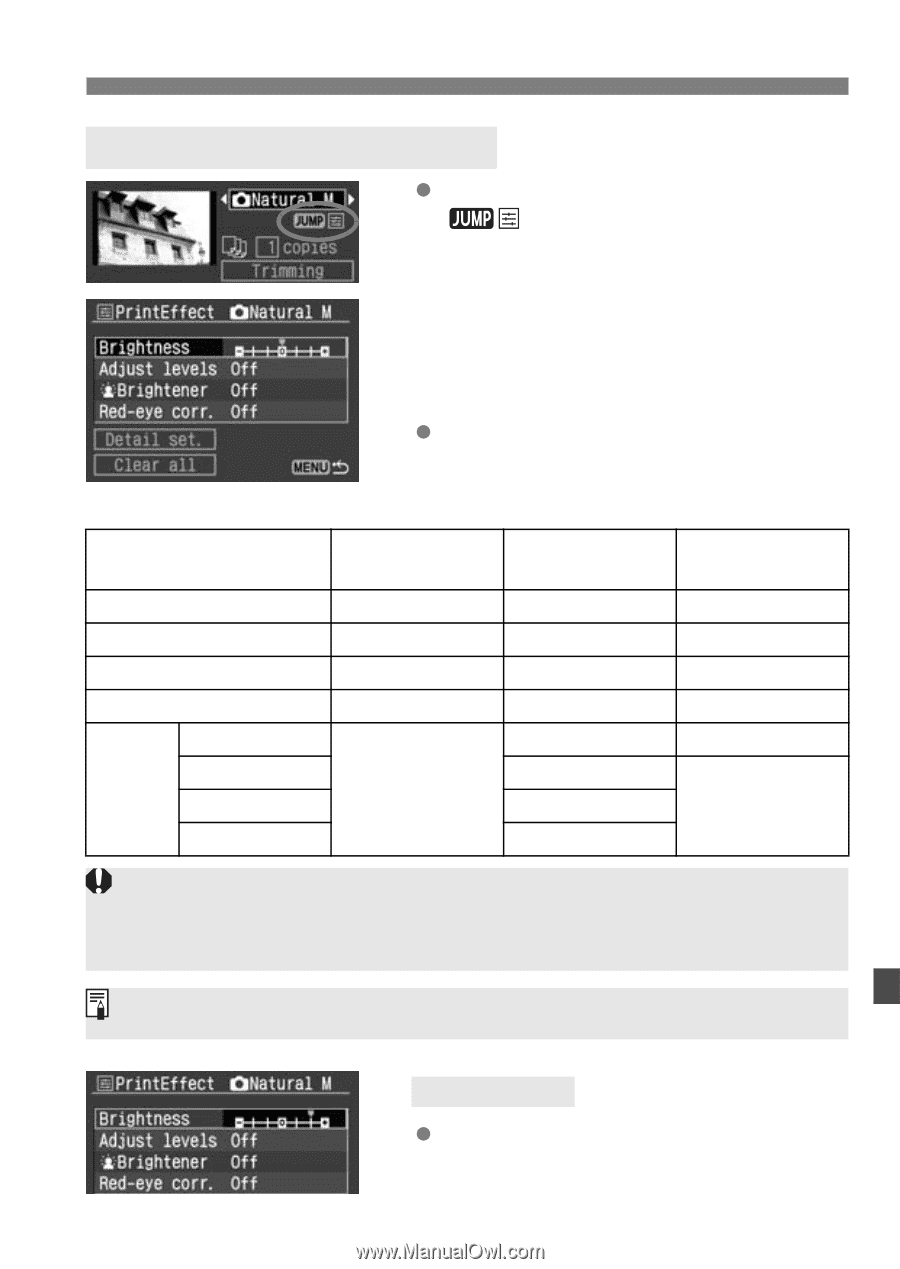
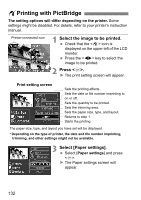
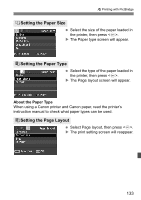
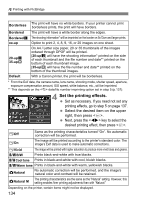
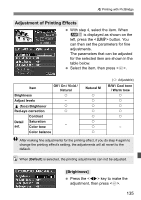
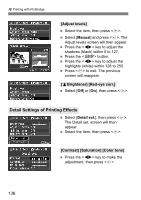
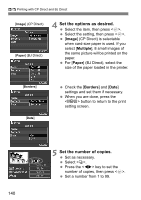
wPrinting with PictBridge Adjustment of Printing Effects With step 4, select the item. When is displayed as shown on the left, press the button. You can then set the parameters for fine adjustments. The parameters that can be adjusted for the selected item are shown in the table below. Select the item, then press . Item Brightness Off / On / Vivid / Natural k Adjust levels - k (face) Brightener k Red-eye correction k Contrast Detail Saturation set. Color tone - Color balance Natural M k k k k k k k k (k: Adjustable) B/W / Cool tone / Warm tone k k k k k - After making fine adjustments for the printing effect, if you do step 4 again to change the printing effect's setting, the adjustments will all revert to the default. When [Default] is selected, the printing adjustments can not be adjusted. [Brightness] Press the key to make the adjustment, then press . 135
-
 1
1 -
2
-
3
-
4
-
5
-
6
-
7
-
8
-
9
-
10
-
11
-
12
-
13
-
14
-
15
-
16
-
17
-
18
-
19
-
20
-
21
-
22
-
23
-
24
-
25
-
26
-
27
-
28
-
29
-
30
-
31
-
32
-
33
-
34
-
35
-
36
-
37
-
38
-
39
-
40
-
41
-
42
-
43
-
44
-
45
-
46
-
47
-
48
-
49
-
50
-
51
-
52
-
53
-
54
-
55
-
56
-
57
-
58
-
59
-
60
-
61
-
62
-
63
-
64
-
65
-
66
-
67
-
68
-
69
-
70
-
71
-
72
-
73
-
74
-
75
-
76
-
77
-
78
-
79
-
80
-
81
-
82
-
83
-
84
-
85
-
86
-
87
-
88
-
89
-
90
-
91
-
92
-
93
-
94
-
95
-
96
-
97
-
98
-
99
-
100
-
101
-
102
-
103
-
104
-
105
-
106
-
107
-
108
-
109
-
110
-
111
-
112
-
113
-
114
-
115
-
116
-
117
-
118
-
119
-
120
-
121
-
122
-
123
-
124
-
125
-
126
-
127
-
128
-
129
-
 130
130 -
 131
131 -
 132
132 -
 133
133 -
 134
134 -
 135
135 -
 136
136 -
 137
137 -
 138
138 -
 139
139 -
 140
140 -
141
-
142
-
143
-
144
-
145
-
146
-
147
-
148
-
149
-
150
-
151
-
152
-
153
-
154
-
155
-
156
-
157
-
158
-
159
-
160
-
161
-
162
-
163
-
164
-
165
-
166
-
167
-
168
-
169
-
170
-
171
-
172
-
173
-
174
-
175
-
176
-
177
-
178
-
179
-
180
 |
 |