Canon EOS Rebel XSi Picture Style Editor 1.2 for Windows Instruction Manual
Canon EOS Rebel XSi Manual
 |
View all Canon EOS Rebel XSi manuals
Add to My Manuals
Save this manual to your list of manuals |
Canon EOS Rebel XSi manual content summary:
- Canon EOS Rebel XSi | Picture Style Editor 1.2 for Windows Instruction Manual - Page 1
Software Picture Style Editor Ver. 1.2 Instruction Manual O Content of this Instruction Manual O PSE is used for Picture Style Editor. O In this manual, the windows used in the examples are Pre-adjustments Image Characteristics Saving Preferences Reference © CANON INC. 2008 CT1-7151PSEWE-000 - Canon EOS Rebel XSi | Picture Style Editor 1.2 for Windows Instruction Manual - Page 2
support will be made available for the SOFTWARE. 4. LIMITED WARRANTY AND LIMITATION OF LIABILITY: It is your responsibility to choose, maintain and match the hardware and software components of your computer system. Thus Canon does not guarantee uninterrupted service the Software in Canada shall be - Canon EOS Rebel XSi | Picture Style Editor 1.2 for Windows Instruction Manual - Page 3
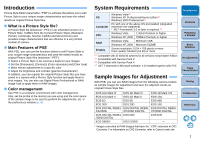
OS preinstalled (Upgraded Computer machines not supported) * .NET Framework 2.0 or later versions except Starter Edition *2 Compatible with Service Pack 2 *3 Compatible with Service Pack 4 *4 .NET Framework is information on CR2 Converter, refer to Canon's web site. Introduction Contents Preparing - Canon EOS Rebel XSi | Picture Style Editor 1.2 for Windows Instruction Manual - Page 4
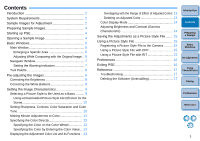
Style File with DPP 15 Using a Picture Style File with RIT 15 Preferences 16 Exiting PSE 16 Reference 17 Troubleshooting 17 Deleting the Software (Uninstalling 17 Introduction Contents Preparing a Sample Basic Windows Pre-adjustments Image Characteristics Saving Preferences Reference - Canon EOS Rebel XSi | Picture Style Editor 1.2 for Windows Instruction Manual - Page 5
the "Function for Use with the Accessories" of "Reference" Professional (hereinafter, "DPP") or RAW Image Task (hereinafter, in "EOS Utility Instruction Manual" (PDF electronic manual) for "RIT") and is then opened as a sample image with PSE will not have details. the adjustments made in DPP or - Canon EOS Rebel XSi | Picture Style Editor 1.2 for Windows Instruction Manual - Page 6
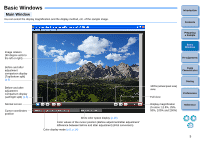
Basic Windows Main Window You can select the display magnification and the display method, etc. of the sample image. Image rotation (90 degree units to the left or right) Before and after adjustment comparison display (Top/bottom split) (p.6) Before and after adjustment comparison display (Left/ - Canon EOS Rebel XSi | Picture Style Editor 1.2 for Windows Instruction Manual - Page 7
Enlarging a Specific Area You can enlarge a specific area in the main window to 100%. In the main window, double-click the area you want to enlarge. Adjusting While Comparing with the Original Image You can display before and after versions of an adjusted image in the same window and perform - Canon EOS Rebel XSi | Picture Style Editor 1.2 for Windows Instruction Manual - Page 8
Navigator Window In the main window, the display position of an image when it is enlarged and the image histogram are displayed. You can also set warning indicators to prevent excessive settings being made. Displaying the [Navigator] window. O Select the [View] menu ` [Navigator]. Setting the - Canon EOS Rebel XSi | Picture Style Editor 1.2 for Windows Instruction Manual - Page 9
Tool Palette You can adjust the image characteristics of the Picture Style file by using the various functions of the [Tool palette]. Because the adjustments made with the [Tool palette] are immediately applied to the image in the main window, you can check the results as you work. Select a Picture - Canon EOS Rebel XSi | Picture Style Editor 1.2 for Windows Instruction Manual - Page 10
, Neutral and Faithful). You can also register and use a Picture Style file effective for the scene that you have downloaded from Canon's web site. Select a Picture Style. Preparing a Sample Basic Windows Pre-adjustments Image Characteristics ¿ The selected Picture Style is applied to the - Canon EOS Rebel XSi | Picture Style Editor 1.2 for Windows Instruction Manual - Page 11
Using a Downloaded Picture Style File Effective for the Scene 1 Click the [ ] button. ¿ The [Open Picture Style file] window appears. 2 Select a Picture Style file to be registered and click the [Open] button. ¿ The selected Picture Style file is applied to the image. Setting Sharpness, Contrast, - Canon EOS Rebel XSi | Picture Style Editor 1.2 for Windows Instruction Manual - Page 12
Making Minute Adjustments to Color You can make minute adjustments to a color you have specified, using the hue, saturation and luminosity functions in order to get the color you want. You can also set a range for the effect on surrounding colors which occurs when you adjust the colors you have - Canon EOS Rebel XSi | Picture Style Editor 1.2 for Windows Instruction Manual - Page 13
3 Adjust the color. Drag to the left or right to adjust ¿ The color is adjusted to the range specified in step 2 and the color of the image changes. O When dragging the slider, the point before adjustment [ ] and the point after adjustment [ ] will be displayed on the color wheel. 4 Check the range - Canon EOS Rebel XSi | Picture Style Editor 1.2 for Windows Instruction Manual - Page 14
Specifying the Color Directly In addition to specifying the adjustment point by clicking the color on the image (p.11), you can also specify the color directly on the color wheel or by entering the color value. Specifying the Color on the Color Wheel 1 Click the [ ] button (p.11). 2 Click the - Canon EOS Rebel XSi | Picture Style Editor 1.2 for Windows Instruction Manual - Page 15
Color Display Mode You can select the color display mode which will be the basis for color adjustment from three options (HSL, Lab or RGB) as well as check values for adjusted colors. Switches the color display mode Color value after adjustment Color value before adjustment O When "HSL" is selected - Canon EOS Rebel XSi | Picture Style Editor 1.2 for Windows Instruction Manual - Page 16
. Refer to "Applying Picture Style Files to the Camera" of "Chapter 2 Setting the Camera from Your Computer" in "EOS Utility Instruction Manual" (PDF electronic manual) for details on operation. Preparing a Sample Basic Windows Pre-adjustments ¿ The file is saved as a Picture Style file in the - Canon EOS Rebel XSi | Picture Style Editor 1.2 for Windows Instruction Manual - Page 17
Preferences You can perform color management settings such as specifying the work color space for the sample image displayed in the main window, or setting the profile for the monitor. 1 Select the [Tools] menu ` [Preferences]. ¿ The [Preferences] window appears. 2 Specify the required settings and - Canon EOS Rebel XSi | Picture Style Editor 1.2 for Windows Instruction Manual - Page 18
Troubleshooting selecting the user setting, refer to your computer User's Manual. PSE does not work O PSE does not operate display properly O Sample images that are not supported by PSE (p.2) do not display. Deleting the Start] button ` [All Programs] ` [Canon Utilities] ` [Picture Style Editor] ` - Canon EOS Rebel XSi | Picture Style Editor 1.2 for Windows Instruction Manual - Page 19
from the actual software. O The content of this Instruction Manual has been reviewed thoroughly. However, if you should notice any errors or omissions, please contact a Canon Service Center. O Please note that irrespective of the above-mentioned, Canon does not take responsibility for the outcome of
-
 1
1 -
 2
2 -
 3
3 -
 4
4 -
 5
5 -
 6
6 -
 7
7 -
8
-
9
-
10
-
11
-
12
-
13
-
14
-
15
-
16
-
17
-
18
-
19
 |
 |
Introduction
Preparing
a Sample
Basic
Windows
Pre-adjustments
Image
Characteristics
Saving
Preferences
Reference
Contents
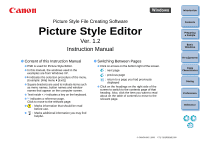
Picture Style File Creating Software
Picture Style Editor
Ver. 1.2
Instruction Manual
O
Content of this Instruction Manual
O
PSE is used for Picture Style Editor.
O
In this manual, the windows used in the
examples are from Windows XP.
O
`
indicates the selection procedure of the menu.
(Example: [File] menu
`
[Exit].)
O
Square brackets are used to indicate items such
as menu names, button names and window
names that appear on the computer screen.
O
Text inside < > indicates a key on the keyboard.
O
**
indicates a reference page.
Click to move to the relevant page.
O
:
Marks information that should be read
before use.
O
:
Marks additional information you may find
helpful.
© CANON INC. 2008
CT1-7151PSEWE-000
O
Switching Between Pages
O
Click on arrows on the bottom right of the screen.
: next page
: previous page
: return to a page you had previously
displayed
O
Click on the headings on the right side of the
screen to switch to the contents page of that
heading. Also, click the item you want to read
about on the table of contents to move to the
relevant page.