Canon FAX-JX200 FAX-JX200/JX201 User'sGuide - Page 39
Settings and Activity Reports, Selecting a Menu
 |
View all Canon FAX-JX200 manuals
Add to My Manuals
Save this manual to your list of manuals |
Page 39 highlights
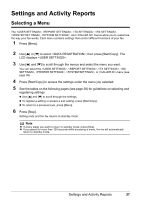
Settings and Activity Reports Selecting a Menu The , , , , , , and menus allow you to customize the way your fax works. Each menu contains settings that control different functions of your fax. 1 Press [Menu]. 2 Use [{] or [}] to select , then press [Start/Copy]. The LCD displays . 3 Use [{] and [}] to scroll through the menus and select the menu you want. You can select the , , , , , , or menu (see page 38). 4 Press [Start/Copy] to access the settings under the menu you selected. 5 See the tables on the following pages (see page 38) for guidelines on selecting and registering settings. z Use [{] and [}] to scroll through the settings. z To register a setting or access a sub-setting, press [Start/Copy]. z To return to a previous level, press [Menu]. 6 Press [Stop]. Setting ends and the fax returns to standby mode. Note z If at any stage you want to return to standby mode, press [Stop]. z If you pause for more than 120 seconds while accessing a menu, the fax will automatically return to standby mode. Settings and Activity Reports 37
-
 1
1 -
2
-
3
-
4
-
5
-
6
-
7
-
8
-
9
-
10
-
11
-
12
-
13
-
14
-
15
-
16
-
17
-
18
-
19
-
20
-
21
-
22
-
23
-
24
-
25
-
26
-
27
-
28
-
29
-
30
-
31
-
32
-
33
-
 34
34 -
 35
35 -
 36
36 -
 37
37 -
 38
38 -
 39
39 -
 40
40 -
 41
41 -
 42
42 -
 43
43 -
 44
44 -
45
-
46
-
47
-
48
-
49
-
50
-
51
-
52
-
53
-
54
-
55
-
56
-
57
-
58
-
59
-
60
-
61
-
62
-
63
-
64
-
65
-
66
-
67
-
68
-
69
-
70
-
71
-
72
-
73
-
74
-
75
-
76
-
77
-
78
 |
 |