Canon FAX-JX210P Easy Setup Instructions
Canon FAX-JX210P Manual
 |
View all Canon FAX-JX210P manuals
Add to My Manuals
Save this manual to your list of manuals |
Canon FAX-JX210P manual content summary:
- Canon FAX-JX210P | Easy Setup Instructions - Page 1
a power outlet. Important When cleaning the exterior of the machine, use a soft cloth to wipe it gently. For details, refer to "Cleaning Your Machine" in "Routine Maintenance" of the User's Guide. 2 Install the FINE Cartridge 3 Loading Paper a Lift the Cover until it locks into place. d Insert - Canon FAX-JX210P | Easy Setup Instructions - Page 2
Recommended screen appears, click Next. Note If straight lines are misaligned or print quality is not satisfactory after installing the printer driver, you may need to align the Print Head. Refer to "Aligning the FINE Cartridge" in "Routine Maintenance" of the User's Guide or On-screen Manual
-
 1
1 -
 2
2
 |
 |
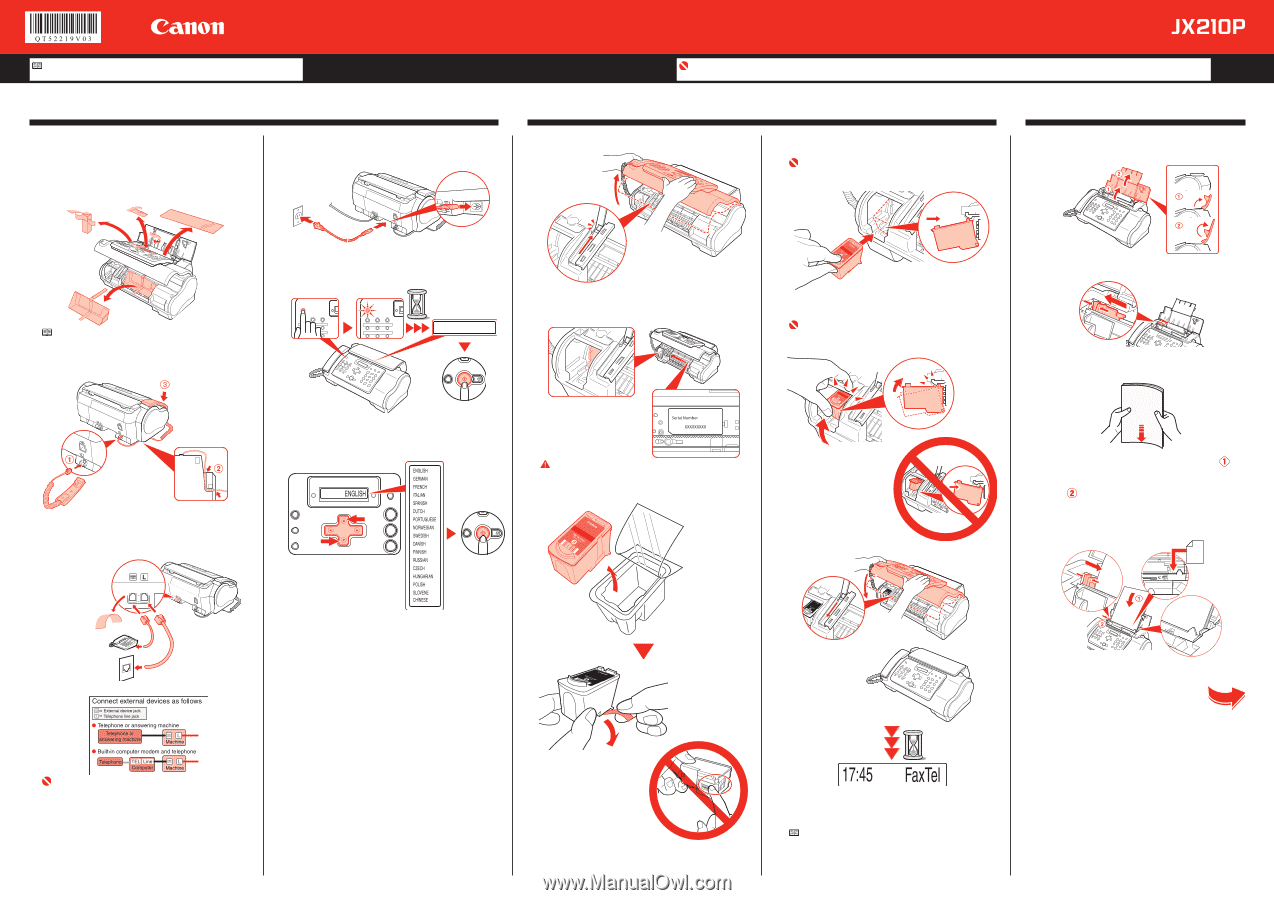
Start Here
Easy Setup Instructions
a
Unpack the Machine.
Confirm the included items against the illustration printed
on the lid of the packing box.
b
Open the Cover and remove the protective
materials.
Note
The actual protective materials may differ in shape, quantity, and
position from the ones shown in the illustration above.
c
Connect the Handset to the jack, and place it in
its cradle.
There is a groove
on the bottom of the
machine to hold the
Handset Cord.
d
Connect the telephone line and any necessary
external device.
For more details, see “Step 5” on the back of
this sheet.
Connect the telephone
line cord to the wall jack.
You can connect
an external device
(telephone or answering
machine) if necessary.
Important
Be sure to use supplied telephone line cable.
1
Prepare the Machine
a
Lift the Cover until it locks into place.
b
When the Cover is opened, the Holder will move
to the left.
Caution
Do not touch internal parts other than the Holder.
c
Prepare the FINE Cartridge.
Remove the
FINE Cartridge
from its package.
Remove the protective tape.
When doing so,
DO NOT TOUCH
the metallic areas.
e
Plug the power cord into the back of the
machine and connect the other end to a power
outlet.
f
Press [ON], wait until the LCD displays
<SELECT LANGUAGE>, then press
[Start/Copy].
SELECT
LANGUAGE
Press [Start/Copy].
g
Use [
{
] or [
}
] on the Operation Panel to select
the language for the LCD, then press
[Start/Copy].
Press [Start/Copy].
2
Install the FINE Cartridge
d
Insert the FINE Cartridge slightly slanted into the
Holder.
Important
Make sure the machine is turned on and [ON] lights green.
Make sure the Holder has moved to the left.
e
Push up the FINE Cartridge until it clicks into
place.
Important
If the Holder moves to the right side, close and reopen the
Cover to return the Holder to the left.
DO NOT
put the head of the FINE
Cartridge downward into the Holder.
f
Close the Cover.
Wait until the preparation
operation is completed: this takes
about one to two minutes.
Before using your machine, enter the date
and time correctly. For details, refer to
“Entering the Date and Time” in “Before
Using Your Machine” of the
User’s Guide
.
Note
If an error message is displayed on the LCD, refer to “LCD
Messages” in “Troubleshooting” of the
User’s Guide
.
The machine may make some operating noises when preparing
to print. This is normal operation.
•
•
•
•
Important
When cleaning the exterior of the machine, use a soft cloth to wipe it gently. For details, refer to “Cleaning Your Machine” in “Routine Maintenance” of
the
User’s Guide
.
a
Open the Document Cover and extend the
Paper Support to support the paper.
b
Squeeze, then slide the Paper Guide to the left.
c
Tap the edge of the stack on a flat surface to
even the stack.
d
Insert the stack face up into the Rear Tray
,
and align the right edge of the stack with the
right side of the Rear Tray. Then slide the Paper
Guide
snugly against the left edge of the
stack.
Be careful not to press the Paper Guide strongly against
the stack, or the paper will not be fed properly.
3
Loading Paper
Turn Over
For the instructions for Setting Receive
Mode, Connecting the Machine, and
Software Installation.
Note
Please note that the illustrations of the fax in this guide may differ from your model.