Canon FAXPHONE L100 FAXPHONE L100 Basic Operation Guide - Page 39
Canon FAXPHONE L100 Manual
 |
View all Canon FAXPHONE L100 manuals
Add to My Manuals
Save this manual to your list of manuals |
Page 39 highlights
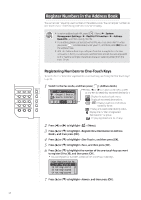
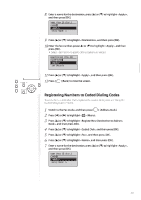
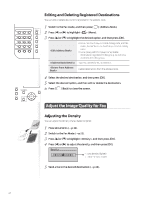
8 Enter a name for the destination, press [▲] or [▼] to highlight , and then press [OK]. Name (Max 16 char.) CANON Entry Mode: A 9 Press [▲] or [▼] to highlight , and then press [OK]. press [OK]. • Select to specify detailed options as needed. Destination (Max 40) 0123456789 Set Details 10 Enter the fax number, press [▲] or [▼] to highlight , and then Fax 11 Press [▲] or [▼] to highlight , and then press [OK]. 12 Press [ ] (Back) to close the screen. Registering Numbers to Coded Dialing Codes To send a fax to a destination that is registered to a coded dialing code, see "Using the Coded Dialing Codes" (→p.45). 1 2 3 4 5 6 7 Switch to the Fax mode, and then press [ Press [◄] or [►] to highlight < > (Menu). ] (Address Book). Press [▲] or [▼] to highlight , and then press [OK]. Press [▲] or [▼] to highlight , and then press [OK]. Press [▲] or [▼] to highlight , and then press [OK]. Press [▲] or [▼] to highlight , and then press [OK]. Enter a name for the destination, press [▲] or [▼] to highlight , and then press [OK]. Name (Max 16 char.) CANON Entry Mode: A 39
-
 1
1 -
2
-
3
-
4
-
5
-
6
-
7
-
8
-
9
-
10
-
11
-
12
-
13
-
14
-
15
-
16
-
17
-
18
-
19
-
20
-
21
-
22
-
23
-
24
-
25
-
26
-
27
-
28
-
29
-
30
-
31
-
32
-
33
-
 34
34 -
 35
35 -
 36
36 -
 37
37 -
 38
38 -
 39
39 -
 40
40 -
 41
41 -
 42
42 -
 43
43 -
 44
44 -
45
-
46
-
47
-
48
-
49
-
50
-
51
-
52
-
53
-
54
-
55
-
56
-
57
-
58
-
59
-
60
-
61
-
62
-
63
-
64
-
65
-
66
-
67
-
68
-
69
-
70
-
71
-
72
-
73
-
74
-
75
-
76
-
77
-
78
-
79
-
80
-
81
-
82
-
83
-
84
-
85
-
86
-
87
-
88
-
89
-
90
-
91
-
92
-
93
-
94
-
95
-
96
 |
 |
