Canon FAXPHONE L100 FAXPHONE L100 Basic Operation Guide - Page 56
Canon FAXPHONE L100 Manual
 |
View all Canon FAXPHONE L100 manuals
Add to My Manuals
Save this manual to your list of manuals |
Page 56 highlights
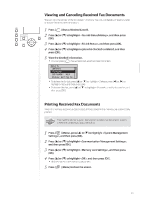
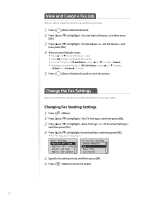
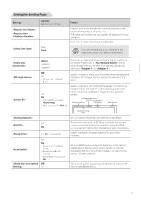
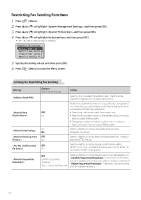
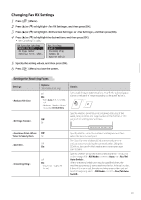
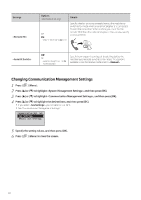
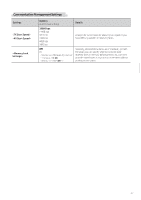
View and Cancel a Fax Job You can view or cancel fax jobs that are waiting or in progress. 1 2 3 4 Press [ ] (Status Monitor/Cancel). Press [▲] or [▼] to highlight , and then press [OK]. Press [▲] or [▼] to highlight or , and then press [OK]. View or cancel the job status. • Press [▲] or [▼] to view the fax job status. • Press [OK ] to view the detailed information. • To cancel the job, in , press [▲] or [▼] to select . • To delete or forward the job, in , press [▲] or [▼] to select or (→p.55). Press [ ] (Status Monitor/Cancel) to close the screen. 5 Change the Fax Settings You can change the fax settings for sending and receiving to suit your needs. Changing Fax Sending Settings 1 2 3 4 Press [ ] (Menu). Press [▲] or [▼] to highlight , and then press [OK]. Press [▲] or [▼] to highlight or , and then press [OK]. Press [▲] or [▼] to highlight the desired item, and then press [OK]. • See "Settings for Sending Faxes." Basic Settings Register Unit Name Register Unit Telep...Select Line Type Public Line Connect...TX Function Settings Change Defaults ECM TX Pause Time Auto Redial 5 6 Specify the setting values, and then press [OK]. Press [ ] (Menu) to close the screen. 56
-
 1
1 -
2
-
3
-
4
-
5
-
6
-
7
-
8
-
9
-
10
-
11
-
12
-
13
-
14
-
15
-
16
-
17
-
18
-
19
-
20
-
21
-
22
-
23
-
24
-
25
-
26
-
27
-
28
-
29
-
30
-
31
-
32
-
33
-
34
-
35
-
36
-
37
-
38
-
39
-
40
-
41
-
42
-
43
-
44
-
45
-
46
-
47
-
48
-
49
-
50
-
 51
51 -
 52
52 -
 53
53 -
 54
54 -
 55
55 -
 56
56 -
 57
57 -
 58
58 -
 59
59 -
 60
60 -
 61
61 -
62
-
63
-
64
-
65
-
66
-
67
-
68
-
69
-
70
-
71
-
72
-
73
-
74
-
75
-
76
-
77
-
78
-
79
-
80
-
81
-
82
-
83
-
84
-
85
-
86
-
87
-
88
-
89
-
90
-
91
-
92
-
93
-
94
-
95
-
96
 |
 |