Canon FAXPHONE L100 FAXPHONE L100 Basic Operation Guide - Page 80
Canon FAXPHONE L100 Manual
 |
View all Canon FAXPHONE L100 manuals
Add to My Manuals
Save this manual to your list of manuals |
Page 80 highlights
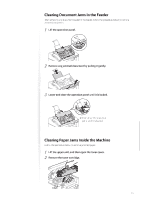
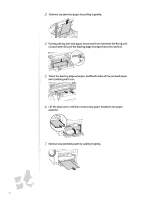
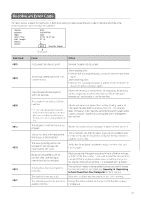
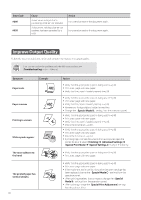
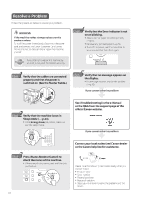
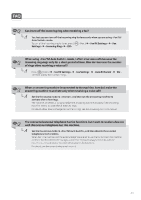
Error Code #099 Cause A user canceled a job that is processing to be sent or received. A document waiting to be sent or received has been canceled by a user. Action Try to send or receive the document again. #995 Try to send or receive the document again. Improve Output Quality Follow the recommended actions for each symptom to improve the output quality. If you cannot solve the problem with the following actions, see [Troubleshooting] in the e-Manual. Symptom Example Action Paper curls • Verify that the appropriate paper is being used (→p.18). • Print a test page with new paper. • Verify that the paper is loaded properly (→p.18 Verify that the appropriate paper is being used (→p.18). Print a test page with new paper. Verify that the paper is loaded properly (→p.18). Remove any foreign objects inside the machine. Change the setting from the operation panel. Verify that the appropriate paper is being used (→p.18). Print a test page with new paper. Verify that the paper is loaded properly (→p.18). Check the toner level (→p.67). Verify that the appropriate paper is being used (→p.18). Print a test page with new paper. Check the toner level (→p.67). If printing high-contrast documents from a computer, open the printer driver and select [Finishing] [Advanced Settings] [Special Print Mode] [Special Settings 2] to adjust the density. Paper creases Printing is uneven White specks appear The toner adheres to the hand • Verify that the appropriate paper is being used (→p.18). • Print a test page with new paper. • Verify that the appropriate paper is being used (→p.18). • Print a test page with new paper. • If the machine is not in use for a long after the toner cartridge has The printed paper has vertical streaks been replaced, change the settings from the operation panel. • When printing received faxes or reports, change the settings from the operation panel. • When printing, change the [Special Print Adjustment] settings from the printer driver. 80
-
 1
1 -
2
-
3
-
4
-
5
-
6
-
7
-
8
-
9
-
10
-
11
-
12
-
13
-
14
-
15
-
16
-
17
-
18
-
19
-
20
-
21
-
22
-
23
-
24
-
25
-
26
-
27
-
28
-
29
-
30
-
31
-
32
-
33
-
34
-
35
-
36
-
37
-
38
-
39
-
40
-
41
-
42
-
43
-
44
-
45
-
46
-
47
-
48
-
49
-
50
-
51
-
52
-
53
-
54
-
55
-
56
-
57
-
58
-
59
-
60
-
61
-
62
-
63
-
64
-
65
-
66
-
67
-
68
-
69
-
70
-
71
-
72
-
73
-
74
-
 75
75 -
 76
76 -
 77
77 -
 78
78 -
 79
79 -
 80
80 -
 81
81 -
 82
82 -
 83
83 -
 84
84 -
 85
85 -
86
-
87
-
88
-
89
-
90
-
91
-
92
-
93
-
94
-
95
-
96
 |
 |