Canon FAXPHONE L90 Reference Guide FAXPHONE L90 - Page 101
sheet B with a clean, soft, lint-free cloth, moistened with water.
 |
UPC - 013803082029
View all Canon FAXPHONE L90 manuals
Add to My Manuals
Save this manual to your list of manuals |
Page 101 highlights
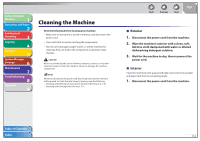
Before Using the Machine 1 Document and Paper 2 Sending and Receiving 3 Copying 4 Printing 5 System Manager Settings 6 Maintenance 7 Troubleshooting 8 Appendix 9 3. Lower the scanning platform (A) in the document delivery slot. 4. Gently wipe the scanning glass (A) and white sheet (B) with a clean, soft, lint-free cloth moistened with water. Do not dampen the cloth too much, as this may tear the document or damage the machine. Back Previous Next TOP 5. After the scanning area becomes dry, lift the scanning platform back into place. 6. Insert the paper stack cover. Make sure the back end of the cover does not catch and lower the scanning platform. 7. Reconnect the power cord. Table of Contents Index 7-7
-
 1
1 -
2
-
3
-
4
-
5
-
6
-
7
-
8
-
9
-
10
-
11
-
12
-
13
-
14
-
15
-
16
-
17
-
18
-
19
-
20
-
21
-
22
-
23
-
24
-
25
-
26
-
27
-
28
-
29
-
30
-
31
-
32
-
33
-
34
-
35
-
36
-
37
-
38
-
39
-
40
-
41
-
42
-
43
-
44
-
45
-
46
-
47
-
48
-
49
-
50
-
51
-
52
-
53
-
54
-
55
-
56
-
57
-
58
-
59
-
60
-
61
-
62
-
63
-
64
-
65
-
66
-
67
-
68
-
69
-
70
-
71
-
72
-
73
-
74
-
75
-
76
-
77
-
78
-
79
-
80
-
81
-
82
-
83
-
84
-
85
-
86
-
87
-
88
-
89
-
90
-
91
-
92
-
93
-
94
-
95
-
 96
96 -
 97
97 -
 98
98 -
 99
99 -
 100
100 -
 101
101 -
 102
102 -
 103
103 -
 104
104 -
 105
105 -
 106
106 -
107
-
108
-
109
-
110
-
111
-
112
-
113
-
114
-
115
-
116
-
117
-
118
-
119
-
120
-
121
-
122
-
123
-
124
-
125
-
126
-
127
-
128
-
129
-
130
-
131
-
132
-
133
-
134
-
135
-
136
-
137
-
138
-
139
-
140
-
141
-
142
-
143
-
144
-
145
-
146
-
147
-
148
-
149
-
150
-
151
-
152
-
153
-
154
-
155
-
156
-
157
-
158
-
159
-
160
-
161
-
162
-
163
-
164
-
165
-
166
-
167
-
168
-
169
-
170
-
171
-
172
-
173
-
174
-
175
-
176
-
177
-
178
-
179
-
180
-
181
-
182
-
183
-
184
-
185
-
186
-
187
-
188
-
189
-
190
-
191
-
192
-
193
 |
 |

1
2
3
4
5
6
7
8
9
Back
Next
Previous
TOP
7-7
Before Using the
Machine
Document and Paper
Sending and
Receiving
Copying
Printing
System Manager
Settings
Maintenance
Troubleshooting
Appendix
Index
Table of Contents
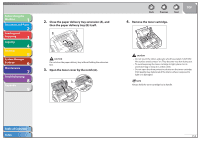
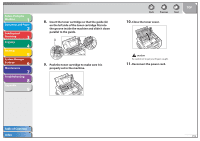
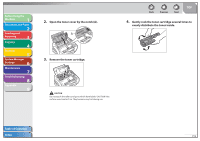
3.
Lower the scanning platform (A) in the
document delivery slot.
4.
Gently wipe the scanning glass (A) and white
sheet (B) with a clean, soft, lint-free cloth
moistened with water.
Do not dampen the cloth too much, as this may tear the document
or damage the machine.
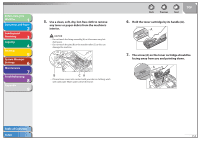
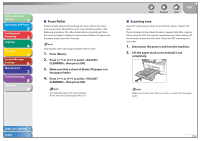
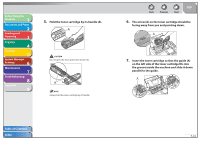
5.
After the scanning area becomes dry, lift the
scanning platform back into place.
6.
Insert the paper stack cover.
Make sure the back end of the cover does not catch and lower the
scanning platform.
7.
Reconnect the power cord.