Canon FAXPHONE L90 Reference Guide FAXPHONE L90 - Page 137
If <LOAD CORRECT PAPER> is displayed, Re-Loading the Paper, Changing the Paper Size Setting
 |
UPC - 013803082029
View all Canon FAXPHONE L90 manuals
Add to My Manuals
Save this manual to your list of manuals |
Page 137 highlights
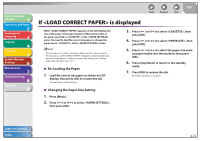
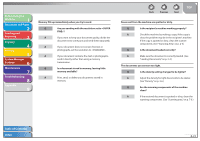
Before Using the Machine 1 Document and Paper 2 Sending and Receiving 3 Copying 4 Printing 5 System Manager Settings 6 Maintenance 7 Troubleshooting 8 Appendix 9 Back Previous Next TOP If is displayed When appears on the LCD display, the size of the paper in the paper feeder is different from that of the paper specified in of the menu. You need to load the correct size paper or change the paper size in of the menu. - For print jobs, you need to specify the paper size from your computer. - For copy jobs, disappears automatically. Load the correct size paper or change the paper size setting. (See "Setting Paper Size and Type," on p. 2-11.) ˙ Re-Loading the Paper 1. Load the correct size paper as shown on LCD display, then press [OK] to resume the job. The machine re-starts printing. 3. Press [ ] or [ ] to select , then press [OK]. 4. Press [ ] or [ ] to select , then press [OK]. 5. Press [ ] or [ ] to select the paper size same as paper loaded into the machine, then press [OK]. 6. Press [Stop/Reset] to return to the standby mode. 7. Press [OK] to resume the job. No further operation is required. ˙ Changing the Paper Size Setting 1. Press [Menu]. 2. Press [ ] or [ ] to select , then press [OK]. Table of Contents Index 8-18
-
 1
1 -
2
-
3
-
4
-
5
-
6
-
7
-
8
-
9
-
10
-
11
-
12
-
13
-
14
-
15
-
16
-
17
-
18
-
19
-
20
-
21
-
22
-
23
-
24
-
25
-
26
-
27
-
28
-
29
-
30
-
31
-
32
-
33
-
34
-
35
-
36
-
37
-
38
-
39
-
40
-
41
-
42
-
43
-
44
-
45
-
46
-
47
-
48
-
49
-
50
-
51
-
52
-
53
-
54
-
55
-
56
-
57
-
58
-
59
-
60
-
61
-
62
-
63
-
64
-
65
-
66
-
67
-
68
-
69
-
70
-
71
-
72
-
73
-
74
-
75
-
76
-
77
-
78
-
79
-
80
-
81
-
82
-
83
-
84
-
85
-
86
-
87
-
88
-
89
-
90
-
91
-
92
-
93
-
94
-
95
-
96
-
97
-
98
-
99
-
100
-
101
-
102
-
103
-
104
-
105
-
106
-
107
-
108
-
109
-
110
-
111
-
112
-
113
-
114
-
115
-
116
-
117
-
118
-
119
-
120
-
121
-
122
-
123
-
124
-
125
-
126
-
127
-
128
-
129
-
130
-
131
-
 132
132 -
 133
133 -
 134
134 -
 135
135 -
 136
136 -
 137
137 -
 138
138 -
 139
139 -
 140
140 -
 141
141 -
 142
142 -
143
-
144
-
145
-
146
-
147
-
148
-
149
-
150
-
151
-
152
-
153
-
154
-
155
-
156
-
157
-
158
-
159
-
160
-
161
-
162
-
163
-
164
-
165
-
166
-
167
-
168
-
169
-
170
-
171
-
172
-
173
-
174
-
175
-
176
-
177
-
178
-
179
-
180
-
181
-
182
-
183
-
184
-
185
-
186
-
187
-
188
-
189
-
190
-
191
-
192
-
193
 |
 |