Canon MP470 MP470 series Quick Start Guide
Canon MP470 - PIXMA Color Inkjet Manual
 |
UPC - 013803089882
View all Canon MP470 manuals
Add to My Manuals
Save this manual to your list of manuals |
Canon MP470 manual content summary:
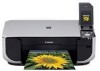
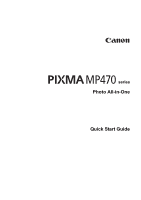
- Canon MP470 | MP470 series Quick Start Guide - Page 1
Photo All-in-One series Quick Start Guide - Canon MP470 | MP470 series Quick Start Guide - Page 2
self-help in an intuitively guided interactive troubleshooting environment, the place to start is our helpful tech support web site. In addition, the latest driver downloads, answers to frequently asked questions, product information, and "where to buy" instructions are found here. 2. Email Tech - Canon MP470 | MP470 series Quick Start Guide - Page 3
series Photo All-in-One Quick Start Guide - Canon MP470 | MP470 series Quick Start Guide - Page 4
the prior written consent of Canon U.S.A., Inc. © 2007 Canon U.S.A., Inc. Disclaimer Canon U.S.A., Inc. has reviewed this manual thoroughly in order that it will be an easy-to-use guide to your Canon PIXMA MP470 series Photo All-in-One. All statements, technical information and recommendations - Canon MP470 | MP470 series Quick Start Guide - Page 5
Appears on the Computer Screen 68 Error Message Appears on a PictBridge Compliant Device 70 Cannot Print Properly via Bluetooth Communication 71 Cannot Print Properly from a Photo Index Sheet 71 Cannot Remove a Memory Card 71 Scanning Problems 72 The Document Cover Comes Off 72 Appendix - Canon MP470 | MP470 series Quick Start Guide - Page 6
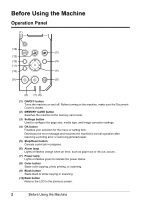
or flashes orange when an error, such as paper-out or ink-out, occurs. (7) Power lamp Lights or flashes green to indicate the power status. (8) Color button Starts color copying, photo printing, or scanning. (9) Black button Starts black & white copying or scanning. (10) Back button Returns the LCD - Canon MP470 | MP470 series Quick Start Guide - Page 7
such as the number of copies. (12) Menu button Displays menus. (13) SCAN button Switches the machine to the scan mode. Used when the machine is connected to your computer. For details, refer to the Scanning Guide on-screen manual. (14) COPY button Switches the machine to the copy mode. Before Using - Canon MP470 | MP470 series Quick Start Guide - Page 8
screen on the LCD. This section describes how to use the menu screen and the settings screen. (6) (1) (2) (7) (3) (8) (4) (5) (9) (1) SCAN button (2) COPY button (3) Menu button (4) {, }, [, and ] buttons (5) Back button (6) LCD (Liquid Crystal Display) (7) MEMORY CARD button (8) Settings - Canon MP470 | MP470 series Quick Start Guide - Page 9
copy amount Wireless print settings*1, 2 PictBridge settings (page 32) Bluetooth settings*1, 2 Other settings*1 Date display Read/write attribute Adjust contrast Slide show setting Quiet mode Language selection*1 Reset setting*1 *1 For details, refer to the User's Guide onscreen manual. *2 Appears - Canon MP470 | MP470 series Quick Start Guide - Page 10
from Your Computer" on page 29. When printing from a wireless communication device, refer to "Printing Photographs from a Wireless Communication Device" in the User's Guide on-screen manual. This section describes the procedure to change the settings, taking the steps to specify the page size for - Canon MP470 | MP470 series Quick Start Guide - Page 11
the setting. (1) Use the [ or ] button to change the setting. Example: Change to 4"x6"(101x152) here. 5 Complete setting. (1) Press the Settings button. The LCD returns to the previous screen. Note For details on the setting Items z For - Canon MP470 | MP470 series Quick Start Guide - Page 12
confirm the following. z The FINE Cartridges are installed properly. If you setup sheet to complete them. 1 Open the Operation Panel and press the ON/OFF button to turn on the machine. The Power lamp flashes and then remains lit green. Important If the Alarm lamp begins to flash orange and an error - Canon MP470 | MP470 series Quick Start Guide - Page 13
is not operated for about five minutes*. * You cannot change the wait time before the LCD goes out. Note When / 15 mm „ Loading Original Documents Load originals to copy or scan on the Platen Glass. Note Make sure any glue, ink, correction fluid, or the like on the original document is completely - Canon MP470 | MP470 series Quick Start Guide - Page 14
about making copies, see "Copying" on page 20. z For details about scanning images, see "Scanning Using the Operation Panel of the Machine" in "Scanning Images" on page 31. z To scan photographs Place the photograph at least 0.4 inches / 10 mm away from and in square with the edges of the Platen - Canon MP470 | MP470 series Quick Start Guide - Page 15
Doing so may cause the scanner to malfunction or the Platen Glass to break. Note z If photographs are placed closer, they may be scanned as a single image. For details, refer to the Scanning Guide on-screen manual. z For details about scanning images, see "Scanning Using the Operation Panel of the - Canon MP470 | MP470 series Quick Start Guide - Page 16
Specialty Media Canon recommends that you use Canon genuine media to ensure optimal print quality. z Photo Quality Media z Glossy Photo Paper z Matte Photo Paper z Photo Paper Plus Double Sided z Photo Paper Plus Glossy z Photo Paper Plus Semi-gloss z Photo Paper Pro z Photo Stickers z Media - Canon MP470 | MP470 series Quick Start Guide - Page 17
Paper Glossy Photo Paper Matte Photo Paper Glossy Photo Paper Photo Paper Plus Glossy Photo Paper Pro Photo Paper Plus Glossy Photo Paper Plus Double Sided Photo Paper Plus Glossy T-Shirt Transfers *1 Paper with a Model Number is Canon specialty media. Refer to the instruction manual supplied with - Canon MP470 | MP470 series Quick Start Guide - Page 18
stuck to one another causing them not to be fed properly. In this case, load one sheet " of the User's Guide onscreen manual. When printing photos saved on a memory card ink is fixed. Note For a detailed description of printing media types, refer to "Printing Media" in the User's Guide onscreen manual - Canon MP470 | MP470 series Quick Start Guide - Page 19
orientation (B) can cause the paper to be jammed. (A) (B) Note z We recommend using genuine Canon photo media when printing photographs. For details on the specialty media Canon provides for use with its various printers, see "Using Specialty Media" on page 12. When Printing on Plain Paper z You - Canon MP470 | MP470 series Quick Start Guide - Page 20
Thickness Lever, refer to "Inside" in "Main Components" of the User's Guide on-screen manual. 3 Load the paper. (1) (1) Load the paper in the Rear Paper Size) and Media Type in the printer driver. For details on printer driver settings, see "Printing with Windows" on page 29 or "Printing with - Canon MP470 | MP470 series Quick Start Guide - Page 21
„ Loading Envelopes Use either European DL or US Comm. Env. #10-sized envelope. Important z You need to print from the computer to print on envelopes. z Do not use the following envelopes: - Envelopes with a double flap (or - Canon MP470 | MP470 series Quick Start Guide - Page 22
to "Inside" in "Main Components" of the User's Guide on-screen manual. (3) (A) Printing orientation (B) Make sure the flaps are folded. 3 Specify the settings in the printer driver. (1) Select Envelope in Media Type. (2) Select the size for envelopes. In Windows®, select DL Env. or Comm. Env - Canon MP470 | MP470 series Quick Start Guide - Page 23
of the Rear Tray with the print side facing UP. (2) Pinch the Paper Guide and slide it against the left side of the (1) paper stack. (3) Set Paper Size) and Media Type in the printer driver. For details on printer driver settings, see "Printing with Windows" on page 29 or "Printing with - Canon MP470 | MP470 series Quick Start Guide - Page 24
[ button to decrease the intensity and the ] button to increase it. 6 Press the Color button for color copying, or the Black button for black & white copying. Setting Items You can change the copy settings such as page size, media type, image quality etc. by using the Settings button. Note z To - Canon MP470 | MP470 series Quick Start Guide - Page 25
renders tones in a range of grays instead of black or white. (4) Magnification Specify the reduction/enlargement method. For details, refer to "Reducing or Enlarging a Copy" in "Making Copies" of the User's Guide on-screen manual. Tab 2 You can specify auto intensity. (1) (1) Auto intensity - Canon MP470 | MP470 series Quick Start Guide - Page 26
ON is selected, you can change the intensity by using the [ or ] button. Move the cursor to the center of the slide bar to enable auto intensity again. Using Useful Copy Functions For details, refer to "Using Useful Copy Functions" in the User's Guide on-screen manual. Reducing or Enlarging a Copy - Canon MP470 | MP470 series Quick Start Guide - Page 27
Digital memory card z SDHC memory card z MultiMediaCard z Compact Flash (CF) Card Supports Type I/II (3.3 V) z Microdrive z MEMORY STICK z MEMORY STICK PRO Memory cards that can be inserted in the Card Slot using the adapter: Important If one of the following memory cards is inserted without an - Canon MP470 | MP470 series Quick Start Guide - Page 28
Printable Image Data This machine supports JPEG and TIFF images created by DCF ver. 1.0/2.0 See "Turning the Machine On and Off" on page 8. 2 Open the Card Slot Cover. 3 Insert one and only one memory card into the Card Slot. Insert a memory card with the labeled side facing to the right. Card - Canon MP470 | MP470 series Quick Start Guide - Page 29
] button to display the photo to print. Note You can change the way that photos are displayed by pressing the OK button when the Display photo function is being used to view the photos on the LCD. For details, refer to "Printing Photographs" in the User's Guide on-screen manual. (2) Press the Color - Canon MP470 | MP470 series Quick Start Guide - Page 30
type, or print quality by using the Settings button. Note z To change the tab, use the { or } button to select the tab and file no. only. Tab 2 You can optimize photos with the functions below. (1) (6) (2) (7) (3) (8) (4) (9) (5) (10) (1) Red eye correction Corrects red eyes in portraits - Canon MP470 | MP470 series Quick Start Guide - Page 31
black areas. (5) Face brightener Brightens a darkened face on the photo skin tone. (10) Effects Applies special effects to the photo, such as photo with a frame on Canon Photo Stickers. Print all photos Prints all photos saved on the memory card. Photo Index print Prints an index of all the photos - Canon MP470 | MP470 series Quick Start Guide - Page 32
OK button to start printing the Photo Index Sheet. 7 Fill in the appropriate circles in the Photo Index Sheet. 8 Load paper as you specified in the Photo Index Sheet. 9 Use the [ or ] button to select Scan sheet and print, then press the OK button. 10 Place the Photo Index Sheet face-down on the - Canon MP470 | MP470 series Quick Start Guide - Page 33
required settings and click OK. Note For details on the printer driver functions, click Help or Instructions to view the online help or the PC Printing Guide on-screen manual. Instructions is only displayed when the on-screen manuals are installed. 6 Click Print (or OK). Printing from Your Computer - Canon MP470 | MP470 series Quick Start Guide - Page 34
application software. 3 Select Page Setup on the application software's software's File menu. 8 Select Quality & Media in the pop-up menu. 9 Specify the required settings. Note For details on the printer driver functions, click to view the PC Printing Guide on-screen manual. If the on-screen manuals - Canon MP470 | MP470 series Quick Start Guide - Page 35
application software and the Control Panel (Windows Vista and Windows XP only) to scan originals with this machine. For detailed operations, refer to the Scanning Guide on-screen manual. „ Scanning Using the Operation Panel of the Machine For details, refer to "Scanning Methods" in the User's Guide - Canon MP470 | MP470 series Quick Start Guide - Page 36
cable recommended by the device's manufacturer. Caution Do not connect any equipment other than PictBridge compliant devices or the optional Bluetooth cable between the PictBridge compliant device and machine, follow the instructions given in the device's instruction manual. Note When printing photos - Canon MP470 | MP470 series Quick Start Guide - Page 37
instruction manual. (1) Make sure that the PictBridge compliant device is turned off. (2) Connect the PictBridge compliant device to the machine using a USB cable . If your PictBridge compliant device does not have setting menu, change the setting from the machine. For details, see "Setting on - Canon MP470 | MP470 series Quick Start Guide - Page 38
device, be sure to follow the instructions given in the instruction manual of your PictBridge compliant device. Note Canon genuine papers depending on the country or region of purchase. *4 When printing on Photo Paper Plus Semi-gloss 8" x 10" / 203.2 x 254.0 mm (SG-201), select 20 x 25 cm/8" x 10 - Canon MP470 | MP470 series Quick Start Guide - Page 39
A4- or Letter-sized paper. Sticker paper: When you select 10 x 15 cm/4" x 6" for Paper size, you can print image. If you are using a Canon-brand PictBridge compliant device, the following additional sky as well as on black areas. - Face brightens a darkened face on the photo taken against the light. - Canon MP470 | MP470 series Quick Start Guide - Page 40
(1) Use the [ or ] button to select the tab to set. (2) Use the { or } button to select the item to set. (3) Use the [ or ] button to change the item to set. (4) Repeat step (1) and (3) to specify the item. (5) After finishing all settings you need, then press the OK button. z Setting Items Setting - Canon MP470 | MP470 series Quick Start Guide - Page 41
. Makes green and blue more lively. Automatically optimizes brightness and tone of a photo. Reduces the noise on blue areas like the sky as well as on black areas. Brightens a darkened face on the photo taken against the light. Corrects and smooths the jagged contours for printing. Adjusts - Canon MP470 | MP470 series Quick Start Guide - Page 42
Cartridge. z If the error message is displayed on the LCD, see "An Error Message Is Displayed on the LCD" on page 57. z Increase the Print Quality setting in the printer driver Print Head Cleaning" on page 42. If the problem is not resolved after performing Print Head Cleaning twice Step 3 See "Print - Canon MP470 | MP470 series Quick Start Guide - Page 43
Pattern Print the nozzle check pattern to determine whether the ink ejects properly from the print head nozzles. 1 Make on the Paper Thickness Lever, refer to "Inside" in "Main Components" of the User's Guide on-screen manual. 3 Print the nozzle check pattern. (1) Press the Menu button. (2) Use the - Canon MP470 | MP470 series Quick Start Guide - Page 44
. Note The nozzle check pattern will not be printed correctly if there is not enough ink. Replace the FINE Cartridge if the remaining amount of ink is insufficient. See "Replacing a FINE Cartridge" on page 46. 1 Check the nozzle check pattern you printed. (1) (2) (1) Check if lines in this - Canon MP470 | MP470 series Quick Start Guide - Page 45
z If Lines Are Missing or White Streaks Are Present (1) Select Also B and press the OK button. The cleaning confirmation screen is displayed. (2) Select Yes and press the OK button to start Print Head Cleaning. See "Print Head Cleaning" on page 42. Routine Maintenance 41 - Canon MP470 | MP470 series Quick Start Guide - Page 46
ink to be absorbed in the ink absorber. Cleaning the Print Head consumes ink in "Main Components" of the User's Guide on-screen manual. 3 Start Print Head Cleaning. Cleaning finishes. This takes about one minute. The pattern print confirmation 40. Note If the problem is not resolved after performing - Canon MP470 | MP470 series Quick Start Guide - Page 47
" in "Main Components" of the User's Guide on-screen manual. 3 Start Print Head Deep Cleaning. problem is not resolved, perform Print Head Deep Cleaning again. (3) If this does not solve the problem, a FINE Cartridge may have run out of ink. Replace it with a new one. See "Replacing a FINE Cartridge - Canon MP470 | MP470 series Quick Start Guide - Page 48
the Paper Thickness Lever to the left. For details on the Paper Thickness Lever, refer to "Inside" in "Main Components" of the User's Guide on-screen manual. 3 Print the print head alignment pattern. (1) Press the Menu button. (2) Use the [ or ] button to select Maintenance/settings, then press the - Canon MP470 | MP470 series Quick Start Guide - Page 49
4 Adjust the print head position. (1) Check the printed patterns and use the [ or ] button to input the number of the pattern in column A that has the least noticeable streaks. Note If it is difficult to pick the best pattern, pick the setting that produces the least noticeable white streaks. (A) - Canon MP470 | MP470 series Quick Start Guide - Page 50
then starts to detect a remaining ink level. If you install a used FINE Cartridge, the indicated ink level of it may not be correct. In such case, refer to the ink level information only as a guide. You can check the current ink level by pressing the COPY button, the SCAN button, or the MEMORY CARD - Canon MP470 | MP470 series Quick Start Guide - Page 51
with both cartridges. Canon recommends to use new FINE cartridges in order to obtain optimum qualities. Even when printing with one ink only, print with leaving the empty FINE Cartridge installed. If either of the Color FINE Cartridge or Black FINE Cartridge is not installed, an error occurs and - Canon MP470 | MP470 series Quick Start Guide - Page 52
Tray. 2 Make sure that the machine is turned on, lift the Scanning Unit (Printer Cover), then pull the Scanning Unit Support (A) down into place. The FINE Cartridge Holder moves to the left. Caution (A) z Do not hold the FINE Cartridge Holder to stop or move it. z Do not touch the metallic - Canon MP470 | MP470 series Quick Start Guide - Page 53
touch it. z Be careful not to stain your clothes and hands with ink on the removed protective tape. 5 Install the FINE Cartridge. (1) Insert a new FINE Cartridge all the B way into the appropriate slot. The Black FINE Cartridge should be installed into the left slot ( B ) and the Color FINE - Canon MP470 | MP470 series Quick Start Guide - Page 54
get your fingers caught. Note z If the error message is still displayed after the Scanning Unit (Printer Cover) is closed, see "An Error Message Is Displayed on the LCD" on page 57. z When you start printing after replacing the FINE Cartridge, Print Head Cleaning is performed automatically. Do not - Canon MP470 | MP470 series Quick Start Guide - Page 55
to turn off the machine, the machine automatically puts a protective cap on the Print Head to prevent the ink from drying. If you remove the power cord or switch off the power outlet strip before the Power lamp goes out, this capping will not be done properly, causing the Print Head to dry and clog - Canon MP470 | MP470 series Quick Start Guide - Page 56
powders or fine threads may remain inside the machine and cause problems such as a blocked Print Head and poor printing results. power cord before cleaning the machine. Important The inner side of the Document Cover (white sheet) (B) is easily damaged, so wipe it gently. With a clean, soft, lint-free - Canon MP470 | MP470 series Quick Start Guide - Page 57
on the Paper Thickness Lever, refer to "Inside" in "Main Components" of the User's Guide on-screen manual. 6 Repeat step 2 three times. The paper cleans the paper feed roller as it feeds through the machine. If the problem is not resolved, wipe the paper feed roller (A) located on the right side - Canon MP470 | MP470 series Quick Start Guide - Page 58
Inside" in "Main Components" of the User's Guide on-screen manual. 5 Perform bottom plate cleaning. (1) ink, perform Bottom Plate Cleaning again. If the problem is not resolved after performing cleaning again, the protrusions inside the machine may be stained. Clean them according to instructions - Canon MP470 | MP470 series Quick Start Guide - Page 59
„ Cleaning the Protrusions Inside the Machine If protrusions inside the machine are stained, wipe off any ink from the protrusions using a cotton swab or the like. Caution Be sure to turn off the power and disconnect the power cord before cleaning the machine. Routine Maintenance 55 - Canon MP470 | MP470 series Quick Start Guide - Page 60
the methods of machine operation for troubleshooting. To handle problems using your computer, refer to "Troubleshooting" in the User's Guide on-screen manual. For details on how to view the on-screen manuals, see "Reading the On-screen Manuals" on page 74. z "An Error Message Is Displayed on the LCD - Canon MP470 | MP470 series Quick Start Guide - Page 61
machine. Open the Scanning Unit (Printer Cover) and install the appropriate FINE Cartridge. If the error is not resolved, the FINE Cartridge may be damaged. Contact your Canon Service representative. One or more ink cartridges are not installed in place. U075 Some ink cartridges are not installed - Canon MP470 | MP470 series Quick Start Guide - Page 62
the machine. **** Error code z Make sure that the protective material is removed from the FINE Cartridge Holder, then turn the machine off and back on again. If the problem is not resolved, contact your Canon Service representative. z Turn off the machine, and unplug the power cord of the machine - Canon MP470 | MP470 series Quick Start Guide - Page 63
your Canon service representative. Follow the procedure described in your setup sheet for proper installation. If the MP Drivers were not installed correctly, uninstall the MP Drivers, restart your computer, and then reinstall the MP Drivers. Refer to the PC Printing Guide on-screen manual. Note - Canon MP470 | MP470 series Quick Start Guide - Page 64
, and the USB hub if you are using one, support USB 2.0 Hi- Speed connection. Be sure to use a certified USB 2.0 Hi-Speed cable. We recommend the cable to be no longer than around 10 feet / 3 meters. z The operating system of your computer supports USB 2.0 Hi-Speed connection. Obtain and install the - Canon MP470 | MP470 series Quick Start Guide - Page 65
Panel on the machine. Refer to "Printing Photographs from a Wireless Communication Device" in the User's Guide on-screen manual. Confirm by using the printer driver. Refer to the PC Printing Guide on-screen manual. z Check 3: If the problem is not resolved, there may be other causes. See also - Canon MP470 | MP470 series Quick Start Guide - Page 66
Not Satisfactory" in the User's Guide on-screen manual. „ Printing Does Not Start/Printing Is Blurred/Colors Are Wrong/Straight Lines Are Misaligned Cause Action FINE Cartridge is not installed properly Remove the FINE Cartridge, then reinstall it. / There is no ink left. Small dusts may - Canon MP470 | MP470 series Quick Start Guide - Page 67
or images in deep color, we recommend using Photo Paper Pro or other Canon specialty paper. See "Media Types You Cannot in the paper source, the inside will become stained with ink, causing printed paper to become smudged. Perform the Bottom Plate User's Guide on-screen manual. Troubleshooting 63 - Canon MP470 | MP470 series Quick Start Guide - Page 68
ink. Resize your original document in your application software. For details on recommended printing area, refer to "Printing Area" in the User's Guide on-screen manual in height. (A) (B) We recommend printing curl-corrected paper one sheet at a time. Note Depending on the media type, Troubleshooting - Canon MP470 | MP470 series Quick Start Guide - Page 69
Properties Dialog Box Directly from Control Panel" in "Opening the Printer Properties Dialog Box (Windows)" of the User's Guide on-screen manual. (2)Click the Maintenance tab and then View Printer Status. The printer status monitor is displayed. (3)Click Display Print Queue. (4)Select Cancel All - Canon MP470 | MP470 series Quick Start Guide - Page 70
Power lamp is flashing green, the machine is initializing. Wait until the Power lamp stops flashing and remains lit green. Note When printing large data such as a photo against the right side of the Rear Tray and slide the Paper Guide so that it just touches the left edge of the stack. Troubleshooting - Canon MP470 | MP470 series Quick Start Guide - Page 71
tears and a piece remains inside the machine, turn the machine off, open the Scanning Unit (Printer Cover) and remove it. Be careful not to touch the components inside the paper or the paper jam error continues after removing the paper, contact your Canon Service representative. Troubleshooting 67 - Canon MP470 | MP470 series Quick Start Guide - Page 72
and try printing again. MP Drivers are not installed properly. The MP Drivers may not be installed properly. Uninstall them following the procedure described in the PC Printing Guide on-screen manual and reinstall them following the procedure described in your setup sheet. 68 Troubleshooting - Canon MP470 | MP470 series Quick Start Guide - Page 73
the procedure described in your setup sheet to reinstall the MP Drivers. „ Error No.: 1700/1710 Is Displayed Cause The ink absorber is almost full. Action See "The ink absorber is almost full. Press [OK] to continue printing. Contact the service center." in "An Error Message Is Displayed on the - Canon MP470 | MP470 series Quick Start Guide - Page 74
solution, also refer to the instruction manual of the device. For other troubles on the device, contact the manufacturer. Error Message On PictBridge Compliant Device "Printer in use" "No paper" "Paper jam" "Printer cover open" "No print head" "Waste tank full"/ "Ink absorber full" Action If the - Canon MP470 | MP470 series Quick Start Guide - Page 75
cord of the machine from the power supply. After a while, plug the power cord of the machine back in, turn on the machine, and then reconnect the PictBridge compliant device to the machine. If the same error occurs, contact your Canon Service representative. Cannot Print Properly via Bluetooth - Canon MP470 | MP470 series Quick Start Guide - Page 76
Scanning Problems „ ScanGear Won't Start Cause Action The scanner driver (ScanGear) is not Follow the procedure described in your setup sheet to reinstall the MP Drivers. installed. „ Other Scanning Troubles Refer to the Scanning Guide on-screen manual. The Document Cover Comes Off Cause The - Canon MP470 | MP470 series Quick Start Guide - Page 77
instructions on scanning operation and settings. PC Printing Guide Refer to this guide for full instructions on printer driver setting. PC Photo Printing Guide (Windows only) Refer to this guide for instructions on using the various application software included on the Setup CD-ROM. Bluetooth Guide - Canon MP470 | MP470 series Quick Start Guide - Page 78
instructions on installing the on-screen manuals, refer to your setup sheet. You can view the on-screen manuals in the following way: To view the on-screen manual, double-click the XXX On-screen Manual shortcut icon on the desktop, or click Start > All Programs (or Programs) > Canon XXX Manual - Canon MP470 | MP470 series Quick Start Guide - Page 79
supply Power consumption External dimensions Weight Canon FINE Cartridges Multiple copy Intensity adjustment Zoom Scanner driver Maximum scanning size Scanning resolution Gradation (Input/Output) General Specifications 4800 (horizontal)* x 1200 (vertical) * Ink droplets can be placed with a pitch - Canon MP470 | MP470 series Quick Start Guide - Page 80
on the machine setting), Borderless, Bordered, N-up (2, 4, 9, 16)*1, 35-up*2 *1 Layout compatible with Canon-brand sticker above. Refer to "Compatible Media Types" in the User's Guide on-screen manual. *2 Selected photos are printed in 35 mm film style layout (contact printing layout). This print - Canon MP470 | MP470 series Quick Start Guide - Page 81
z To upgrade from Windows XP to Windows Vista, first uninstall software bundled with the Canon inkjet printer. Additional System Requirements for On-Screen Manuals Browser: Windows HTML Help Viewer Note: Microsoft Internet Explorer 5.0 or later must be installed. The on-screen manual may not be - Canon MP470 | MP470 series Quick Start Guide - Page 82
equipment (extension lead/cord, 2- or 3-way adapter, etc.). Never use the machine if the power cord is bundled or knotted. If you detect smoke, unusual smells or strange noises around the machine, immediately unplug the machine at the power supply and call for service. Periodically, unplug the - Canon MP470 | MP470 series Quick Start Guide - Page 83
°F) and humidity of 10% to 90% (condensation free). Do not place the machine on a thick rug or carpet. Do not place the machine with its back attached to the wall. Ensure that the area around the power outlet is kept clear at all times so you can easily unplug the power cord if necessary. Never - Canon MP470 | MP470 series Quick Start Guide - Page 84
the power cord and call for service. Do not transport or store the machine on a slant, vertically or upside-down, as the ink may Cartridges (Ink Cartridges) out of the reach of small children. If a child ingests any ink, consult a doctor immediately. Do not shake FINE Cartridges (Ink Cartridges). Ink - Canon MP470 | MP470 series Quick Start Guide - Page 85
and Use of Images It may be unlawful to make copies of, scan, print, or use reproductions of the following documents. The list provided is stamps (canceled or uncanceled) z Identifying badges or insignias z Selective service or draft papers z Checks or drafts issued by governmental agencies z - Canon MP470 | MP470 series Quick Start Guide - Page 86
. A dated proof of purchase is required at the time of warranty service. A copy of your dated bill of sale will satisfy this requirement. This warranty does not cover any accessories, or any consumables, such as paper or ink cartridges, as to which there shall be no warranty or replacement. 82 - Canon MP470 | MP470 series Quick Start Guide - Page 87
the user's manual or other documentation for the Product. (b) Use of parts, media, software or supplies (other than those sold by Canon USA), including nonCanon ink cartridges or refilled ink cartridges, that cause damage to the Product or cause abnormally frequent service calls or service problems - Canon MP470 | MP470 series Quick Start Guide - Page 88
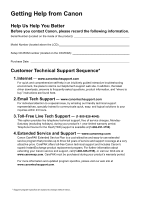
FOR WHOM IT WAS PURCHASED AS A GIFT, AND STATES YOUR EXCLUSIVE REMEDY. Canon USA offers a range of customer technical support* options: z Interactive troubleshooting, e-mail technical support, the latest driver downloads and answers to frequently asked questions (www.canontechsupport.com) z Toll - Canon MP470 | MP470 series Quick Start Guide - Page 89
Canon U.S.A., Inc. One Canon Plaza Lake Success, NY 11042 USA Canon is a registered trademark of Canon Inc. ©2007 Canon U.S.A., Inc. Canon is a registered trademark of Canon Inc. in the United States and may also be a registered trademark in other countries. Safety Precautions 85 - Canon MP470 | MP470 series Quick Start Guide - Page 90
Macintosh 30 Windows 29 Printing Photographs Directly from a Compliant Device 32 PictBridge print settings 34 R Replacing a FINE Cartridge 46 ink status information 46 Routine Maintenance 38 S Safety Precautions 78 Scanning Images 31 Specialty Media 12 Specifications 75 T Troubleshooting 56 Turning - Canon MP470 | MP470 series Quick Start Guide - Page 91
additional supplies, use the following descriptions and order numbers. Description FINE Cartridges PG-30 Black CL-31 Color PG-40 Black CL-41 Color Canon Specialty Papers All Occasion Photo Cards (4" x 8"/ 50 sheets) Glossy Photo Paper Credit Card Size (100 sheets) High Resolution Paper (8.5" x 11 - Canon MP470 | MP470 series Quick Start Guide - Page 92
The following FINE Cartridges are compatible with this product. For information on product specifications, please visit our website at www.usa.canon.com QT5-1007-V01 XXXXXXXX © CANON INC. 2007 PRINTED IN VIETNAM
-
 1
1 -
 2
2 -
 3
3 -
 4
4 -
 5
5 -
 6
6 -
 7
7 -
8
-
9
-
10
-
11
-
12
-
13
-
14
-
15
-
16
-
17
-
18
-
19
-
20
-
21
-
22
-
23
-
24
-
25
-
26
-
27
-
28
-
29
-
30
-
31
-
32
-
33
-
34
-
35
-
36
-
37
-
38
-
39
-
40
-
41
-
42
-
43
-
44
-
45
-
46
-
47
-
48
-
49
-
50
-
51
-
52
-
53
-
54
-
55
-
56
-
57
-
58
-
59
-
60
-
61
-
62
-
63
-
64
-
65
-
66
-
67
-
68
-
69
-
70
-
71
-
72
-
73
-
74
-
75
-
76
-
77
-
78
-
79
-
80
-
81
-
82
-
83
-
84
-
85
-
86
-
87
-
88
-
89
-
90
-
91
-
92
 |
 |
series
Quick Start Guide
Photo All-in-One