Canon Mini260 Photo Printing Guide
Canon Mini260 - PIXMA Color Inkjet Printer Manual
 |
UPC - 013803067248
View all Canon Mini260 manuals
Add to My Manuals
Save this manual to your list of manuals |
Canon Mini260 manual content summary:
- Canon Mini260 | Photo Printing Guide - Page 1
Photo Printer Photo Printing Guide Table of Contents Introduction 2 Before Printing 3 Printing from the Memory Card 18 Printing Photographs Directly from a Digital Camera 31 Printing Photographs from a Wireless Communication Device 36 Printing Maintenance 42 Changing the Printer - Canon Mini260 | Photo Printing Guide - Page 2
self-help in an intuitively guided interactive troubleshooting environment, the place to start is our helpful tech support web site. In addition, the latest driver downloads, answers to frequently asked questions, product information, and "where to buy" instructions are found here. 2. Email Tech - Canon Mini260 | Photo Printing Guide - Page 3
: AC 100-240V, 50/60Hz About Consumables Consumables (ink tanks / FINE Cartridges) are available for 5 years after production has stopped. Safety Precautions Warning Never attempt to plug the power cord into the power outlet or unplug the power cord when your hands are wet. Never damage, modify - Canon Mini260 | Photo Printing Guide - Page 4
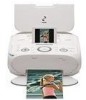
Introduction Thank you for purchasing the Canon PIXMA mini260. This Photo Printing Guide uses the following symbols to indicate important information. Always observe the instructions indicated by these symbols. Warning Instructions that, if ignored, could result in death or serious personal injury - Canon Mini260 | Photo Printing Guide - Page 5
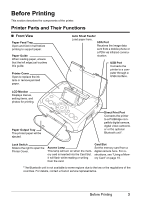
Open and fold in half before printing to support paper. Paper Guide When loading paper, ensure that the left edge just touches this guide. Printer Cover Open to replace the ink tank or remove jammed paper. Auto Sheet Feeder Load paper here. IrDA Port Receives the image data sent from a mobile phone - Canon Mini260 | Photo Printing Guide - Page 6
Kit, refer to the manual provided with the Portable Kit. AC Adapter Connector Connector used to connect the supplied AC Adapter plug. Carrying Handle Pulls out this handle to carry the printer. Interior Print Head Holder Install the Print Head here. Ink Lamp Lights or flashes red to indicate the - Canon Mini260 | Photo Printing Guide - Page 7
For information on how to install the Print Head and ink tank, refer to the Easy Setup Instructions (Setup Sheet). Ink Lamp You can check the status of ink tank according to the way its lamp flashes. On: The printer is ready to print. Slow flashing (at around 3-second intervals): Ink is low. If the - Canon Mini260 | Photo Printing Guide - Page 8
print, is currently printing, or is currently initializing. Flashing: the printer is preparing to turn on or off. Function button (f1)/(f2) Select the menu displayed at the lower corner of the screen on the LCD. See "Other Buttons" on page 9. +- buttons Specifies the number of copies. Alarm lamp - Canon Mini260 | Photo Printing Guide - Page 9
the procedure to display each menu from the HOME screen. 1 Display the HOME screen. (1) Press the HOME button. The HOME screen will be displayed. Before Printing 7 - Canon Mini260 | Photo Printing Guide - Page 10
settings of the printer. See "When Printing Becomes Faint or Colors are Incorrect" on page 42 or "Changing the Printer Settings" on page 52. Sticker print: Print your favorite photo with a frame on the Canon genuine Photo Stickers. See "Printing Stickers from a Photo-Sticker print" on page 21 - Canon Mini260 | Photo Printing Guide - Page 11
screen, Remaining ink volume screen will be displayed. When you press the Function button (f2/Introduction), the introductions for the selected menu will be displayed. When you press them on the other than the HOME screen, the operation procedure or the menus will be displayed. Before Printing 9 - Canon Mini260 | Photo Printing Guide - Page 12
If the Print Head and ink tank are not installed, refer to the Easy Setup Instructions (Setup Sheet) to install them. 1 Plug the AC Adapter and connect the other end to a power outlet. 2 Open the Paper Feed Tray and press the ON/OFF button to turn the printer on. The POWER lamp flashes then changes - Canon Mini260 | Photo Printing Guide - Page 13
that is too thick (more than 105 gsm or 28 lb)* Picture postcards Postcards with an affixed photo or sticker Any type of paper with holes Paper that is not rectangle Paper bound with staples or glue Paper with adhesives Paper decorated with glitter, etc * Non-Canon genuine paper Before Printing 11 - Canon Mini260 | Photo Printing Guide - Page 14
loading it. Note If paper is curled, gently bend the corners in the opposite direction until the paper becomes completely flat. 3 Ensure that the Paper Thickness Lever is set to the right. Note Set the Paper Thickness Lever to the left, only if ink smudges or the printed surface is stained. 12 - Canon Mini260 | Photo Printing Guide - Page 15
the stack of paper. (2) Align the paper with the right edge of the Auto Sheet Feeder and insert the paper until it is fully inserted. Photo stickers Card Shorter margin Note Do not touch the printed surface until the ink dries. For specific drying times, refer to the instructions packaged with - Canon Mini260 | Photo Printing Guide - Page 16
on sticker paper, select Sticker print. When printing photos in a mobile phone or a PDA on sticker paper, see "Printing Photographs from a Wireless Communication Device" on page 36. Note You may not be able to purchase some Canon genuine papers depending on your country. 14 Before Printing - Canon Mini260 | Photo Printing Guide - Page 17
digital camera guarantees operation, refer to the manuals supplied with your digital camera. Format the memory card with a digital camera. The memory card may not be usable with the printer if formatted on a computer. Images edited on a computer may not be printed correctly. Do not insert more than - Canon Mini260 | Photo Printing Guide - Page 18
printer is equipped with two Card Slots to meet various types of memory cards. Refer to the illustration below to find the Card Slot corresponds to your memory card. Check the card face and insert it gently until it reaches the bottom and the Access lamp slot with the arrow-printed side facing up. - Canon Mini260 | Photo Printing Guide - Page 19
the printer connected to your computer, follow the instructions for removal of the memory card from the computer. For the procedure, refer to "Using Data in the Memory Card on the Computer" of the User's Guide on-screen manual. 1 Ensure that the Access lamp is not flashing, then remove the memory - Canon Mini260 | Photo Printing Guide - Page 20
Photographs to Print-Select and print You can display the photos stored in the memory card on the LCD and print them. 1 Prepare to print. To prepare the printer for printing: (1) Turn on the printer. See "Turning On the Printer" on page 10. (2) Load the paper. See "Loading Printing Paper" on page - Canon Mini260 | Photo Printing Guide - Page 21
Date-Select date range" on page 27. To print a specified area, see "Printing a Specified Area-Trimming" on page 28. 5 Start printing. (1) Confirm the total number of copies to print for the selected photos, the paper size, and media type. See "Print Setting Screens" on page 23. (2) Press the - Canon Mini260 | Photo Printing Guide - Page 22
select Next, and then press the OK button. 5 Select the paste method. Paste automatically Select the Search or All photos on the following Layout print screen, and proceed to step 7. All the photos in the memory card are pasted automatically in the selected layout. Paste one by one Specify to paste - Canon Mini260 | Photo Printing Guide - Page 23
Reset button to cancel printing. Printing Stickers from a Photo-Sticker print You can print your favorite photo with a frame on the Canon genuine Photo Stickers. Stickers ×16 1 Prepare to print. See "Selecting Photographs to Print-Select and print" on page 18. 2 Select Sticker print, and then press - Canon Mini260 | Photo Printing Guide - Page 24
Wheel or the W or X button to select the layout, and then press the OK button. 4 Select the photo to print. (1) Use the Easy-Scroll Wheel or the W or X button to select the photo you want to print. (2) Press the OK button. The screen to select a frame will be displayed. Note You can do... See - Canon Mini260 | Photo Printing Guide - Page 25
Wide 4x7.1 (101x180) (2) Specify the media type. Glossy Photo Paper/Matte Photo Paper/Photo Plus Glossy/Photo Paper Pro (3) Specify the print quality. Standard/High(quality-priority) Print Settings 1 If the print setting screen or the print confirmation screen is displayed, select the setting item - Canon Mini260 | Photo Printing Guide - Page 26
Card" on page 16. Printing a Photo Index-Photo index print You can print a list of all photos saved in the memory card. Procedure: Home button > Special photo print > Photo index print Note When using index printing, the number of images printed on a single sheet of paper depends on the page size - Canon Mini260 | Photo Printing Guide - Page 27
Color Balance-Color balance print This function allows you to print a sample of a photo in 9 different hues on a single sheet of paper. You can then select the hue you like from the sample and print a final copy. Procedure: Home button > Special photo print > Color balance print Sample photo - Canon Mini260 | Photo Printing Guide - Page 28
, press the Stop/Reset button. Display photos sequentially-Slide show You can display to confirm photos stored on the memory card on the LCD sequentially. Procedure: HOME button > Slide show Note You can do... You can specify the image quality of the slide show. 26 Printing from the Memory Card - Canon Mini260 | Photo Printing Guide - Page 29
there are many photos stored on the memory card, you can select photos to display or print by specifying the shooting date with the search function. Note You can use the search function to specify a date or date range from the Select and print, Color balance print in Special photo print, or Sticker - Canon Mini260 | Photo Printing Guide - Page 30
. If you select Select date range (1) Select the date of the oldest photos to print and then press the OK button. (2) Select the date of the most recent photos to print and then press the OK button. You can display the photos that are shot within the specified range of date. Note The date that - Canon Mini260 | Photo Printing Guide - Page 31
on the whole paper without a border. Date Date ON Prints the date the photo was taken. Date OFF Does not print the date the photo was taken. File no. File no. ON Prints the image No. (DCF No.) on the photo. File no. OFF Does not print the image No. (DCF No.) on the photo. Note It is possible - Canon Mini260 | Photo Printing Guide - Page 32
Color hue Adjusts the color hue of a printed image. Color hue red +2/Color hue red +1/Color hue original/Color hue yellow +1/ Color hue yellow +2 Effect No effects Prints a photo without any processing. Effect: Sepia Prints a photo using sepia tones only. Simulate illustration.... Prints a photo - Canon Mini260 | Photo Printing Guide - Page 33
with the device. If you use the device battery, be sure to charge it fully. 1 Set up the printer for printing. Refer to the Easy Setup Instructions (Setup Sheet). 2 Turn on the printer and load paper. See "Loading Printing Paper" on page 11. Printing Photographs Directly from a Digital Camera 31 - Canon Mini260 | Photo Printing Guide - Page 34
instruction manual of your PictBridge compliant device. This section describes the page size, media type, layout, image optimization modes, and date printing mode that can be set on a PictBridge compliant device connected to the printer. Confirming or Changing the Device Settings To change the paper - Canon Mini260 | Photo Printing Guide - Page 35
Fast Photo Photo Fast Photo Paper loaded in printer Photo Paper Plus Glossy Photo Paper Plus Semi-gloss Glossy Photo Paper Photo Stickers* Photo Paper Pro Glossy Photo Paper Credit Card Photo Paper Pro * Sticker media manufactured by Canon. Set Paper size to 10×15 cm/4"×6" when printing stickers - Canon Mini260 | Photo Printing Guide - Page 36
Instruction manual. Controls of the digital camera cannot be used for the following: - Print quality setting - Printer maintenance Confirming and Changing PictBridge Print Settings from the Printer This section describes how to change the print settings of the PictBridge standard such as the paper - Canon Mini260 | Photo Printing Guide - Page 37
caused by reflection when the flash hits a person's eyes. (11) Adjusts the brightness of a printed image. (12) Adjusts the contrast of a printed image. (13) Adjusts the color hue of a printed image. (14) Prints photos in sepia color or illustration-like. Printing Photographs Directly from a Digital - Canon Mini260 | Photo Printing Guide - Page 38
from a mobile phone or a PDA through Infrared communication or Bluetooth communication. The initial setting is borderless printing on 4" x 6" Photo Paper Plus Glossy. 1 Turn on the printer. 2 Display the Wireless print settings screen. (1) Display the Settings screen. (2) Select Device settings - Canon Mini260 | Photo Printing Guide - Page 39
smooths out the jaggedness. Image optimizer ON/Image optimizer OFF (4) Select the layout of the photos as below. Sticker print: Stickers x 16 Printing on paper other than sticker: Bordered, x 2, x 4, x 8 Borderless, x 2, x 4, x 8 Note When printing on Canon Genuine Photo Stickers, make the settings - Canon Mini260 | Photo Printing Guide - Page 40
Infrared Communication You can print photos in your mobile phone or PDA. When printing through infrared communication, also refer to the manual of your mobile phone or PDA. 1 Turn on the printer. 2 Load the paper. See "Loading Printing Paper" on page 11. 3 Set the printing paper and layout. See - Canon Mini260 | Photo Printing Guide - Page 41
phone supports, refer to your product's instruction manual. Printing through Bluetooth communication When you print through Bluetooth communication from a mobile phone or a PDA, refer to the manual of your mobile phone or PDA. 1 Prepare to print. (1) Turn on the printer. (2) Load the paper See - Canon Mini260 | Photo Printing Guide - Page 42
Bluetooth unit BU-20 to the printer. 3 Set the printing paper and layout. See "Setting the Page Size, Media Type, and Layout When Printing from a Mobile Phone or a PDA" on page 36. 4 Start printing from a mobile phone or a PDA. When you select the device name, select the initial value "Canon mini260 - Canon Mini260 | Photo Printing Guide - Page 43
device name of this printer displayed on the screen of the Bluetooth devices. When you set mini260-2, the printer name on the Bluetooth device is "Canon mini260-2". The initial value is set to mini260-1. Selecting ON will disable searching and printing from Bluetooth devices. Selecting Enable will - Canon Mini260 | Photo Printing Guide - Page 44
Print Head Deep Cleaning" on page 45 If Print Head Deep Cleaning does not resolve the problem, the Print Head may be damaged. Contact your Canon Service representative. Note Before performing maintenance Open the Printer Cover and make sure that the ink lamp is lit red. - If the ink lamp is flashing - Canon Mini260 | Photo Printing Guide - Page 45
ink ejects properly from the Print Head Nozzles. Use this function when printed results are blurred or the color is incorrect. 1 Prepare to print. (1) Turn on the printer. See "Turning On the Printer" on page 10. (2) Load the supplied paper or Canon 4"×6"/101.6×152.4mm paper into the Paper Support - Canon Mini260 | Photo Printing Guide - Page 46
or white stripes appear in the nozzle check pattern. Cleaning the Print Head consumes ink, so perform Cleaning only when necessary. 1 Turn on the printer. See "Turning On the Printer" on page 10. 2 Start Print Head Cleaning. (1) Display the Settings screen. (2) Select Maintenance and then press the - Canon Mini260 | Photo Printing Guide - Page 47
improve by standard Print Head Cleaning, try Print Head Deep Cleaning, which is a more powerful process. Print Head Deep Cleaning consumes ink, so perform this procedure only when necessary. 1 Turn on the printer. See "Turning On the Printer" on page 10. 2 Start Print Head Deep Cleaning. (1) Display - Canon Mini260 | Photo Printing Guide - Page 48
the Print Head position. It may solve the problem. 1 Prepare to print. (1) Turn on the printer. See "Turning On the Printer" on page 10. (2) Load two sheets of supplied paper or Canon genuine 4"×6"/101.6×152.4mm paper in the Auto Sheet Feeder. Note The following papers are recommended. z Matte Photo - Canon Mini260 | Photo Printing Guide - Page 49
will not print properly if the wrong ink tank is used. Ink Tank: CLI-36 Color Getting the Ink Level Information You can confirm the ink level in ink tank by the ink lamp. Open the Printer Cover to confirm how the ink lamp light or flash. Ink is low: ......Repeats The ink lamp flashes slowly (at - Canon Mini260 | Photo Printing Guide - Page 50
do not remove it from the printer and leave it out in the open. This will cause the ink tank to dry out, and the printer may not operate properly when it is reinstalled. To maintain optimal printing quality, use an ink tank within six months of first use. Color ink is consumed in Print Head Cleaning - Canon Mini260 | Photo Printing Guide - Page 51
. (1) Slide the Lock Switch toward the right to open the Printer Cover. The Print Head Holder moves to the center. Important If the Printer Cover is left open for more than 10 minutes, the Print Head Holder moves to the right. Close and reopen the Printer Cover to return the holder to the center - Canon Mini260 | Photo Printing Guide - Page 52
of the protective cap. Important Do not touch the electrical contacts (A) on the ink tank. Doing so can cause the printer to malfunction or (A) become unable to print. Do not reattach the protective cap once you have removed it. Once the protective cap is removed, do not touch the open - Canon Mini260 | Photo Printing Guide - Page 53
tank slightly slanted toward the Print Head. (1) (2) (2) Push down on the clicks into place. on the ink tank until it Ensure that the ink lamp is lit red. 6 Close the Printer Cover. (2) (1) Lift the Printer Cover and pull the Lock Bar close. (2) Close the Printer Cover firmly until it clicks - Canon Mini260 | Photo Printing Guide - Page 54
the procedure to change the settings in the Device settings screen, taking the steps to specify Date display as an example. 1 Turn on the printer. 2 Display the Device settings screen. See "Basic Operation for the Operation Panel" on page 7. (1) Select Device settings, then press the OK button. The - Canon Mini260 | Photo Printing Guide - Page 55
from a Mobile Phone or a PDA" on page 36. Bluetooth settings For details, see "Changing the Bluetooth Settings-Bluetooth settings" on page 41. PictBridge settings For details, see "Confirming and Changing PictBridge Print Settings from the Printer" on page 34. Other settings Date display Changes the - Canon Mini260 | Photo Printing Guide - Page 56
with using the optional battery. The printer can be set to the Read/write mode when using both the AC adapter and optional battery, but do not remove the AC adapter when you write the data on the memory card. If you set this setting to Read/write mode, card direct printing cannot be done - Canon Mini260 | Photo Printing Guide - Page 57
POWER Lamp (blue) and ALARM Lamp (orange) Flash Alternately" on page 69 "Cannot Print Properly from the Digital Camera" on page 69 "Cannot Print Properly through Wireless Communication" on page 71 Error Message Is Displayed on the LCD Cause There are no photos in memory card. The print head lock - Canon Mini260 | Photo Printing Guide - Page 58
the Easy Setup Instructions (Setup Sheet) to install the Print Head. If the Print Head is already installed, remove the Print Head and then reinstall it. If the error is not resolved, the Print Head may be damaged. Contact your Canon Service representative. The printer has a built-in ink absorber to - Canon Mini260 | Photo Printing Guide - Page 59
is not supported by this printer. Use a digital camera or digital video camcorder compatible with this printer. An error requiring servicing may have occurred. Turn off the printer, and unplug the power cord of the printer from the power supply. If you are attaching the optional battery, remove it - Canon Mini260 | Photo Printing Guide - Page 60
directly to strong light. After carrying out the above measures, if the problem continues after aligning the Print Head again, press the OK button to dismiss the error message, and then perform Manual Print Head Alignment. * Use the following papers. Matte Photo Paper Photo Paper Plus Glossy 58 - Canon Mini260 | Photo Printing Guide - Page 61
the print heads manually, follow the procedure below. 1. Press the ON/OFF button to turn on the printer, and then load two sheets of supplied paper or Canon genuine 4" x 6"/101.6 x 152.4 mm paper* in the Auto Sheet Feeder. * Use the following papers. Matte Photo Paper Photo Paper Pro Photo Paper - Canon Mini260 | Photo Printing Guide - Page 62
POWER lamp on the Operation Panel is off The printer is not powered on. Connect the power cord and press the ON/OFF button. The printer will power on and the LCD will display a message. If the POWER lamp the OK button. If the Bluetooth unit is connected to the printer, press the T button five times - Canon Mini260 | Photo Printing Guide - Page 63
screen, then remove the CD- ROM. (5) Turn the printer off. (6) Restart the computer. (7) Make sure you have no application software running, including anti-virus software. (8) Follow the procedure described in the Easy Setup Instructions (Setup Sheet) to reinstall the printer driver. Click Start - Canon Mini260 | Photo Printing Guide - Page 64
procedure described in the Easy Setup Instructions (Setup Sheet) for proper installation. If the drivers were not installed correctly, uninstall the printer driver, restart your computer, and then reinstall the drivers. Refer to the Printer Driver Guide on-screen manual. Note If the installer was - Canon Mini260 | Photo Printing Guide - Page 65
45. The media is loaded with the wrong side facing upwards. Many types of paper are made to be printed on only a particular side of the paper. Printing on the wrong side may cause unclear prints or incorrect color. See "Printing Media" of the User's Guide on-screen manual. Troubleshooting 63 - Canon Mini260 | Photo Printing Guide - Page 66
missing colors are due to empty tank. If there is plenty of ink and the printer does not print, clean the Print Head and then print the nozzle check pattern to check that ink is ejecting properly. If the problem is not resolved after performing Print Head Cleaning twice, perform Print Head Deep - Canon Mini260 | Photo Printing Guide - Page 67
necessary. For details on cleaning, see "Cleaning the Roller (Roller Cleaning)" of the User's Guide on-screen manual. Inside of the printer is dirty. Performing many printings may leave some ink inside the printer, causing printouts to be smudged. In this case, perform bottom plate cleaning to - Canon Mini260 | Photo Printing Guide - Page 68
setting is effective in reducing uneven colors. Printer Does Not Start or Stops During Print Jobs Printing Does Not Start Cause Ink tank is empty. Ink tank is not installed securely. Action An ink tank is not installed properly, or is out of ink. Confirm the error message displayed on the LCD - Canon Mini260 | Photo Printing Guide - Page 69
)" of the User's Guide on-screen manual. Make sure of the following when you load paper in the printer. When loading two or more sheets of paper, align the edges of the sheets before loading. Always load the paper in portrait orientation, regardless of the printing orientation. Align paper to the - Canon Mini260 | Photo Printing Guide - Page 70
to confirm that you are using the correct paper and are loading it into the printer correctly. If you cannot remove the paper or the paper tears inside the printer, or if the paper jam error continues after removing the paper, contact your Canon Service representative. Do not load credit card-sized - Canon Mini260 | Photo Printing Guide - Page 71
ALARM Lamp (orange) Flash Alternately Disconnect the printer cable from the printer, turn the printer off, and then unplug the printer from the power supply. Plug the printer back in and turn the printer back on after leaving it for a while. If the problem is not resolved, contact your Canon Service - Canon Mini260 | Photo Printing Guide - Page 72
the Easy Setup Instructions (Setup Sheet). If the Print Head has already been installed, remove the Print Head and reinstall it. If the error still remains, the Print Head may be defective. Contact the Canon service representative. The printer has a built-in ink absorber to hold the ink used during - Canon Mini260 | Photo Printing Guide - Page 73
supplied AC adapter or attach the charged battery. (3) Turn the Printer on. The ink tank error has occurred. Replace the ink tank. See "Replacing an Ink Tank" on page 47. An error requiring servicing might have occurred (POWER lamp and Alarm lamps flash alternately). Disconnect the cable between the - Canon Mini260 | Photo Printing Guide - Page 74
to the printer (For Bluetooth communication). Confirm that the Bluetooth unit is inserted properly. If Bluetooth settings is displayed on the menu screen, the Bluetooth unit is inserted properly. Note This printer cannot print data from a PC via Bluetooth communication. 72 Troubleshooting - Canon Mini260 | Photo Printing Guide - Page 75
this Photo Printing Guide, on-screen manuals are also supplied with your printer. Install the following on-screen manuals when you need to know how to print from your computer, printer driver setup, or how to use the supplied print application. Select Easy Install to install the printer driver and - Canon Mini260 | Photo Printing Guide - Page 76
Bluetooth Unit Users Safety Precautions Please read the safety warnings and cautions provided in this manual to ensure that you use your product safely. Do not attempt to use the product in any way not described in this manual. Warning You may cause an electric shock/fire or damage the printer alarms - Canon Mini260 | Photo Printing Guide - Page 77
AC adapter with connecting to the printer. For details how to attach it to the printer, refer to the manual that comes with the Portable Kit. Printable number of pages when using the battery: Approx. 85 pages (4" × 6") * The printable number varies depending on photos or the charged condition of the - Canon Mini260 | Photo Printing Guide - Page 78
Printer Printing resolution: Print speed: Print width: Acoustic noise level: Operating environment: Storage environment: Power supply: Power consumption: Dimensions (with the Paper Support retracted): Weight: Print Head: AC Adapter Dimensions: Weight: Rated input: Rated output: PictBridge Paper - Canon Mini260 | Photo Printing Guide - Page 79
type: Layout: Trimming: Image optimize: Date/File No. print Default (selections based on the printer setting), Photo (Photo Paper Plus Glossy, Glossy Photo Paper, Photo Paper Plus Semi-gloss), Fast Photo (Photo Paper Pro) Default (selections based on the printer setting), Borderless, Bordered, N-up - Canon Mini260 | Photo Printing Guide - Page 80
Browser: Windows HTML Help Viewer Note: Microsoft® Internet Explorer 5.0 or later must be installed. The On-screen Manual may not be displayed properly depending on your operating system or Internet Explorer version. We recommend that you keep your system up to date with Windows Update. Browser - Canon Mini260 | Photo Printing Guide - Page 81
and may cause insulation failure and fire. Use only power supplies listed in the user instructions (Canon AC Adapter: K30273 and/or Li-ion Battery Pack: Canon K30274). Do not use them for other products. Use a damp cloth to clean the printer. Never use flammable solvents such as alcohol, benzene or - Canon Mini260 | Photo Printing Guide - Page 82
is printing. Do not place any object on the printer. Do not place metal objects (paper clips, staples, etc.) or containers of flammable solvents (alcohol, thinners, etc.) on top of the printer. If any foreign object (metal or liquid) fall into the printer, unplug the power cord and call for service - Canon Mini260 | Photo Printing Guide - Page 83
Head after printing. The metal parts may be very hot and could cause burns. During printing AC Adapter Do not touch the part around the ejecting paper during printing. This could cause the printer to malfunction. When you pack the AC adapter for travel or storage, never wrap the cord around the - Canon Mini260 | Photo Printing Guide - Page 84
Use of a shielded cable is required to comply with Class B limits in Subpart B of Part 15 of the FCC Rules. Do not make any changes or modifications to the equipment unless otherwise specified in the manual. If such changes or modifications should be made, you could be required to stop operation of - Canon Mini260 | Photo Printing Guide - Page 85
the user's manual or other documentation for the Product. (b) Use of parts, media, software or supplies (other than those sold by Canon USA), including nonCanon ink cartridges or refilled ink cartridges, that cause damage to the Product or cause abnormally frequent service calls or service problems - Canon Mini260 | Photo Printing Guide - Page 86
WHOM IT WAS PURCHASED AS A GIFT, AND STATES YOUR EXCLUSIVE REMEDY. Canon USA offers a range of customer technical support* options: Interactive troubleshooting, e-mail technical support, the latest driver downloads and answers to frequently asked questions (www.canontechsupport.com) Toll-free live - Canon Mini260 | Photo Printing Guide - Page 87
SURE TO RETAIN YOUR PRINTHEAD AND INK CARTRIDGE(S) AND TANK(S). InstantExchange Service expedites, usually by the second business day, the exchange of a defective Product with a replacement Product, which will normally be shipped the same day if your request for this service is by 3 p.m. E.T. Monday - Canon Mini260 | Photo Printing Guide - Page 88
are duplicated in all such forms and that any documentation, advertising materials, and other materials related to such distribution and use acknowledge that the software was developed at Cygnus Support, Inc. Cygnus Support, Inc. may not be used to endorse or promote products derived from this - Canon Mini260 | Photo Printing Guide - Page 89
- Canon Mini260 | Photo Printing Guide - Page 90
- Canon Mini260 | Photo Printing Guide - Page 91
. Description Order # Ink Tanks CLI-36 Color 1511B002 Canon Specialty Papers Photo Paper Plus Glossy (4" x 6"/ 20 sheets) Photo Paper Plus Glossy (4" x 6"/ 50 sheets) Photo Paper Plus Glossy (4" x 6"/ 120 sheets) Photo Paper Pro for Borderless Printing (4" x 6"/ 20 sheets) Photo Paper Pro for - Canon Mini260 | Photo Printing Guide - Page 92
The following ink tank is compatible with this printer. For details on ink tank replacement, refer to "Replacing an Ink Tank" in this guide. QT5-0760-V01 XXXXXXXX ©CANON INC.2006 PRINTED IN VIETNAM
-
 1
1 -
 2
2 -
 3
3 -
 4
4 -
 5
5 -
 6
6 -
 7
7 -
8
-
9
-
10
-
11
-
12
-
13
-
14
-
15
-
16
-
17
-
18
-
19
-
20
-
21
-
22
-
23
-
24
-
25
-
26
-
27
-
28
-
29
-
30
-
31
-
32
-
33
-
34
-
35
-
36
-
37
-
38
-
39
-
40
-
41
-
42
-
43
-
44
-
45
-
46
-
47
-
48
-
49
-
50
-
51
-
52
-
53
-
54
-
55
-
56
-
57
-
58
-
59
-
60
-
61
-
62
-
63
-
64
-
65
-
66
-
67
-
68
-
69
-
70
-
71
-
72
-
73
-
74
-
75
-
76
-
77
-
78
-
79
-
80
-
81
-
82
-
83
-
84
-
85
-
86
-
87
-
88
-
89
-
90
-
91
-
92
 |
 |
Photo Printing Guide
Table of Contents
Introduction
2
Before Printing
3
Printing from the Memory Card
18
Printing Photographs Directly from a Digital Camera
31
Printing Photographs from a Wireless Communication Device
36
Printing Maintenance
42
Changing the Printer Settings
52
Troubleshooting
55
Appendix
73
US
Photo Printer
QT5-0760-V01