Canon PIXMA MG5220 MG5220 series Gu쟠de inicio [Spanish Version]
Canon PIXMA MG5220 Manual
 |
View all Canon PIXMA MG5220 manuals
Add to My Manuals
Save this manual to your list of manuals |
Canon PIXMA MG5220 manual content summary:
- Canon PIXMA MG5220 | MG5220 series Gu쟠de inicio [Spanish Version] - Page 1
ESPAÑOL Canon Inkjet Photo All-In-One Equipo multifunción fotográfico Canon Inkjet series Getting Started Read Me First Guía de inicio Léame en primer lugar Make sure to read this manual before using the machine. Please keep it in hand for future reference. Asegúrese de leer este manual antes de - Canon PIXMA MG5220 | MG5220 series Gu쟠de inicio [Spanish Version] - Page 2
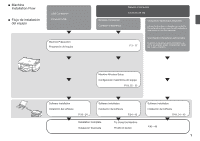
the Ink Tanks P.10 4 Align the Print Head P.13 5 Load Paper P.15 6 Select Connection Method P.18 7 Install the Software (USB Connection) P.19 8 Wireless Setup P.25 Wireless Setup Using Easy Setup P.26 Wireless Setup Using WPS (Wi‑Fi Protected Setup) P.30 Wireless Setup Using WCN (Windows Connect - Canon PIXMA MG5220 | MG5220 series Gu쟠de inicio [Spanish Version] - Page 3
instalación del equipo USB Connection Conexión USB Machine Preparation Preparación del equipo Wireless Connection Conexión Wireless Setup Configuración inalámbrica del equipo P.18, 25 - 33 Software Installation Instalación del software P.18 - 24 Software Installation Instalación del software - Canon PIXMA MG5220 | MG5220 series Gu쟠de inicio [Spanish Version] - Page 4
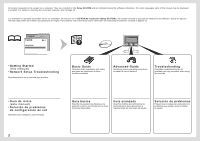
el proceso de instalación del software. Quizá en algunos idiomas haya partes del manual que aparezcan en inglés. Para obtener más información sobre cómo abrir los manuales en pantalla, consulte la página 45. • Getting Started (this manual) • Network Setup Troubleshooting Describes how to set up - Canon PIXMA MG5220 | MG5220 series Gu쟠de inicio [Spanish Version] - Page 5
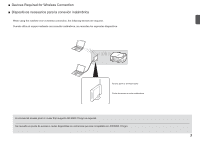
el equipo mediante una conexión inalámbrica, se necesitan los siguientes dispositivos. Access point or wireless router Punto de acceso o router inalámbrico A commercial access point or router that supports IEEE802.11b/g/n is required. Se necesita un punto de acceso o router disponibles en comercios - Canon PIXMA MG5220 | MG5220 series Gu쟠de inicio [Spanish Version] - Page 6
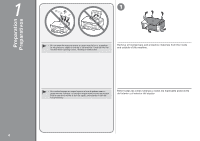
1 1 Preparation Preparativos • Do not install the machine where an object may fall on it. In addition, do not place any object on the top of the machine. It may fall into the machine when opening covers, resulting in malfunction. Remove all orange tape and protective materials from the inside - Canon PIXMA MG5220 | MG5220 series Gu쟠de inicio [Spanish Version] - Page 7
Tray to remove them. 1. Print Head 2. Ink tanks (5: BK, M, C, PGBK, Y) 3. Manuals 4. Power cord 5. Setup CD-ROM (containing the drivers, applications and on-screen manuals) 6. Matte Photo Paper MP-101 (for Automatic Print Head Alignment) 7. Other documents • A USB cable is necessary to connect the - Canon PIXMA MG5220 | MG5220 series Gu쟠de inicio [Spanish Version] - Page 8
) (C) para obtener un ángulo de visión cómodo. • Una vez conectado el cable de corriente, el botón ACTIVADO (ON) tarda unos 4 segundos en ponerse en funcionamiento esté iluminada la luz de encendido (POWER). Si se retira el cable de alimentación mientras la luz de encendido (POWER) está iluminada - Canon PIXMA MG5220 | MG5220 series Gu쟠de inicio [Spanish Version] - Page 9
Install the Print Head Instalación del cabezal de impresión 2 1 B B A Lift the Scanning Unit (Cover) (A) until it stops. Close the Document Cover (B) and lift it with the Scanning Unit (Cover). 2 C The Print Head Holder (C) moves to the installation position. If the Print Head Holder does not - Canon PIXMA MG5220 | MG5220 series Gu쟠de inicio [Spanish Version] - Page 10
The machine may not print properly if you touch them. • There may be some ink on the inside of the bag the Print Head comes in, or the inside of cap - this has no effect on print quality. Be careful not to get ink on yourself when handling these items. Levante firmemente la parte (D) de la palanca - Canon PIXMA MG5220 | MG5220 series Gu쟠de inicio [Spanish Version] - Page 11
6 7 Tilt the Print Head forward and set it in place as shown. • Do not knock the Print Head against the sides of the holder. Hold the Print Head Lock Lever firmly and lower it completely. • Once you have installed the Print Head, do not remove it unnecessarily. Incline el cabezal de impresión - Canon PIXMA MG5220 | MG5220 series Gu쟠de inicio [Spanish Version] - Page 12
orange protective cap 90 degrees horizontally to remove it off. Do not push the sides of the ink tank. • Do not touch the inside (C) of the orange protective cap or the open ink port (D). The ink may stain your hands if you touch them. 1. Retire totalmente la cinta naranja. 2. Retire totalmente la - Canon PIXMA MG5220 | MG5220 series Gu쟠de inicio [Spanish Version] - Page 13
firmemente la marca PUSH del depósito de tinta hasta que haga clic en su lugar. Cuando la instalación finaliza correctamente, la lámpara de tinta (Ink) se ilumina de color rojo. Instale los demás depósitos de tinta de la misma manera según el orden de los colores indicado en la - Canon PIXMA MG5220 | MG5220 series Gu쟠de inicio [Spanish Version] - Page 14
next step. Do not press the OK button yet. • It takes about 5 minutes before the LCD changes. • If an error message is displayed, check if the Print Head and the ink tanks are installed properly. Levante la unidad de escaneado (cubierta) (E) ligeramente y, a continuación, ciérrala suavemente. Aseg - Canon PIXMA MG5220 | MG5220 series Gu쟠de inicio [Spanish Version] - Page 15
del cabezal de impresión 4 1 2 3 A C D Prepare the Paper Support (A). 1. Open it. 2. Withdraw it upwards. 3. Tilt it back. B Move the Paper Guides (B) Load a sheet of supplied specialty paper for Print Head Alignment to both edges. (Matte Photo Paper MP-101) in the Rear Tray (C). Load - Canon PIXMA MG5220 | MG5220 series Gu쟠de inicio [Spanish Version] - Page 16
on the LCD, press the OK button to clear the error, then go to the next step. After the installation is complete, perform Print Head Alignment by referring to "When Printing Becomes Faint or Colors Are Incorrect" in the on-screen manual: Basic Guide. Deslice las guías de papel izquierda y derecha - Canon PIXMA MG5220 | MG5220 series Gu쟠de inicio [Spanish Version] - Page 17
en función del tipo de soporte. Specialty paper Plain paper including photo paper Load paper in the Cassette (B). Load paper in the Rear Tray to handle paper, refer to "Loading Paper" in the on-screen manual: Basic Guide after installation is complete. • Para obtener más información sobre cómo - Canon PIXMA MG5220 | MG5220 series Gu쟠de inicio [Spanish Version] - Page 18
F Pull out the Cassette (F). Extraiga el cassette (F). 16 3 4 G 5 H Move the left Paper Guide (G) to the edge. Slide the front Paper Guide (H) to align with the actual size of the paper. The front Paper Guide will click and stop when it aligns with the corresponding mark of paper size. Load - Canon PIXMA MG5220 | MG5220 series Gu쟠de inicio [Spanish Version] - Page 19
6 7 8 I Align the paper to the right side of the Cassette (1), and slide the left Paper Guide completely against the left edge of the paper (2). Make sure that the height of the paper stack does not exceed the line (I). Insert the Cassette - Canon PIXMA MG5220 | MG5220 series Gu쟠de inicio [Spanish Version] - Page 20
software (Conexión USB)" en la página 19. • Want to connect to computers without using cables. • Want to use from multiple computers. • Si desea conectar a ordenadores sin usar cables. • Si desea utilizarlo desde varios ordenadores. Wireless Connection Conexión inalámbrica Go to "8 Wireless Setup - Canon PIXMA MG5220 | MG5220 series Gu쟠de inicio [Spanish Version] - Page 21
Connection) Instalación del software (Conexión USB) 7 Do not connect the USB cable yet. No conecte aún el cable USB. □ For Spanish Users in the U.S.A.: □ Para los usuarios de habla hispana en EE. UU.: • To use the machine by connecting it to a computer, software including the drivers needs to be - Canon PIXMA MG5220 | MG5220 series Gu쟠de inicio [Spanish Version] - Page 22
□ Si se conecta el equipo mediante un cable USB antes de instalar □ Easy-WebPrint EX el software: For Windows 7 1. Remove the USB cable connected to your computer. 2. Proceed to . For Windows Vista/Windows XP This dialog box may appear. 1. Remove the USB cable connected to your computer. If the - Canon PIXMA MG5220 | MG5220 series Gu쟠de inicio [Spanish Version] - Page 23
(My Computer); a continuación, haga doble clic en MSETUP4.EXE. 3 Windows 7/Windows Vista Windows XP Click Run Msetup4.exe on the AutoPlay screen, then click Yes or the help button, then follow the on-screen instructions. Haga doble clic en el icono Setup de la carpeta del CD-ROM para pasar a - Canon PIXMA MG5220 | MG5220 series Gu쟠de inicio [Spanish Version] - Page 24
4 5 6 Click Easy Install. The drivers, application software, and on-screen manuals are installed. • If you want to select particular items to install, click Custom Install. Click Install. Select Use the printer via USB, then click Next. Follow any on-screen instructions to proceed with the - Canon PIXMA MG5220 | MG5220 series Gu쟠de inicio [Spanish Version] - Page 25
appears □ Si aparece la pantalla Extended Survey Program B When the Printer Connection screen appears, connect the machine to the computer with a USB cable. After connecting the cable, TURN ON THE MACHINE. When the serial number is not displayed on the registration screen automatically, input the - Canon PIXMA MG5220 | MG5220 series Gu쟠de inicio [Spanish Version] - Page 26
manual: Advanced Guide. Instalación del Controlador de impresora XPS (XPS Printer Driver) En Windows 7 y Windows Vista SP1 o posterior, también se puede instalar el Controlador de impresora XPS (XPS Printer Driver). Para instalarlo, ejecute a partir de de "7 Instalación del software (Conexión USB - Canon PIXMA MG5220 | MG5220 series Gu쟠de inicio [Spanish Version] - Page 27
of disclosing data such as your personal information to a third party. • If an error message appears or if you have trouble with the network connection, refer to the printed manual: Network Setup Troubleshooting. • Place the machine and computer on the same network segment. Internet Internet Punto - Canon PIXMA MG5220 | MG5220 series Gu쟠de inicio [Spanish Version] - Page 28
your network key by using the Canon PIXMA Wireless Setup Assistant or the instructions which can be downloaded from the Canon support webpage (www.usa.canon.com/downloadlibrary). If you are unable to retrieve the network key or other settings, refer to the manual of your access point or router - Canon PIXMA MG5220 | MG5220 series Gu쟠de inicio [Spanish Version] - Page 29
If your access point or router supports WPS □ Si el router o punto de acceso admite WPS □ If you are using Windows 7/Windows Vista and have a USB flash drive □ Si utiliza Windows 7/Windows Vista y tiene una unidad flash USB The wireless connection can be setup without gathering the information on - Canon PIXMA MG5220 | MG5220 series Gu쟠de inicio [Spanish Version] - Page 30
displayed properly, however, can be selected. Make sure that one of the above screens is displayed, then press the right FUNCTION button. If the above screen is not displayed, go to on page 29. Seleccione Configuración fácil (Easy setup) y, a continuación, pulse el botón OK. Seleccione el nombre - Canon PIXMA MG5220 | MG5220 series Gu쟠de inicio [Spanish Version] - Page 31
cannot be established, refer to the printed manual: Network Setup Troubleshooting. Next, read "9 Install the Software (Network Connection)" on page 34! Cuando aparezca la pantalla anterior, pulse el botón OK. • Si aparece Error al conectar con el punto de acceso. (Failed to connect to the access - Canon PIXMA MG5220 | MG5220 series Gu쟠de inicio [Spanish Version] - Page 32
); a continuación, pulse el botón FUNCIÓN (FUNCTION) derecho (B). Utilice el botón [ o ] (C) para seleccionar Configurac. LAN inalámbrica (Wireless LAN setup) y, a continuación, pulse el botón OK. Seleccione Sí (Yes) y, a continuación, pulse el botón OK. Cuando se active la conexión inalámbrica - Canon PIXMA MG5220 | MG5220 series Gu쟠de inicio [Spanish Version] - Page 33
use the PIN code method for setup, select PIN code method in , then press the OK button. Follow the on-screen instructions to operate the machine and the wireless LAN. If another error appears, refer to the printed manual: Network Setup Troubleshooting. Seleccione Otra configuración (Other setup) - Canon PIXMA MG5220 | MG5220 series Gu쟠de inicio [Spanish Version] - Page 34
screen appears, press the OK button, then start over from . • If an error message appears, refer to the printed manual: Network Setup Troubleshooting. Next, read "9 Install the Software (Network Connection)" on page 34! Mantenga pulsado el botón WPS del punto de acceso (durante unos 5 segundos - Canon PIXMA MG5220 | MG5220 series Gu쟠de inicio [Spanish Version] - Page 35
en el ordenador Windows 7 1. Click Start > Control Panel > View network status and tasks > Manage wireless networks. 2. Select the network name (SSID) and right-click it, then select Properties. 3. Select Copy this network profile to a USB flash drive. Follow the on-screen instructions to complete - Canon PIXMA MG5220 | MG5220 series Gu쟠de inicio [Spanish Version] - Page 36
connecting it to a computer, software including the drivers needs to be copied (installed) to the computer's hard disk. The installation process takes about 20 minutes. (The installation time varies depending on the computer environment or the number of application software to be installed.) • Quit - Canon PIXMA MG5220 | MG5220 series Gu쟠de inicio [Spanish Version] - Page 37
Windows 7/Windows Vista Windows XP Install the Software Instalación del software Turn on the computer, then insert the Setup CD-ROM into the CD-ROM drive. If you are using Windows, the setup program starts automatically. For Windows on-screen instructions. Haga doble clic en el icono Setup de la - Canon PIXMA MG5220 | MG5220 series Gu쟠de inicio [Spanish Version] - Page 38
3 4 5 Click Easy Install. The drivers, application software, and on-screen manuals are installed. • If you want to select particular items to install, click Custom Install. Click Install. Select Use the printer on network, then click Next. Follow any on-screen instructions to proceed with the - Canon PIXMA MG5220 | MG5220 series Gu쟠de inicio [Spanish Version] - Page 39
"Información" en la página 41. On the Canon IJ Network Tool screen, select MG5200 series in Printers, then click Next. • If the machine is not detected, refer to the printed manual: Network Setup Troubleshooting. Make sure there is no problem, then click Update. Next, read "Registration (Macintosh - Canon PIXMA MG5220 | MG5220 series Gu쟠de inicio [Spanish Version] - Page 40
Macintosh) This section describes how to register the machine on a Macintosh computer. Windows users: read "Information" on page 41. • The alphanumeric characters after Canon MG5200 series is the machine's Bonjour service name or MAC address. • If the machine has not been detected, make sure of the - Canon PIXMA MG5220 | MG5220 series Gu쟠de inicio [Spanish Version] - Page 41
Mac OS X v.10.4.11 1 2 3 4 When the Printer List window appears, click Add. Click More Printers in the Printer Browser window. • When the You have no printers available. screen appears, click Add. Select Canon IJ Network in the pop-up menu, select Canon MG5200 series in the list of printers - Canon PIXMA MG5220 | MG5220 series Gu쟠de inicio [Spanish Version] - Page 42
"Information" on page 41! Cuando aparezca la pantalla Registro de la impresora y del escáner (Register Printer and Scanner), haga clic en Registrar el escáner (Register Scanner). Seleccione Canon MG5200 series en la pantalla Conf. de escaneo desde PC (Scan-from-PC Settings) y, a continuación, haga - Canon PIXMA MG5220 | MG5220 series Gu쟠de inicio [Spanish Version] - Page 43
de usuario (User Registration) A Click Next. Follow any on-screen instructions to proceed with the software installation. When the serial number is not displayed on the registration screen automatically, input the serial number located inside the machine (as shown in the illustration). • If the - Canon PIXMA MG5220 | MG5220 series Gu쟠de inicio [Spanish Version] - Page 44
For Windows Solution Menu EX starts. For Macintosh Solution Menu EX starts when clicking OK in the Canon Solution Menu EX dialog. Remove the Setup CD-ROM . Congratulations! Setup is complete. Proceed to page 45 for information regarding the Solution Menu EX and the on-screen manual or page - Canon PIXMA MG5220 | MG5220 series Gu쟠de inicio [Spanish Version] - Page 45
. For details on useful functions of the XPS Printer Driver, refer to the on-screen manual: Advanced Guide. in "9 Install the Software (Network Connection)" on page 35. Instalación del Controlador de impresora XPS (XPS Printer Driver) En Windows 7 y Windows Vista SP1 o posterior, también se puede - Canon PIXMA MG5220 | MG5220 series Gu쟠de inicio [Spanish Version] - Page 46
ordenadores adicionales 10 If the machine is already connected to a wireless connection, it can be used from additional computers on the Insert the Setup CD-ROM into the computer from which you want to use the machine. 2 Follow the on-screen instructions to install the software. Other settings - Canon PIXMA MG5220 | MG5220 series Gu쟠de inicio [Spanish Version] - Page 47
drivers. You can print creative items by correcting/enhancing photos using the application software. For details on how to use the application software and the machine, refer to the on-screen manual el manual en pantalla. How to start Solution Menu EX Click this icon on the desktop (Windows) or - Canon PIXMA MG5220 | MG5220 series Gu쟠de inicio [Spanish Version] - Page 48
Supported Memory Cards (Adapter required for .) Tarjetas de memoria compatibles side facing left. • Insert only one memory card. • The Access lamp USB flash drives. For details, refer to "Printing Photos" in the on-screen manual: Basic Guide. También se puede imprimir desde una unidad flash USB - Canon PIXMA MG5220 | MG5220 series Gu쟠de inicio [Spanish Version] - Page 49
card into the Card Slot, the photos on the memory card are read and the screen to specify photos and the number of copies to print appears. Make information on printing from a memory card, refer to "Printing Photos" in the on-screen manual: Basic Guide. Cargue papel fotográfico de tamaño 4" x 6" ( - Canon PIXMA MG5220 | MG5220 series Gu쟠de inicio [Spanish Version] - Page 50
button and Color button light up. For the procedure to copy on paper other than plain paper, refer to "Copying" in the on‑screen manual: Advanced Guide. Cargue papel normal de tamaño A4 o Carta en el cassette (A). (Para conocer los detalles, consulte la página 15.) En esta sección se describe cómo - Canon PIXMA MG5220 | MG5220 series Gu쟠de inicio [Spanish Version] - Page 51
Menu EX, click the (Solution Menu EX) icon on the desktop (Windows) or on the Dock (Macintosh). 2. Click Photo Print, then click Photo Print (C). Select the image you want to print, then click Layout/Print. When a photo is selected, the number of copies is set to "1". Click Print. If you are using - Canon PIXMA MG5220 | MG5220 series Gu쟠de inicio [Spanish Version] - Page 52
to Mac OS X v.10.6, install software bundled with the Canon inkjet printer. • Internet Explorer 7 or later is required to install Easy-WebPrint EX. For Windows use only. Specifications are subject to change without notice. About Consumables Consumables (ink tanks / FINE Cartridges) are available - Canon PIXMA MG5220 | MG5220 series Gu쟠de inicio [Spanish Version] - Page 53
impresora de inyección de tinta Canon antes de actualizar de Windows Vista a Windows 7 y, a continuación, vuelva a instalar el software. • Es posible que algunas funciones no estén disponibles con Windows Media Center. • Macintosh: el disco duro debe estar formateado como Mac OS Plus (con registro - Canon PIXMA MG5220 | MG5220 series Gu쟠de inicio [Spanish Version] - Page 54
Support by Email" situado bajo Tech Support. Toll-Free Tech Support- 1-800-OK-CANON This option provides live telephone technical support, free of service The following ink tanks are compatible with this machine. Información de pedidos Los depósitos de tinta siguientes son compatibles con este
-
 1
1 -
 2
2 -
 3
3 -
 4
4 -
 5
5 -
 6
6 -
 7
7 -
8
-
9
-
10
-
11
-
12
-
13
-
14
-
15
-
16
-
17
-
18
-
19
-
20
-
21
-
22
-
23
-
24
-
25
-
26
-
27
-
28
-
29
-
30
-
31
-
32
-
33
-
34
-
35
-
36
-
37
-
38
-
39
-
40
-
41
-
42
-
43
-
44
-
45
-
46
-
47
-
48
-
49
-
50
-
51
-
52
-
53
-
54
 |
 |
ESPAÑOL
ENGLISH
series
Guía de inicio
Asegúrese de leer este manual antes de usar el equipo. Consérvelo a mano para utilizarlo como referencia en el futuro.
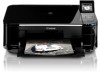
Equipo multifunción fotográfico Canon Inkjet
Léame en primer lugar
Getting Started
Make sure to read this manual before using the machine. Please keep it in hand for future reference.
Canon Inkjet Photo All-In-One
Read Me First