Canon PIXMA MG8120 MG8120 series Getting Started - Page 33
Wireless Setup Using WCN (Windows Connect Now), Windows 7, Windows Vista
 |
View all Canon PIXMA MG8120 manuals
Add to My Manuals
Save this manual to your list of manuals |
Page 33 highlights
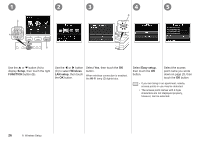
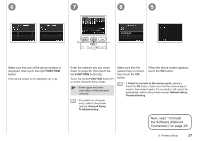
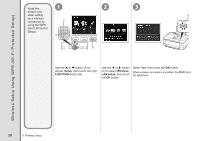
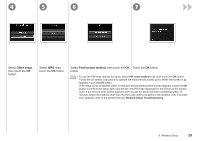
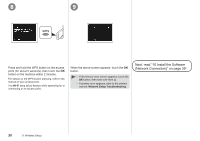
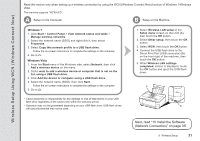
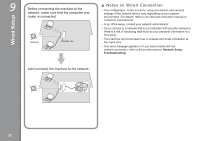
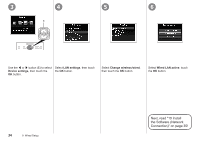
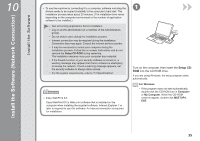
Wireless Setup Using WCN (Windows Connect Now) Read this section only when setting up a wireless connection by using the WCN (Windows Connect Now) function of Windows 7/Windows Vista. The machine supports "WCN-UFD". A Setup on the Computer B Setup on the Machine Windows 7 1. Click Start > Control Panel > View network status and tasks > Manage wireless networks. 2. Select the network name (SSID) and right-click it, then select Properties. 3. Select Copy this network profile to a USB flash drive. Follow the on-screen instructions to complete the settings on the computer. 4. Go to . Windows Vista 1. From the Start menu of the Windows side, select Network, then click Add a wireless device on the menu. 2. Click I want to add a wireless device or computer that is not on the list, using a USB flash drive. 3. Click Add the device or computer using a USB flash drive. 4. Select the network name (SSID), then click Next. Follow the on-screen instructions to complete the settings on the computer. 5. Go to . 1. Select Wireless LAN setup of the Setup menu screen on the LCD (A), then touch the OK button. 2. Select Other setup, then touch the OK button. 3. Select WCN, then touch the OK button. 4. Connect the USB flash drive to the Direct Print Port (USB connector) (B) on the front right of the machine, then touch the OK button. 5. When Wireless LAN settings completed. screen is displayed, touch the OK button and eject the USB flash drive. A • Canon assumes no responsibility for any damage or loss of data stored on your USB flash drive regardless of the cause even within the warranty period. • Operation may not be guaranteed depending on your USB flash drive. USB flash drives B with security enabled may not be used. Next, read "10 Install the Software (Network Connection)" on page 35! 8 Wireless Setup 31
-
 1
1 -
2
-
3
-
4
-
5
-
6
-
7
-
8
-
9
-
10
-
11
-
12
-
13
-
14
-
15
-
16
-
17
-
18
-
19
-
20
-
21
-
22
-
23
-
24
-
25
-
26
-
27
-
 28
28 -
 29
29 -
 30
30 -
 31
31 -
 32
32 -
 33
33 -
 34
34 -
 35
35 -
 36
36 -
 37
37 -
 38
38 -
39
-
40
-
41
-
42
-
43
-
44
-
45
-
46
-
47
-
48
-
49
-
50
-
51
-
52
-
53
-
54
 |
 |
