Canon PIXMA MP499 Network Installation Guide (MAC)
Canon PIXMA MP499 Manual
 |
View all Canon PIXMA MP499 manuals
Add to My Manuals
Save this manual to your list of manuals |
Canon PIXMA MP499 manual content summary:
- Canon PIXMA MP499 | Network Installation Guide (MAC) - Page 1
> Installing Your Multifunction to Additional Computers on Your Network PIXMA MP499 Mac OS 1 - Canon PIXMA MP499 | Network Installation Guide (MAC) - Page 2
Next >> Installing Your Multifunction to Additional Computers on Your Network PIXMA MP499 Mac OS Preparing to Connect My Multifunction To My Network 3 Network Requirements 3 Notes on Wireless Connection 4 Using the Machine from Additional Computers 5 Registering the Printer & Scanner 10 - Canon PIXMA MP499 | Network Installation Guide (MAC) - Page 3
of the computer and access point or router is complete, and that the computer is connected to the network. Wireless Connection Before connecting the machine to the network, the computer needs to be connected to the network. Make sure that configuration of the computer and access point or router - Canon PIXMA MP499 | Network Installation Guide (MAC) - Page 4
, there is a risk of disclosing data such as your personal information to a third party. • If an error message appears or if you have trouble with the network connection, refer to the printed manual: Network Setup Troubleshooting. • Place the machine and computer on the same network segment. 4 - Canon PIXMA MP499 | Network Installation Guide (MAC) - Page 5
Additional Computers > Software Installation If the machine is already connected to a wireless connection, it can be used from additional before installation. • If the firewall function of your security software is turned on, a warning message may appear that Canon software is - Canon PIXMA MP499 | Network Installation Guide (MAC) - Page 6
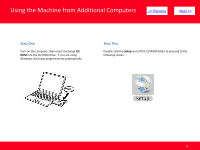
from Additional Computers > Step One Turn on the computer, then insert the Setup CDROM into the CD-ROM drive. If you are using Windows, the setup program starts automatically. Step Two Double-click the Setup icon of the CD-ROM folder to proceed to the following screen. 6 - Canon PIXMA MP499 | Network Installation Guide (MAC) - Page 7
>> Step Three Enter your administrator name and password. Click OK. Step Four Click Easy Install. Click Install. The drivers, application software, and on-screen manuals are installed. Note: If you want to select particular items to install, click Custom Install. If the CD-ROM folder does not - Canon PIXMA MP499 | Network Installation Guide (MAC) - Page 8
click Next. Step Six When the Printer Detection screen appears, click Next. Follow any on-screen instructions to proceed with the software installation. IMPORTANT If the Printer Connection screen appears instead of the screen above, the connection method is not correctly selected in 5. Follow - Canon PIXMA MP499 | Network Installation Guide (MAC) - Page 9
screen, select MP499 series in Printers, then click Next. Note: The alphanumeric characters after Canon MP499 series is the machine's Bonjour service name or MAC address. If the machine is not detected, refer to the printed manual: Network Setup Troubleshooting. Make sure there is no problem, then - Canon PIXMA MP499 | Network Installation Guide (MAC) - Page 10
on a Macintosh computer. Step One When the Register Printer and Scanner screen appears, click Register Printer. Proceed to the section that relates to your operating system for further installation instructions Mac OS X v. 10.5.x / 10.6.x: Go to Step 2-A Mac OS X v. 10.4.11: Go to Step 2-B 10 - Canon PIXMA MP499 | Network Installation Guide (MAC) - Page 11
Registering the Printer & Scanner > Step Two 2-A 1. Select Canon MP499 series canonijnetwork and click Add. Go to Step Three. Step Two 2-B 1. When the Printer List window appears, click Add. Note: When the You have no printers available. screen appears, click Add. *It may take - Canon PIXMA MP499 | Network Installation Guide (MAC) - Page 12
Registering the Printer & Scanner > Step Two 2-B 2. Click More Printers in the Printer Browser window. Step Two 2-B 3. Select Canon IJ Network in the pop-up menu, select Canon MP499 series in the list of printers, then click Add. 12 - Canon PIXMA MP499 | Network Installation Guide (MAC) - Page 13
Registering the Printer & Scanner > Step Two 2-B 4. Make sure that Canon MP499 series is added to the list of printers. Go to Step Three. Step Three When the Register Printer and Scanner screen appears, click Register Scanner. 13 - Canon PIXMA MP499 | Network Installation Guide (MAC) - Page 14
Registering the Printer & Scanner > Step Four Select MP499 series on the Scan-from-Operation-Panel Settings screen, then click OK. Step Five Click Next on the Register Printer and Scanner screen. 14 - Canon PIXMA MP499 | Network Installation Guide (MAC) - Page 15
Registering the Printer & Scanner > Step Six Click Next on the Print Head Alignment Recommended screen. Step Seven Click Next on the Register Printer and Scanner screen. 15 - Canon PIXMA MP499 | Network Installation Guide (MAC) - Page 16
Registering the Printer & Scanner > Step Eight If the User Registration screen appears, read the information and click Next , click Agree. If you click Do not agree, the Extended Survey Program will not be installed. (This has no effect on the machine's functionality.). 16 - Canon PIXMA MP499 | Network Installation Guide (MAC) - Page 17
Registering the Printer & Scanner Step Nine Click Exit. Setup is complete
-
 1
1 -
 2
2 -
 3
3 -
 4
4 -
 5
5 -
 6
6 -
 7
7 -
8
-
9
-
10
-
11
-
12
-
13
-
14
-
15
-
16
-
17
 |
 |

Installing Your Multifunction to
Additional Computers on Your Network
PIXMA MP499
Mac OS
1
<< Previous
Next >>