Canon PIXMA MP520 MP520 series Quick Start Guide
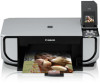
Canon PIXMA MP520 Manual
 |
View all Canon PIXMA MP520 manuals
Add to My Manuals
Save this manual to your list of manuals |
Canon PIXMA MP520 manual content summary:
- Canon PIXMA MP520 | MP520 series Quick Start Guide - Page 1
Photo All-In-One Quick Start Guide - Canon PIXMA MP520 | MP520 series Quick Start Guide - Page 2
and comprehensive self-help in an intuitively guided interactive troubleshooting environment, the place to start is our helpful tech support web site. In addition, the latest driver downloads, answers to frequently asked questions, product information, and "where to buy" instructions are found here - Canon PIXMA MP520 | MP520 series Quick Start Guide - Page 3
Photo All-In-One Quick Start Guide - Canon PIXMA MP520 | MP520 series Quick Start Guide - Page 4
form, in whole or in part, without the prior written consent of Canon U.S.A., Inc. © 2007 Canon U.S.A., Inc. Disclaimer Canon U.S.A., Inc. has reviewed this manual thoroughly in order that it will be an easy-to-use guide to your Canon PIXMA MP520 series Photo All-In-One. All statements, technical - Canon PIXMA MP520 | MP520 series Quick Start Guide - Page 5
52 Print Head Cleaning 54 Print Head Deep Cleaning 55 Aligning the Print Head 56 Cleaning Your Machine 59 Troubleshooting 67 An Error Message Is Displayed on the LCD 68 LCD Cannot Be Seen At All 70 An Unintended Language Is Displayed on the LCD 70 Cannot Install the MP Drivers 71 - Canon PIXMA MP520 | MP520 series Quick Start Guide - Page 6
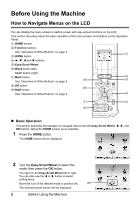
How to Navigate Menus on the LCD You can display the menu screen or setting screen and use various functions on the LCD. This section describes about the basic operation of the menu screen and buttons on the Operation Panel. (1) HOME screen (2) Function buttons See "Operation of Other Buttons - Canon PIXMA MP520 | MP520 series Quick Start Guide - Page 7
Cleaning Your Machine" on page 59, or "Changing the Machine Settings" in the User's Guide on-screen manual. Easy photo reprint: You can scan printed photos and then print them. See "Photo Printing from Printed Photo" on page 31. Memory card: Print the photo ink volume screen is displayed. - Canon PIXMA MP520 | MP520 series Quick Start Guide - Page 8
confirm the following. z The Print Head and ink tanks are installed into place. If you are using the machine connected to a computer, confirm also the following. z The machine is connected to your computer (or a compatible device). z The MP Drivers are installed. Note If preparatory operations above - Canon PIXMA MP520 | MP520 series Quick Start Guide - Page 9
Mode The LCD goes out if the machine is not operated for about five minutes*. * You cannot change the wait time before the LCD goes out. Note When you want to restore the display, perform a print operation or press any button except for the ON/OFF button. When you press the ON/OFF - Canon PIXMA MP520 | MP520 series Quick Start Guide - Page 10
Original Documents Load originals to copy or scan on the Platen Glass. For details on how to load a photo, see "Photo Printing from Printed Photo" on page 31. Note Make sure any glue, ink, correction fluid, or the like on the original document is completely dry before loading it on the Platen Glass - Canon PIXMA MP520 | MP520 series Quick Start Guide - Page 11
. If you are printing without changing paper source settings, load paper in the Rear Tray. „ Using Specialty Media Canon recommends that you use Canon genuine media to ensure optimal print quality. z Photo Quality Media z Glossy Photo Paper z Photo Paper Plus Semi-gloss z Photo Paper Plus Glossy - Canon PIXMA MP520 | MP520 series Quick Start Guide - Page 12
Credit card: 20 sheets *5 Photo Paper PR-101 Pro*4 Matte Photo MP-101 Paper Photo Paper PP-101D 1 sheet Plus Double Sided*3, *4 T-Shirt Transfers*3 Photo Stickers*7 TR-301 1 sheet PS-101 1 sheet Paper Output Tray Load Limit Media Type Machine Setting Printer Driver Setting 50 sheets Plain - Canon PIXMA MP520 | MP520 series Quick Start Guide - Page 13
User's Guide on-screen manual. Important z Put unused paper back into the package, and store them avoiding heat, humidity, and direct sunlight. z Do not touch the printed surface nor stack the printed sheets until the ink is fixed. Note z To specify the page size and media type when printing photos - Canon PIXMA MP520 | MP520 series Quick Start Guide - Page 14
use of the Rear Tray. See "Paper Handling" on page 8. For details on loading paper, see "Loading Paper" on page 13. z Printer driver settings may be required depending on the usage. For details on printer driver settings, refer to the PC Printing Guide on-screen manual. 10 Before Using the Machine - Canon PIXMA MP520 | MP520 series Quick Start Guide - Page 15
„ If You Print Regularly on Photo Paper as well as on Plain Paper If you use photo paper as much as plain paper, you can load photo paper in the Rear Tray and plain paper in the Front Tray. This way, you can switch the paper source according to the type of - Canon PIXMA MP520 | MP520 series Quick Start Guide - Page 16
Changing the printer driver settings take precedence when printing. Confirm the setting in the printer driver. See "Printing with Windows" on page 33 or "Printing with Macintosh" on page 34. For details on paper source selection using the printer driver, refer to the PC Printing Guide onscreen manual - Canon PIXMA MP520 | MP520 series Quick Start Guide - Page 17
paper to be jammed. (A) (B) Note z We recommend using genuine Canon photo media when printing photographs. For details on the specialty media Canon provides for use with its various printers, refer to "Using Specialty Media" on page 7. When Printing on Plain Paper z You can use general copy paper - Canon PIXMA MP520 | MP520 series Quick Start Guide - Page 18
and open it gently. (3) Extend the Output Paper Support. (4) Press the Paper Feed Switch so that the Rear Tray lamp (A) lights. Note You can also select the paper source with the printer driver. For details, refer to the PC Printing Guide onscreen manual. 3 Load the paper. (1) Load the paper in the - Canon PIXMA MP520 | MP520 series Quick Start Guide - Page 19
Letter, or B5-sized plain paper (such as Canon Super White Paper SW-201) in the Front Support. (3) Press the Paper Feed Switch so that the Front Tray lamp (A) lights. Note You can also select the paper source with the printer driver. For details, refer to the PC Printing Guide on-screen manual - Canon PIXMA MP520 | MP520 series Quick Start Guide - Page 20
the Front Tray with the print side facing DOWN and the leading edge to the far side. (2) Align the paper stack against the right edge of the Front Tray. (3) Align the near and the left edges of the paper with the Paper Size Mark. (4) Pinch the Paper Guide and slide it against - Canon PIXMA MP520 | MP520 series Quick Start Guide - Page 21
Media Type in the printer driver. For details on printer driver settings, see "Printing with Windows" on page 33 or "Printing with Macintosh" on page 34. z You can also select the paper source with the printer driver. For details, refer to the PC Printing Guide on-screen manual. Before Using the - Canon PIXMA MP520 | MP520 series Quick Start Guide - Page 22
Comm. Env. #10 in the printer driver according to the envelope size you are using. If you do not, the address will be printed in the wrong direction. z In Windows®, print guidance will be displayed when envelopes are printed. To prevent display of print guidance, refer to "Printing Envelopes" in the - Canon PIXMA MP520 | MP520 series Quick Start Guide - Page 23
select DL Envelope or #10 Envelope in Paper Size. (3) Select Landscape in Orientation. Important Be sure to set the printer driver setting properly. If you do not, the address will be printed in the wrong direction. Note For details on printer driver settings, see "Printing with Windows" on page 33 - Canon PIXMA MP520 | MP520 series Quick Start Guide - Page 24
Media Type in the printer driver. For details on printer driver settings, see "Printing with Windows" on page 33 or "Printing with Macintosh" on page 34. z You can also select the paper source with the printer driver. For details, refer to the PC Printing Guide on-screen manual. 20 Before Using - Canon PIXMA MP520 | MP520 series Quick Start Guide - Page 25
or Black button instead of the OK button. 3 Load paper. See "Loading Printing Paper" on page 7. 4 Load the original on the Platen Glass. See "Handling the Original Document" on page 5. 5 Specify copy settings. (1) Confirm the paper source, page size, media type, and other settings. To change the - Canon PIXMA MP520 | MP520 series Quick Start Guide - Page 26
the intensity. For details, refer to "Changing Intensity Setting" in the User's Guide on-screen manual. (3) Page size Select the page size of the loaded paper. (4) Media type Select the media type of the loaded paper. (5) Print quality Adjust print quality according to the original. (6) Paper - Canon PIXMA MP520 | MP520 series Quick Start Guide - Page 27
(CF) Card Supports Type I/II (3.3 V) z Microdrive z Memory Stick z Memory Stick PRO Memory cards that can be inserted in the Card Slot using the adapter: Important If one of the following purchase of a separate compact flash card adapter for xD-Picture Cards. Printing from a Memory Card 23 - Canon PIXMA MP520 | MP520 series Quick Start Guide - Page 28
machine. See "Turning the Machine On and Off" on page 4. 2 Open the Card Slot Cover. 3 Insert only one memory card into the Card Slot. z How to insert Insert a memory card with the labeled side facing to the right Access lamp has lit up. 5 Close the Card Slot Cover. 24 Printing from a Memory Card - Canon PIXMA MP520 | MP520 series Quick Start Guide - Page 29
other settings. To change the settings, select the item and press the OK button. (3) Select Next, and then press the OK button. 4 Select the photo to print and specify the number of copies for each photo. (1) Use the Easy-Scroll Wheel or the [ or ] button to display a photo to print. (2) Press the - Canon PIXMA MP520 | MP520 series Quick Start Guide - Page 30
the Color button. The specified number of copies of each photo will be printed. „ Setting Items z Print Settings Confirmation Screen Example: Screen displayed in Select and print in the memory card mode or the easy photo reprint mode (1) (2) (3) (4) (5) Note z Page size and media type settings are - Canon PIXMA MP520 | MP520 series Quick Start Guide - Page 31
correction. If you select Manual correction, you can specify each advanced setting item below. Example: Screen displayed in the memory card mode (1) (5) (2) (6) (3) (7) (4) (8) (9) (10) (11) (12) Example: Screen displayed in the easy photo reprint mode (13) Printing from a Memory Card 27 - Canon PIXMA MP520 | MP520 series Quick Start Guide - Page 32
areas like the sky as well as on black areas. (7) Face brightener Brightens a darkened face on the photo taken against the light. (8) Image optimizer*1 Corrects and smooths the jagged contours for printing. (9) Brightness Adjust brightness. (10) Contrast Adjust contrast. (11) Color hue Adjust color - Canon PIXMA MP520 | MP520 series Quick Start Guide - Page 33
info) in the margin of Photo index print or selected individual photos. Photo index print Prints an index of all the photos saved on a memory card. Print all photos Prints all photos saved on the memory card. Using Useful Display Functions Change display The display method of a photograph can be - Canon PIXMA MP520 | MP520 series Quick Start Guide - Page 34
the OK button. 7 Press the Color button. The Photo Index Sheet(s) will be printed. 8 Fill in the appropriate circles in the Photo Index Sheet. 9 Load paper as you specified in the Photo Index Sheet in the Rear Tray. 10 Make sure that Scan sheet and print is selected, then press the OK button. 11 - Canon PIXMA MP520 | MP520 series Quick Start Guide - Page 35
other settings. To change the settings, select the item and press the OK button. (3) Select Next, and then press the OK button. 7 Select the photo to print and specify the number of copies for each photo. (1) Use the Easy-Scroll Wheel or the [ or ] button to display a photo to print. (2) Press the - Canon PIXMA MP520 | MP520 series Quick Start Guide - Page 36
to print in black & white. The specified number of copies of each photo will be printed. Using Useful Printing Functions Sticker print Prints your favorite photo on Canon Photo Stickers to create your own stickers. Print all photos Prints all scanned photos. Using Useful Display Functions Change - Canon PIXMA MP520 | MP520 series Quick Start Guide - Page 37
paper in the Front Tray. z For details on other printer driver functions, click Help or Instructions to view the online help or the PC Printing Guide on-screen manual. Instructions is only displayed when the on-screen manuals are installed. 6 Click Print (or OK). Printing from Your Computer 33 - Canon PIXMA MP520 | MP520 series Quick Start Guide - Page 38
paper in the Front Tray. z For details on other printer driver functions, click to view the PC Printing Guide on-screen manual. If the on-screen manuals are not installed, the PC Printing Guide on-screen manual is not displayed even if is clicked. 10 Click Print. 34 Printing from Your Computer - Canon PIXMA MP520 | MP520 series Quick Start Guide - Page 39
detailed operations of ScanGear, refer to the Scanning Guide on-screen manual. Besides the above-mentioned methods, you can use a TWAIN- or WIA- (Windows Vista and Windows XP only) compliant application software and the Control Panel (Windows Vista and Windows XP only) to scan originals with this - Canon PIXMA MP520 | MP520 series Quick Start Guide - Page 40
to the document type you have selected. For details, refer to "Scanning Methods" in the User's Guide on-screen manual.. 6 Select the scan operation, then press the OK button. 7 Press the Color or Black button. The operation to be performed after scanning the original depends on the scan operation - Canon PIXMA MP520 | MP520 series Quick Start Guide - Page 41
any equipment other than PictBridge compliant devices or the optional Bluetooth Unit BU20 to the Direct Print Port of the machine. If you do so, electric and machine, follow the instructions given in the device's instruction manual. Note When printing photos with the PictBridge compliant device - Canon PIXMA MP520 | MP520 series Quick Start Guide - Page 42
connecting it to this machine according to instructions given in the device's instruction manual. (1) Make sure that the PictBridge change the setting from the machine. For details, see "Setting on the Machine" on page 41. 4 Start printing from your PictBridge compliant device. 38 Printing - Canon PIXMA MP520 | MP520 series Quick Start Guide - Page 43
is set to Borderless. *3 You may not be able to purchase some Canon genuine papers depending on the country or region of purchase. *4 When printing on Photo Paper Plus Semi-gloss 8" x 10" / 203.2 x 254.0 mm (SG-201), select 20 x 25 cm/8" x 10" for Paper size and Default for Paper type. * Select - Canon PIXMA MP520 | MP520 series Quick Start Guide - Page 44
to print an index of images in the DPOF*3 print settings menu. *1 You can use this option only when 10 x 15 cm/4" x 6", 13 x 18 cm/5" x 7", 20 x 25 cm/8" x 10", you select On, photos are optimized for printing using the Photo opt. pro function. If you are using a Canon-brand PictBridge compliant - Canon PIXMA MP520 | MP520 series Quick Start Guide - Page 45
image fix ON or Manual correction, then press the OK button. When Auto image fix On is selected, the scene or person's face of a shot photo is recognized and the most suitable correction for each photo is made automatically. It makes a darkened face by backlight brighter to print. It also analyzes - Canon PIXMA MP520 | MP520 series Quick Start Guide - Page 46
photo taken against the light. (8) Noise reduction Reduces the noise on blue areas like the sky as well as on black areas. (9) Image optimizer Corrects and smooths the jagged contours for printing. (10 Manual correction is selected, the items (5) to (14) are available to specify. 42 Printing - Canon PIXMA MP520 | MP520 series Quick Start Guide - Page 47
of the error. See "An Error Message Is Displayed on the LCD" on page 68 and confirm how to handle it. When printing from your computer, error messages appear on your computer screen as well. Note z Be sure to install the ink tanks in the correct order indicated by the label on the Print Head Holder - Canon PIXMA MP520 | MP520 series Quick Start Guide - Page 48
the wrong position or it is empty. Ensure that the ink tank is in the correct position as directed by the label on the Print Head Holder. If the position is correct and its lamp flashes, it is empty. Replace it with a new one. z Ink lamp is off The tank is not set properly. Press - Canon PIXMA MP520 | MP520 series Quick Start Guide - Page 49
Unit Support to hold the cover. The Print Head Holder moves to the center. Caution z Do not hold the Print Head Holder to stop or move it. z Do not touch the metallic parts inside the machine. Important If the Scanning Unit (Printer Cover) is left open for more than 10 minutes, the Print Head - Canon PIXMA MP520 | MP520 series Quick Start Guide - Page 50
cap once it is removed. Important z Do not touch the electrical contacts (F) on the ink tank. Doing so can cause the machine to malfunction or become unable to print. (F) z Be sure to remove the clear film from the ink tank in the exact order shown above, as failure to follow this step may - Canon PIXMA MP520 | MP520 series Quick Start Guide - Page 51
place. (3) Make sure that the ink lamp lights up red. Important Install all the ink tanks to print. The machine cannot be used unless all the ink tanks are installed. (G) (1) (3) (2) 6 Lift the Scanning Unit (Printer Cover) slightly to set the Scanning Unit Support back to its original position - Canon PIXMA MP520 | MP520 series Quick Start Guide - Page 52
get your fingers caught. Note z If the error message is still displayed after the Scanning Unit (Printer Cover) is closed, see "An Error Message Is Displayed on the LCD" on page 68. z When you start printing after replacing the ink tank, Print Head Cleaning is performed automatically. Do not start - Canon PIXMA MP520 | MP520 series Quick Start Guide - Page 53
a protective cap on the Print Head to prevent the ink from drying. If you remove print or copy in both black & white and in color, or perform Print Head Cleaning, about once a month to prevent degradation of the Print Head. Numerous nozzles are installed in the Print Head for high-precision printing - Canon PIXMA MP520 | MP520 series Quick Start Guide - Page 54
the problem, the Print Head may be damaged. Contact your Canon service representative. z If the Ruled Lines Are Shifted See "Aligning the Print Head" on page 56. Note You can also perform the maintenance operation from your computer. For details, refer to the PC Printing Guide on-screen manual. 50 - Canon PIXMA MP520 | MP520 series Quick Start Guide - Page 55
the nozzle check pattern to determine whether the ink ejects properly from the print head nozzles. 1 Make sure that the machine is turned on, open the Front Tray, and extend the Output Paper Support. 2 Load a sheet of A4 or Letter-sized plain paper in the Rear Tray or Front Tray. 3 Press the Paper - Canon PIXMA MP520 | MP520 series Quick Start Guide - Page 56
the nozzle check pattern, and perform cleaning if necessary. Note If the ink level is low, the nozzle check pattern is not printed correctly. Replace the relevant ink tank. See "Replacing an Ink Tank" on page 43. 1 Check the nozzle check pattern you printed. (1) (2) (1) Check if lines in this - Canon PIXMA MP520 | MP520 series Quick Start Guide - Page 57
to the Maintenance screen. z If Lines Are Missing or White Streaks Are Present (1) Select Also B and press the OK button. The cleaning confirmation screen is displayed. (2) Select Yes and press the OK button to start Print Head Cleaning. See "Print Head Cleaning" on page 54. Routine Maintenance 53 - Canon PIXMA MP520 | MP520 series Quick Start Guide - Page 58
print head condition. Note that cleaning the Print Head causes used ink to be absorbed in the ink absorber. Cleaning the Print Head consumes ink, so perform Print Head Cleaning only when necessary. 1 Make sure that the machine is turned on, open the Front Tray, and extend the Output Paper Support - Canon PIXMA MP520 | MP520 series Quick Start Guide - Page 59
the ink tank of that color. See "Replacing an Ink Tank" on page 43. (2) If the problem is not resolved, turn off the machine and perform another Print Head Deep Cleaning after 24 hours. (3) If this does not solve the problem, the Print Head may be damaged. Contact your Canon service representative - Canon PIXMA MP520 | MP520 series Quick Start Guide - Page 60
displayed. (4) Select Manual head align, then press the OK button. The confirmation screen is displayed. Note (4) If you select Head alignment print, the machine exits the process after printing the current head position adjustment values. (5) Select Yes, then press the OK button. The print head - Canon PIXMA MP520 | MP520 series Quick Start Guide - Page 61
5 Adjust the print head position. (1) Check the printed patterns and use the [ or ] button to input the number of the least (A) (B) (A) Less noticeable vertical white streaks (B) More noticeable vertical white streaks (3) Confirm the displayed message and press the OK button. The second pattern is - Canon PIXMA MP520 | MP520 series Quick Start Guide - Page 62
(4) Check the printed patterns and use the [ or ] button to input the number of the pattern in columns L and M that has the least noticeable horizontal streaks, then press - Canon PIXMA MP520 | MP520 series Quick Start Guide - Page 63
Caution z Do not use tissue paper, paper towels, or similar materials for cleaning. Paper tissue powders or fine threads may remain inside the machine and cause problems such as a blocked Print Head and poor printing results. Use a soft cloth to avoid scratching the components. z Never use volatile - Canon PIXMA MP520 | MP520 series Quick Start Guide - Page 64
sure to turn off the power and disconnect the power cord before cleaning the machine. Important The inner side of the Document Cover (white off, see "The Document Cover Comes Off" on page 87 and attach it. With a clean, soft, lint-free cloth, wipe the Platen Glass (B) and the inner side of the - Canon PIXMA MP520 | MP520 series Quick Start Guide - Page 65
side inside the Rear Tray with a moistened cotton swab or the like. Rotate the roller (A) manually as you clean it. Do not touch the roller with your fingers; rotate it with the cotton swab. If this does not solve the problem, contact your Canon service representative. (A) Routine Maintenance 61 - Canon PIXMA MP520 | MP520 series Quick Start Guide - Page 66
paper in the Front Tray. Note Paper is loaded to aid the cleaning process and will not be printed on. 3 Hold the Rear Cover Lever and then press to the you rotate the roller. Remove ejected paper. If you run out of paper while cleaning, reload the paper in the Front Tray. z If the dirt is hard to - Canon PIXMA MP520 | MP520 series Quick Start Guide - Page 67
in the Front Tray. (2) Turn on the machine, and then press the Paper Feed Switch to select the Front Tray. Note Paper is loaded to clean the paper feed roller. Any original document is not required to load. (3) Perform the copy operation twice. See "Copying" on page 21. Routine Maintenance 63 - Canon PIXMA MP520 | MP520 series Quick Start Guide - Page 68
the inside of the machine. If the inside of the machine becomes dirty, printed paper may get dirty, so we recommend performing cleaning regularly. Important Do not perform any other operation while the bottom plate is being cleaned. 1 Make sure that the machine is turned on, and then remove any - Canon PIXMA MP520 | MP520 series Quick Start Guide - Page 69
the folded part of the ejected paper. If it is smudged with ink, perform Bottom Plate Cleaning again. If the problem is not resolved after performing Bottom Plate Cleaning twice, the protrusions inside the machine may be stained. Clean them according to instructions. See "Cleaning the Protrusions - Canon PIXMA MP520 | MP520 series Quick Start Guide - Page 70
„ Cleaning the Protrusions Inside the Machine If protrusions inside the machine are stained, wipe off any ink from the protrusions using a cotton swab or the like. Caution Be sure to turn off the power and disconnect the power cord before cleaning the machine. 66 Routine Maintenance - Canon PIXMA MP520 | MP520 series Quick Start Guide - Page 71
-screen Manuals" on page 89. z "An Error Message Is Displayed on the LCD" on page 68 z "LCD Cannot Be Seen At All" on page 70 z "An Unintended Language Is Displayed on the LCD" on page 70 z "Cannot Install the MP Drivers" on page 71 z "Cannot Connect to Computer Properly" on page 72 z "Print Results - Canon PIXMA MP520 | MP520 series Quick Start Guide - Page 72
the print head." U051 "The type of print head is incorrect. Install the correct print head." U052 "Some ink tanks are not installed in place." U072 "More than one ink tank of the following color is installed." U071 "The ink absorber is almost full. Press OK to continue printing. Contact the service - Canon PIXMA MP520 | MP520 series Quick Start Guide - Page 73
operations before connecting your device referring to its instruction manual. If the error is still not resolved, check if you can print another photograph. z Check your device connected to the machine. Only PictBridge compliant devices or the optional Bluetooth Unit BU-20 can be connected to the - Canon PIXMA MP520 | MP520 series Quick Start Guide - Page 74
. (3)Press the } button three times, then press the OK button. If the Bluetooth unit is connected to the machine, press the } button five times, and then press the OK button. (4)Use the { or } button to select the language you want to be displayed, then press the OK button. 70 Troubleshooting - Canon PIXMA MP520 | MP520 series Quick Start Guide - Page 75
the MP Drivers. Refer to the PC Printing Guide on-screen manual. Note If the installer was forced to be terminated due to an Windows error, the system may be in an unstable condition and you may not be able to install the MP Drivers. Restart your computer before reinstalling. Troubleshooting 71 - Canon PIXMA MP520 | MP520 series Quick Start Guide - Page 76
. We recommend the cable to be no longer than around 10 feet / 3 meters. z The operating system of your computer supports USB 2.0 Hi-Speed connection. Obtain and install the latest update for your computer. z The USB 2.0 Hi-Speed driver operates properly. Obtain the latest version of the USB 2.0 Hi - Canon PIXMA MP520 | MP520 series Quick Start Guide - Page 77
the Operation Panel on the machine. Refer to "Printing Photographs from a Wireless Communication Device" in the User's Guide on-screen manual. To print from a computer Confirm by using the printer driver. Refer to the PC Printing Guide on-screen manual. z Check 3: If the problem is not resolved - Canon PIXMA MP520 | MP520 series Quick Start Guide - Page 78
. Refer to the instruction manual supplied with the paper for detailed information on the printable side. If you did not align the Print Head after installation, straight lines may be printed misaligned. Make sure to align the Print Head after you install it. See "Aligning the Print Head" on page 56 - Canon PIXMA MP520 | MP520 series Quick Start Guide - Page 79
Panel on the machine From the HOME screen, select Settings, Device settings, and Print settings in this order, and then set Prevent paper abrasion to ON. For details, refer to "Changing the Machine Settings" in the User's Guide onscreen manual. z Setting with the printer driver Refer to "Print - Canon PIXMA MP520 | MP520 series Quick Start Guide - Page 80
the problem. We Print Head nozzles are clogged. Print Head is misaligned. Action See "When Printing Becomes Faint or Colors Are Incorrect" on page 50 and perform any necessary maintenance operations. See "Aligning the Print Head" on page 56 and perform Print Head Alignment. 76 Troubleshooting - Canon PIXMA MP520 | MP520 series Quick Start Guide - Page 81
tank is empty. See "An Error Message Is Displayed on the LCD" on page 68 to identify the ink error, and then take the appropriate action depending on the error condition. Ink tank not installed in proper position. Open the Scanning Unit (Printer Cover) and check the ink lamps. If there is still - Canon PIXMA MP520 | MP520 series Quick Start Guide - Page 82
may solve the problem. If there are any unnecessary print jobs, follow the procedure below to delete them. (1)Open the printer properties dialog box. Refer to "Opening the Printer Properties Dialog Box Directly from the Control Panel" in the User's Guide on-screen manual. (2)Click the Maintenance - Canon PIXMA MP520 | MP520 series Quick Start Guide - Page 83
Machine Moves But Ink Is Not Ejected Cause Print Head nozzles are clogged. Ink tank is empty. The protective film is remaining. Action See "When Printing Becomes Faint or Colors Are Incorrect" on page 50 and perform any necessary maintenance operations. See "An Error Message Is Displayed on the - Canon PIXMA MP520 | MP520 series Quick Start Guide - Page 84
printer driver setting, or click the Print Options on the Page Setup sheet in the printer driver and select Disable the paper source setting of the application software on the Print Options screen. For the print option setting, refer to the PC Printing Guide on-screen manual. 80 Troubleshooting - Canon PIXMA MP520 | MP520 series Quick Start Guide - Page 85
using such paper to print documents with photos or graphics, since the printout may curl and cause paper exit jams. If you cannot remove the paper or the paper tears inside the machine, or if the paper jam error continues after removing the paper, contact your Canon service representative. Do not - Canon PIXMA MP520 | MP520 series Quick Start Guide - Page 86
the OK button on the machine. If you turned off the machine in step (2), all print jobs in queue are canceled. Reprint if necessary. Note When reloading the paper in the machine if the paper jam error continues after removing the paper, contact your Canon service representative. 82 Troubleshooting - Canon PIXMA MP520 | MP520 series Quick Start Guide - Page 87
could also be a problem with the USB cable. Replace the USB cable and try printing again. MP Drivers are not installed properly. The MP Drivers may not be installed properly. Uninstall them following the procedure described in the PC Printing Guide on-screen manual and reinstall them following - Canon PIXMA MP520 | MP520 series Quick Start Guide - Page 88
below to check that the driver for your machine is installed to your computer. (1)Select Print & Fax Preferences from Printer. In Mac OS X v.10.2.8 or 10.3.x, select Edit Printer List from Printer. (2)Check that your machine's name is displayed in the list of printers and that the check box - Canon PIXMA MP520 | MP520 series Quick Start Guide - Page 89
to the instruction manual of the device. For other troubles on the device, contact the manufacturer. Error Message On PictBridge Compliant Device "Printer in use" "No paper" "Paper Error" / "Media type error" "Paper jam" "Printer cover open" "No Print Head" "Waste tank full" / "Ink absorber full - Canon PIXMA MP520 | MP520 series Quick Start Guide - Page 90
"Printer error" Action An error requiring servicing error occurs, contact your Canon service representative. Cannot Print Properly via Bluetooth Communication To troubleshoot printing through Bluetooth communication, refer to the Bluetooth Guide on-screen manual. Cannot Print Properly from a Photo - Canon PIXMA MP520 | MP520 series Quick Start Guide - Page 91
the protrusion on one side of the Problems „ ScanGear Won't Start Cause Action The scanner driver (ScanGear) is not Follow the procedure described in your setup sheet to reinstall the MP Drivers. installed. „ Other Scanning Troubles Refer to the Scanning Guide on-screen manual. Troubleshooting - Canon PIXMA MP520 | MP520 series Quick Start Guide - Page 92
on printer driver setting. PC Photo Printing Guide (Windows only) Refer to this guide for full instructions on using the various application software included on the Setup CD-ROM. Bluetooth Guide Refer to this guide for full instructions of printing from computers and devices that support Bluetooth - Canon PIXMA MP520 | MP520 series Quick Start Guide - Page 93
All Programs (or Programs) > Canon XXX Manual > XXX On-screen Manual (where "XXX" is your machine's name). System Requirements Browser: Windows HTML Help Viewer Note z Microsoft® Internet Explorer 5.0 or later must be installed. z The on-screen manual may not be displayed properly depending on your - Canon PIXMA MP520 | MP520 series Quick Start Guide - Page 94
inches / Approx. 455 (W) x 378 (D) x 172 (H) mm * With the Paper Support and Front Tray retracted. Approx. 7.5 kg (Approx. 16.5 lb.) * With the Print Head and ink tanks installed. Total 1,600 nozzles (PgBK: 320 nozzles, C/M: each 256 x 2 nozzles, Y: 256 nozzles) Multiple copy Intensity adjustment - Canon PIXMA MP520 | MP520 series Quick Start Guide - Page 95
Scanner driver TWAIN / WIA (Windows Vista or Windows XP Guide on-screen manual. *2 Selected photos are printed in 35 mm film style layout (contact printing layout). This print setting is only available with certain Canon PictBridge-compliant devices. You can print shooting Info (Exif Data) on photos - Canon PIXMA MP520 | MP520 series Quick Start Guide - Page 96
Windows 2000 Professional SP2 and SP3 not supported z MP Navigator EX: QuickTime v6.4 or later is needed (Macintosh only) z Some functions may not be available with Windows Media Center. z To upgrade from Windows XP to Windows Vista, first uninstall software bundled with the Canon inkjet printer - Canon PIXMA MP520 | MP520 series Quick Start Guide - Page 97
Additional System Requirements for On-Screen Manuals Browser: Windows HTML Help Viewer Note: Microsoft Internet Explorer 5.0 or later must be installed. The on-screen manual may not be displayed properly depending on your operating system or Internet Explorer version. We recommend that you keep - Canon PIXMA MP520 | MP520 series Quick Start Guide - Page 98
not attempt to use the machine in any way not described in this manual. Warning You may cause an electric shock, fire, or damage the around the machine, immediately unplug the machine at the power supply and call for service. Periodically, unplug the machine and use a dry cloth to wipe off any dust - Canon PIXMA MP520 | MP520 series Quick Start Guide - Page 99
serviceable parts inside the machine. The machine contains high-voltage components. Never attempt any maintenance procedure not described in this guide or electric shocks, install the machine in a location with an ambient temperature range of 5°C to 35°C (41°F to 95°F) and humidity of 10% to 90% ( - Canon PIXMA MP520 | MP520 series Quick Start Guide - Page 100
of small children. If a child ingests any ink, consult a doctor immediately. Do not shake Print Heads or ink tanks. Ink may leak out and stain clothing or the surrounding area. Never touch the electrical contacts on a Print Head after printing. The metal parts may be very hot and could cause burns - Canon PIXMA MP520 | MP520 series Quick Start Guide - Page 101
Use of Images It may be unlawful to make copies of, scan, print, or use reproductions of the following documents. The list provided is non-exhaustive (canceled or uncanceled) z Identifying badges or insignias z Selective service or draft papers z Checks or drafts issued by governmental agencies - Canon PIXMA MP520 | MP520 series Quick Start Guide - Page 102
in Subpart B of Part 15 of the FCC Rules. Do not make any changes or modifications to the equipment unless otherwise specified in the manual. If such changes or modifications should be made, you could be required to stop operation of the equipment. Canon U.S.A., Inc. One Canon Plaza Lake Success, NY - Canon PIXMA MP520 | MP520 series Quick Start Guide - Page 103
's manual or other documentation for the Product. (b) Use of parts, media, software or supplies (other than those sold by Canon USA), including nonCanon ink cartridges or refilled ink cartridges, that cause damage to the Product or cause abnormally frequent service calls or service problems. (c) If - Canon PIXMA MP520 | MP520 series Quick Start Guide - Page 104
WHOM IT WAS PURCHASED AS A GIFT, AND STATES YOUR EXCLUSIVE REMEDY. Canon USA offers a range of customer technical support* options: z Interactive troubleshooting, e-mail technical support, the latest driver downloads and answers to frequently asked questions (www.canontechsupport.com) z Toll-free - Canon PIXMA MP520 | MP520 series Quick Start Guide - Page 105
Canon U.S.A., Inc. One Canon Plaza Lake Success, NY 11042 USA Canon is a registered trademark of Canon Inc. ©2007 Canon U.S.A., Inc. Canon is a registered trademark of Canon Inc. in the United States and may also be a registered trademark in other countries. Safety Precautions 101 - Canon PIXMA MP520 | MP520 series Quick Start Guide - Page 106
Panel 2 Output Paper Support 14 P Paper Guide Front Tray 16 Rear Tray 14 Paper Output Tray 9 Photo Printing from Printed Photo 31 Platen Glass 5 Print Head cleaning 54 deep cleaning 55 Print Head Holder 43 Print Head Lock Lever 45 Printing from a Memory Card 23 Photo Index Sheet 30 select and print - Canon PIXMA MP520 | MP520 series Quick Start Guide - Page 107
For additional supplies, use the following descriptions and order numbers. Description Ink Tanks PGI-5 Black CLI-8 Cyan CLI-8 Magenta CLI-8 Yellow Canon Specialty Papers All Occasion Photo Cards (4" x 8"/ 50 sheets) Glossy Photo Paper Credit Card Size (100 sheets) High Resolution Paper (8.5" x 11 - Canon PIXMA MP520 | MP520 series Quick Start Guide - Page 108
The following ink tanks are compatible with this product. For information on product specifications, please visit our website at www.usa.canon.com QT5-1101-V01 XXXXXXXX ©CANON INC.2007 PRINTED IN THAILAND
-
 1
1 -
 2
2 -
 3
3 -
 4
4 -
 5
5 -
 6
6 -
 7
7 -
8
-
9
-
10
-
11
-
12
-
13
-
14
-
15
-
16
-
17
-
18
-
19
-
20
-
21
-
22
-
23
-
24
-
25
-
26
-
27
-
28
-
29
-
30
-
31
-
32
-
33
-
34
-
35
-
36
-
37
-
38
-
39
-
40
-
41
-
42
-
43
-
44
-
45
-
46
-
47
-
48
-
49
-
50
-
51
-
52
-
53
-
54
-
55
-
56
-
57
-
58
-
59
-
60
-
61
-
62
-
63
-
64
-
65
-
66
-
67
-
68
-
69
-
70
-
71
-
72
-
73
-
74
-
75
-
76
-
77
-
78
-
79
-
80
-
81
-
82
-
83
-
84
-
85
-
86
-
87
-
88
-
89
-
90
-
91
-
92
-
93
-
94
-
95
-
96
-
97
-
98
-
99
-
100
-
101
-
102
-
103
-
104
-
105
-
106
-
107
-
108
 |
 |
Photo All-In-One
Quick Start Guide
Quick Start Guide
series