Canon PIXMA MP600 Quick Start Guide - Page 78
Ink Does Not Come Out/Printing Does Not Start/Printing Is Blurred, Colors Are Wrong/Straight Lines - all in one troubleshooting
 |
View all Canon PIXMA MP600 manuals
Add to My Manuals
Save this manual to your list of manuals |
Page 78 highlights
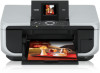
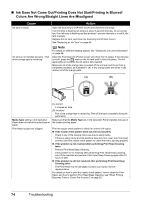
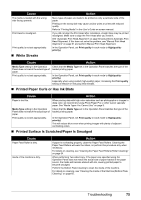
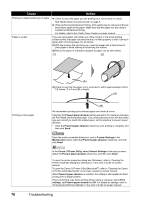
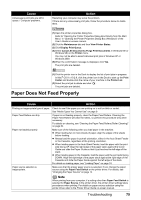
„ Ink Does Not Come Out/Printing Does Not Start/Printing Is Blurred/ Colors Are Wrong/Straight Lines Are Misaligned Cause Action Ink tank is empty. Open the Scanning Unit (Printer Cover) and check the ink lamps. If an ink lamp is flashing red slowly at about 3-second intervals, ink is running low. If an ink lamp is flashing red fast at about 1-second intervals or is not lit, the tank is empty. Replace the ink tank, and close the Scanning Unit (Printer Cover). See "Replacing an Ink Tank" on page 46. Ink tank is not installed securely. / Part of the orange tape is remaining. Note For details on different flashing speeds, see "Getting the Ink Level Information" on page 46. Open the Scanning Unit (Printer Cover) and check the ink lamps. If the ink lamp is not lit, press the mark on the ink tank until it clicks into place. The ink lamp lights up red when the ink tank is fully inserted. Make sure all of the orange tape is peeled off the ink tank and the air hole is completely exposed, as illustrated in (A). If any orange parts are left as in (B), remove all of the orange parts. (A) (B) Media Type setting in the Operation Panel does not match the actual type of paper. Print Head nozzles are clogged. (A) Correct L-shaped air hole. (B) Incorrect Part of the orange tape is remaining. Peel off the tape completely along the perforation. Make sure that the Media Type set in the Operation Panel matches the type of the loaded printing paper. Print the nozzle check pattern to check for uneven ink output. z If the nozzle check pattern does not print out properly Check if any of the missing colors are due to empty tanks. If there is plenty of ink and the machine does not print, clean the Print Head and then print the nozzle check pattern to check that ink is ejecting properly. z If the problem is not resolved after performing Print Head Cleaning twice Perform Print Head Deep Cleaning. If the problem is not resolved after performing Print Head Deep Cleaning, turn off the machine and perform Print Head Deep Cleaning again after 24 hours or later. z If the problem is still not resolved after performing Print Head Deep Cleaning twice The Print Head may be damaged. Contact your Canon service representative. For details on how to print the nozzle check pattern, how to clean the Print Head, and how to perform Print Head Deep Cleaning, see "When Printing Becomes Faint or Colors Are Incorrect" on page 52. 74 Troubleshooting
-
 1
1 -
2
-
3
-
4
-
5
-
6
-
7
-
8
-
9
-
10
-
11
-
12
-
13
-
14
-
15
-
16
-
17
-
18
-
19
-
20
-
21
-
22
-
23
-
24
-
25
-
26
-
27
-
28
-
29
-
30
-
31
-
32
-
33
-
34
-
35
-
36
-
37
-
38
-
39
-
40
-
41
-
42
-
43
-
44
-
45
-
46
-
47
-
48
-
49
-
50
-
51
-
52
-
53
-
54
-
55
-
56
-
57
-
58
-
59
-
60
-
61
-
62
-
63
-
64
-
65
-
66
-
67
-
68
-
69
-
70
-
71
-
72
-
 73
73 -
 74
74 -
 75
75 -
 76
76 -
 77
77 -
 78
78 -
 79
79 -
 80
80 -
 81
81 -
 82
82 -
 83
83 -
84
-
85
-
86
-
87
-
88
-
89
-
90
-
91
-
92
-
93
-
94
-
95
-
96
-
97
-
98
-
99
-
100
-
101
-
102
-
103
-
104
-
105
-
106
-
107
-
108
-
109
-
110
-
111
-
112
 |
 |