Canon PIXMA MX360 MX360 series Getting Started
Canon PIXMA MX360 Manual
 |
View all Canon PIXMA MX360 manuals
Add to My Manuals
Save this manual to your list of manuals |
Canon PIXMA MX360 manual content summary:
- Canon PIXMA MX360 | MX360 series Getting Started - Page 1
Inkjet Office All-In-One Equipo multifunción para oficina Canon Inkjet ENGLISH ESPAÑOL series Getting Started Read Me First Guía de inicio Léame en primer lugar Make sure to read this manual before using the machine. Please keep it in hand for future reference. Asegúrese de leer este manual - Canon PIXMA MX360 | MX360 series Getting Started - Page 2
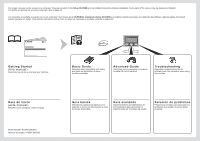
. Advanced Guide Describes various operating procedures to make full use of machine. Troubleshooting Describes troubleshooting tips for problems you may encounter when using the machine. Guía de inicio (este manual) Describe cómo configurar y usar el equipo. Model Number: K10364 (MX360) Número - Canon PIXMA MX360 | MX360 series Getting Started - Page 3
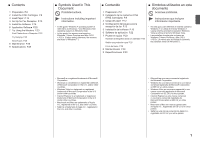
■ Contents 1 Preparation P.2 2 Install the FINE Cartridges P.8 3 Load Paper P.12 4 Set Up for Fax Reception P.13 5 Install the Software P.16 6 Application Software P.22 7 Try Using the Machine P.23 Print Photos from a Computer P.23 Try Copying P.25 Send Faxes P.26 8 Maintenance P.28 9 Specifications - Canon PIXMA MX360 | MX360 series Getting Started - Page 4
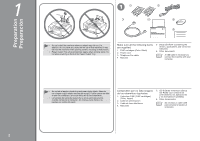
(A) automatically opens when printing starts. Do not place anything in front of the Paper Output Tray. 6 Make sure all the following items are supplied. 1. FINE cartridges (Color, Black) 2. Power cord 3. Telephone line cable 4. Manuals 5. Setup CD-ROM (containing the drivers, applications and on - Canon PIXMA MX360 | MX360 series Getting Started - Page 5
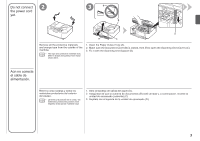
Do not connect the power cord yet. 2 3 B B 2 1 A C 3 D Remove all the protective materials and orange tape from the outside of the machine. • The tape and protective materials may differ in shape and position from those shown here. 1. Open the Paper Output Tray (A). 2. Make sure the - Canon PIXMA MX360 | MX360 series Getting Started - Page 6
5 1 2 3 E Remove both the orange tape (E) and the protective material (F) carefully. 1. Lift the Scanning Unit (Cover) slightly. 2. Fold the Scanning Unit Support. 3. Close the Scanning Unit (Cover) gently. Retire la cinta naranja (E) y el material protector(F) con cuidado. 1. Levante la unidad - Canon PIXMA MX360 | MX360 series Getting Started - Page 7
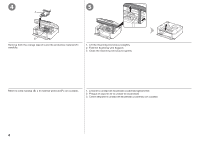
un contestador automático 1 I 2 Use fax features? Yes No Go to . Go to on page 6. Connect one end of supplied telephone line cable (G) to "Confirming the Telephone Line Connection" in the on-screen manual: Basic Guide after installation is complete. • The basic connection method is described - Canon PIXMA MX360 | MX360 series Getting Started - Page 8
Document Cover is closed. Press the ON button (J) to turn on the machine. • It takes about 5 seconds for the ON button to work after the power cord is plugged in. Use the [ or ] button (K) on the Operation Panel to select the language for the LCD (Liquid Crystal Display) (L), then press the OK - Canon PIXMA MX360 | MX360 series Getting Started - Page 9
of the FINE Cartridges, resulting in poor printing. When using the fax features • Removing the power plug deletes all faxes stored in memory. Before removing the power plug, send faxes, print them, or save them to USB flash drive as necessary. • The specification of the power cord differs for each - Canon PIXMA MX360 | MX360 series Getting Started - Page 10
Fix it with the Scanning Unit Support (E). • When you lift the Scanning Unit (Cover), do not touch the buttons on the Operation Panel (F) or the LCD (G). May result in unintended operation. The FINE Cartridge Holder (H) moves to the installation position. If the FINE Cartridge Holder does not move - Canon PIXMA MX360 | MX360 series Getting Started - Page 11
with ink on the removed protective tape. • Do not touch the metal parts of the FINE Cartridges. The machine may not print properly Instale los cartuchos FINE (FINE Cartridges) con cuidado. No los deje caer ni les aplique una presión excesiva. • Asegúrese de usar los cartuchos FINE (FINE Cartridges - Canon PIXMA MX360 | MX360 series Getting Started - Page 12
the right slot . • Do not knock the FINE Cartridge against the sides of the holder. • Install in a well-lit environment. • Install the Black FINE Cartridge into the right slot , and the Color FINE Cartridge into the left slot . Push down of the Ink Cartridge Locking Cover until it snaps into place - Canon PIXMA MX360 | MX360 series Getting Started - Page 13
Fold the Scanning Unit Support. 3. Close the Scanning Unit (Cover) gently. Wait for about 1 minute until the LCD changes as shown in the illustration, then proceed to the next step. • Once you have installed the FINE Cartridges, do not remove them unnecessarily. • If an error message is displayed - Canon PIXMA MX360 | MX360 series Getting Started - Page 14
the printing side facing up. Slide the left and right Paper Guides against both edges of the paper. Make sure that the height of the paper stack does not exceed the line (D). • For details on how to handle paper, refer to "Loading Paper" in the on-screen manual: Basic Guide after installation is - Canon PIXMA MX360 | MX360 series Getting Started - Page 15
one of the following three modes for receiving faxes. You can change the receive mode after installation is complete. For details, refer to "Setting the Receive Mode" in the on-screen manual:Basic Guide éfono. FAX only mode Modo sólo fax • Use a Distinctive Ring Pattern Detection (DRPD) service. • - Canon PIXMA MX360 | MX360 series Getting Started - Page 16
No se puede responder a la llamada. FAX only mode Modo sólo fax DRPD DRPD The telephone's ringtone sounds. The fax is received automatically when the machine detects the fax ring pattern. DRPD must be supported by your telephone service provider. Please contact them for service details. Suena el - Canon PIXMA MX360 | MX360 series Getting Started - Page 17
mode is displayed. • For details on the advanced settings on the receive mode, refer to the onscreen manual: Basic Guide after installation is complete. Pulse el botón FAX (A) y, a continuación, Menú (Menu) (B). Utilice el botón [ o ] (C) para seleccionar Modo recep. ajust. (Receive mode set - Canon PIXMA MX360 | MX360 series Getting Started - Page 18
not switch users during the installation process. • Internet connection may be required during the installation. Connection fees may apply. Consult the internet service provider. • It may be necessary to restart your computer during the installation process. Follow the on-screen instructions and do - Canon PIXMA MX360 | MX360 series Getting Started - Page 19
cuadro de diálogo, continúe con . 2. Haga clic en Cancelar (Cancel). 3. Continúe con . Easy-WebPrint EX is Web print software that is installed on the computer when installing the supplied software. Internet Explorer 7 or later (Windows) or Safari 4 or later (Mac OS X v.10.5 or later) is required - Canon PIXMA MX360 | MX360 series Getting Started - Page 20
AutoPlay screen, then click Yes or Continue on the User Account Control dialog box. If the User Account Control dialog box reappears in following steps, click click the help button, then follow the on-screen instructions. Haga doble clic en el icono Setup de la carpeta del CD-ROM para pasar a la - Canon PIXMA MX360 | MX360 series Getting Started - Page 21
Easy Install. The drivers, application software, and on-screen manuals are installed. • If you want to select particular items to install, click Custom Install. Click Install. Follow any on-screen instructions to proceed with the software installation. Haga clic en Instalación simple (Easy Install - Canon PIXMA MX360 | MX360 series Getting Started - Page 22
back of the machine. • If the power is on, the FINE Cartridge Holder will move when the Scanning Unit (Cover) (B) is opened. If you can agree to Extended Survey Program, click Agree. If you click Do not agree, the Extended Survey Program will not be installed. (This has no effect on the machine - Canon PIXMA MX360 | MX360 series Getting Started - Page 23
"5 Install the Software". Click Custom Install in , then select XPS Printer Driver in the Custom Install screen. For details on useful functions of the XPS Printer Driver, refer to the on-screen manual: Advanced Guide. Congratulations! Setup is complete. To learn more about the Solution Menu EX and - Canon PIXMA MX360 | MX360 series Getting Started - Page 24
Application Software Software de aplicación 6 22 Various application software are installed on the computer along with the drivers. You can print creative items by correcting/enhancing photos using the application software. For details on how to use the application software and the machine, refer - Canon PIXMA MX360 | MX360 series Getting Started - Page 25
page 12. Start Solution Menu EX from the Canon Solution Menu EX icon on the desktop (Windows) or on the Dock (Macintosh), click Photo Print, then click Photo Print (C). Easy-PhotoPrint EX starts. • For details on starting Solution Menu EX, refer to "6 Application Software" on page 22. Cargue papel - Canon PIXMA MX360 | MX360 series Getting Started - Page 26
will start. If you are using Macintosh, click Print on the Print dialog box to start printing. • The machine may make operating noise when feeding paper. This is normal operation. For more information, refer to the on-screen manual: Advanced Guide. Seleccione una carpeta que contenga imágenes - Canon PIXMA MX360 | MX360 series Getting Started - Page 27
a force exceeding 4.4 lb / 2.0 kg. The scanner may malfunction or the glass may break. 1. Close printing. • Close the Document Cover gently, holding it firmly, because it is heavy. For the procedure to copy on paper other than plain paper, refer to "Copying" in the on‑screen manual: Advanced Guide - Canon PIXMA MX360 | MX360 series Getting Started - Page 28
residence. Open the Document Tray (C), then move the Document Guides (D) to both edges. • For details on supported documents and settings for image quality, density (brightness), etc., refer to the on-screen manual: Basic Guide. Pulse el botón FAX (A). En esta sección se explica cómo enviar un - Canon PIXMA MX360 | MX360 series Getting Started - Page 29
• For details on sender information, refer to "Specifying the Basic Settings for Faxing" in the onscreen manual: Basic Guide. For other procedures to send faxes, refer to "Faxing" in the onscreen manual: Basic Guide. Inserte el documento hasta que suene un pitido y, a continuación, deslice las gu - Canon PIXMA MX360 | MX360 series Getting Started - Page 30
staining your hands or clothes with ink, it is recommended that you clean the Ink Cartridge Locking Cover (A) and the inside of the tray (B) with a facial tissue or the like as required. If the Scanning Unit (Cover) is left open for more than 10 minutes, the FINE Cartridge Holder moves to the right - Canon PIXMA MX360 | MX360 series Getting Started - Page 31
software bundled with the Canon inkjet printer. • Internet Explorer 7 or later (Windows), or Safari 4 or later (for Mac OS X v.10.5 or later) is required to install Easy-WebPrint EX. Specifications are subject to change without notice. About Consumables Consumables (ink tanks / FINE Cartridges - Canon PIXMA MX360 | MX360 series Getting Started - Page 32
Bluetooth v2 Cartridges) instalados. Cartucho FINE (FINE Cartridge) de Canon instale el software incluido con la impresora de inyección de tinta Canon. • Se necesita Internet Explorer 7 o posterior (Windows), o Safari 4 o posterior (para Mac OS X v.10.5 o posterior) para instalar Easy-WebPrint EX - Canon PIXMA MX360 | MX360 series Getting Started - Page 33
1-800-OK-CANON This option provides live telephone technical support, free of service charges, Monday-Friday (excluding holidays), during the warranty period. Telephone Device for the Deaf (TDD) support is available at 1-866-251-3752. Ordering Information The following ink cartridges are compatible
-
 1
1 -
 2
2 -
 3
3 -
 4
4 -
 5
5 -
 6
6 -
 7
7 -
8
-
9
-
10
-
11
-
12
-
13
-
14
-
15
-
16
-
17
-
18
-
19
-
20
-
21
-
22
-
23
-
24
-
25
-
26
-
27
-
28
-
29
-
30
-
31
-
32
-
33
 |
 |
ESPAÑOL
ENGLISH
series
Asegúrese de leer este manual antes de usar el equipo. Consérvelo a mano para utilizarlo como referencia en el futuro.
Guía de inicio
Equipo multifunción para oficina Canon Inkjet
Léame en primer lugar
Make sure to read this manual before using the machine. Please keep it in hand for future reference.
Getting Started
Canon Inkjet Office All-In-One
Read Me First