Canon PIXMA MX512 Guide for Printer Setup for Network
Canon PIXMA MX512 Manual
 |
View all Canon PIXMA MX512 manuals
Add to My Manuals
Save this manual to your list of manuals |
Canon PIXMA MX512 manual content summary:
- Canon PIXMA MX512 | Guide for Printer Setup for Network - Page 1
Network Connection Wireless Connection Preparation for Connection Printer Setup Setup Procedure Selection Push Button Method Standard setup WPS Other setup (Advanced setup) Disable WEP WPA/WPA2 Wired Connection Preparation for Connection Cable Connection Printer Setup Character Entry Troubleshooting - Canon PIXMA MX512 | Guide for Printer Setup for Network - Page 2
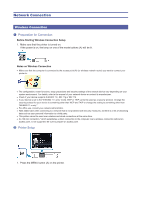
Connection a Preparation for Connection Before Starting Wireless Connection Setup 1. Make sure that the printer is turned on. If the power is on, the lamp on one of the mode buttons (A) will be lit. Notes on Wireless Connection • Make sure that the computer is connected to the access point (A) (or - Canon PIXMA MX512 | Guide for Printer Setup for Network - Page 3
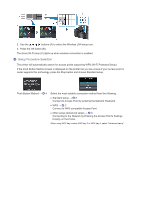
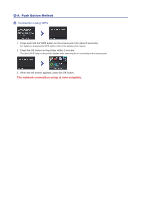
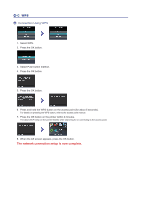
The (blue) Wi-Fi lamp (C) lights up when wireless connection is enabled. c Setup Procedure Selection The printer will automatically search for access points supporting WPS (Wi-Fi Protected Setup). If the Push Button Method screen is displayed on the printer but you are unsure if your access point - Canon PIXMA MX512 | Guide for Printer Setup for Network - Page 4
WPS button, refer to the access point manual. 2. Press the OK button on the printer within 2 minutes. The (blue) Wi-Fi lamp on the printer flashes while searching for or connecting to the access point. 3. When the left screen appears, press the OK button. The network connection setup is now complete. - Canon PIXMA MX512 | Guide for Printer Setup for Network - Page 5
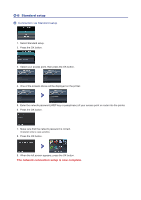
via Standard setup 1. Select Standard setup. 2. Press the OK button. 3. Select your access point, then press the OK button. 4. One of the screens above will be displayed on the printer. 5. Enter the network password (WEP key or passphrase) of your access point or router into the printer. 6. Press - Canon PIXMA MX512 | Guide for Printer Setup for Network - Page 6
WPS button, refer to the access point manual. 7. Press the OK button on the printer within 2 minutes. The (blue) Wi-Fi lamp on the printer flashes while searching for or connecting to the access point. 8. When the left screen appears, press the OK button. The network connection setup is now complete. - Canon PIXMA MX512 | Guide for Printer Setup for Network - Page 7
point, then press the OK button. 6. Select a security protocol for the access point, then press the OK button. Disable 7. When the left screen appears, press the OK button. The network connection setup is now complete. WEP 7. Select the WEP key number you want to use. 8. Press the OK button. - Canon PIXMA MX512 | Guide for Printer Setup for Network - Page 8
the OK button. 11. Make sure that the WEP key is correct. 12.Press the OK button. 13.When the left screen appears, press the OK button. The network connection setup is now complete. WPA/WPA2 7. Enter the passphrase of your access point or router. 8. Press the OK button. 9. Make sure that - Canon PIXMA MX512 | Guide for Printer Setup for Network - Page 9
Connection Before Starting Wired Connection Setup 1. Make sure that the printer is turned on. If the power is on, the lamp on one of the mode buttons party. • This printer cannot be used over wireless and wired connections at the same time. • When using a router, connect the printer and computer to - Canon PIXMA MX512 | Guide for Printer Setup for Network - Page 10
1. Press the MENU button (A) on the printer. 2. Use the buttons (A) to select the Setup icon. 3. Press the OK button (B). 4. Select Device settings. 5. Press the OK button. 6. Select LAN settings. 7. Press the OK button. 8. Select Change wireless/wired. 9. Press the OK button. 10.Select - Canon PIXMA MX512 | Guide for Printer Setup for Network - Page 11
12.Press the MENU button. The network connection setup is now complete. - Canon PIXMA MX512 | Guide for Printer Setup for Network - Page 12
enter the characters using the Numeric buttons (A) on the printer. Follow the procedure below. 1. Press the button of Each time you press the button, the entry mode displayed on the upper right of the screen changes between numeric 123, upper case ABC and lower case abc. 2. Enter characters using - Canon PIXMA MX512 | Guide for Printer Setup for Network - Page 13
installed in an open space where wireless communications are possible? • Is the access point operating in IEEE802.11n (2.4 GHz), IEEE802.11g or IEEE802.11b? After checking the above points, press the left Function button (A) on the printer to search for the access point again. If the problem is - Canon PIXMA MX512 | Guide for Printer Setup for Network - Page 14
printer. 1. Press the MENU button. 2. Select Setup, then press the OK button. 3. Select Device settings, then press the OK button. 4. Select LAN settings > Confirm LAN settings > WLAN setting list to check MAC address. For details on how to change the settings of the access point, refer to the manual - Canon PIXMA MX512 | Guide for Printer Setup for Network - Page 15
or select a WEP key number by entering wireless connection settings of the printer directly. For details on how to change the WEP key number of the access point, refer to the manual supplied with the access point or contact its manufacturer. If the problem is not resolved, there may be other causes - Canon PIXMA MX512 | Guide for Printer Setup for Network - Page 16
To perform Standard setup again 1. Press the MENU button (A). 2. Use the buttons (B) to select Wireless LAN setup, then press the OK button. - Canon PIXMA MX512 | Guide for Printer Setup for Network - Page 17
WPS button on only one access point. Connection failed. See the manual. The screen appears when an error occurs. Check the manual supplied with the access point or contact its manufacturer. Timeout error. Check the access point. See the access point manual. The screen appears when WPS setup - Canon PIXMA MX512 | Guide for Printer Setup for Network - Page 18
installed in an open space where wireless communications are possible? • Is the access point operating in IEEE802.11n (2.4 GHz), IEEE802.11g or IEEE802.11b? After checking the above points, press the left Function button (A) on the printer to search for the access point again. If the problem is - Canon PIXMA MX512 | Guide for Printer Setup for Network - Page 19
printer. 1. Press the MENU button. 2. Select Setup, then press the OK button. 3. Select Device settings, then press the OK button. 4. Select LAN settings > Confirm LAN settings > WLAN setting list to check MAC address. For details on how to change the settings of the access point, refer to the manual - Canon PIXMA MX512 | Guide for Printer Setup for Network - Page 20
or select a WEP key number by entering wireless connection settings of the printer directly. For details on how to change the WEP key number of the access point, refer to the manual supplied with the access point or contact its manufacturer. If the problem is not resolved, there may be other causes - Canon PIXMA MX512 | Guide for Printer Setup for Network - Page 21
printer and configure wireless Manual setup, then press the OK button. Follow the on-screen instructions to proceed with settings. When the setup is complete, press the MENU button. To perform Advanced setup again 1. Press the MENU button (A). 2. Use the buttons (B) to select Wireless LAN setup
-
 1
1 -
 2
2 -
 3
3 -
 4
4 -
 5
5 -
 6
6 -
 7
7 -
8
-
9
-
10
-
11
-
12
-
13
-
14
-
15
-
16
-
17
-
18
-
19
-
20
-
21
 |
 |

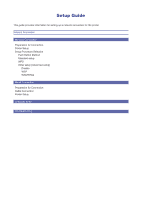
Setup Guide
This guide provides information for setting up a network connection for the printer.
Network Connection
Wireless Connection
Preparation for Connection
Printer Setup
Setup Procedure Selection
Push Button Method
Standard setup
WPS
Other setup (Advanced setup)
Disable
WEP
WPA/WPA2
Wired Connection
Preparation for Connection
Cable Connection
Printer Setup
Character Entry
Troubleshooting