Canon PIXMA MX882 MX882 series Getting Started
Canon PIXMA MX882 Manual
 |
View all Canon PIXMA MX882 manuals
Add to My Manuals
Save this manual to your list of manuals |
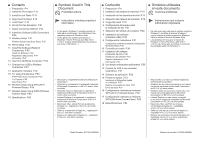
Canon PIXMA MX882 manual content summary:
- Canon PIXMA MX882 | MX882 series Getting Started - Page 1
Inkjet Office All-In-One Equipo multifunción para oficina Canon Inkjet ENGLISH ESPAÑOL series Getting Started Read Me First Guía de inicio Léame en primer lugar Make sure to read this manual before using the machine. Please keep it in hand for future reference. Asegúrese de leer este manual - Canon PIXMA MX882 | MX882 series Getting Started - Page 2
P.50 13 Change from USB to Wireless Connection P.51 Instructions including important information. • In this guide, Windows 7 operating system is referred to as Windows 7 and Windows Vista operating system as Windows Vista. • In this guide, the screens are based on Windows 7 Home Premium and Mac - Canon PIXMA MX882 | MX882 series Getting Started - Page 3
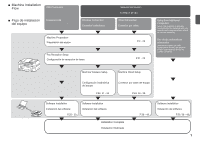
machine) Uso desde ordenadores adicionales (cuando el equipo ya está conectado a la red y se quieren añadir ordenadores desde los cuales utilizarlo) Machine Wireless Setup Machine Wired Setup Configuración inalámbrica del equipo P.24, 31 - 35 Conexión por cable del equipo P.24, 36 - 38 Software - Canon PIXMA MX882 | MX882 series Getting Started - Page 4
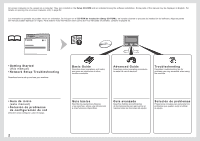
gives an introduction to other functions available. Advanced Guide Describes various operating procedures to make full use of machine. Troubleshooting Describes troubleshooting tips for problems you may encounter when using the machine. • Guía de inicio (este manual) • Solución de problemas de - Canon PIXMA MX882 | MX882 series Getting Started - Page 5
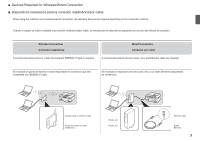
del método de conexión. Wireless Connection Conexión inalámbrica A commercial access point or router that supports IEEE802.11n/g/b is required compatible con IEEE802.11n/g/b. Se necesita un dispositivo de red (router, etc.) y un cable Ethernet (disponibles en comercios). Access point or wireless - Canon PIXMA MX882 | MX882 series Getting Started - Page 6
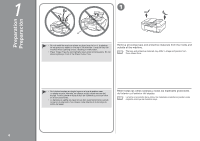
Preparation Preparación 1 1 A • Do not install the machine where an object may fall on it. In addition, do not place any object on the top of the machine. It may fall into the machine when opening covers, resulting in malfunction. • Paper Output Tray (A) automatically opens when printing starts. - Canon PIXMA MX882 | MX882 series Getting Started - Page 7
(A). Open the Paper Output Tray to remove them. 1. Print Head 2. Ink tanks (5: BK, M, C, PGBK, Y) 3. Manuals 4. Power cord 5. Telephone line cable 6. Setup CD-ROM (containing the drivers, applications and on-screen manuals) 7. Matte Photo Paper MP-101 (for Automatic Print Head Alignment) 8. Other - Canon PIXMA MX882 | MX882 series Getting Started - Page 8
features? Yes Go to . No Go to on page 7. Connect one end of supplied telephone line cable (B) to the lower connection method is described here. For other connection methods, refer to the on-screen manual: Basic Guide after installation is complete. ¿Utiliza las funciones de fax? Sí Vaya a . - Canon PIXMA MX882 | MX882 series Getting Started - Page 9
4 1 D 5 Only when connecting a telephone or an answering machine Sólo al conectar un teléfono 2 E o un contestador automático Remove the Cap (D) (1), then connect a telephone or an answering machine with the telephone line cable (2). • Do not use a telephone jack line duplexer to connect - Canon PIXMA MX882 | MX882 series Getting Started - Page 10
or } button (G) on the Operation Panel to select the language for the LCD (Liquid Crystal Display) (H), then press the OK button. • If you want to change the language shown on the LCD, press the Back button (I) to return to the Language selection screen. When this screen is displayed, press the OK - Canon PIXMA MX882 | MX882 series Getting Started - Page 11
When it is necessary to turn off the machine Cuando sea necesario desconectar el equipo 1 2 • Before removing the power plug, make sure that all the lamps on the Operation Panel are not lit. Removing the power plug while any of the lamps on the Operation Panel is lit or flashing may cause drying - Canon PIXMA MX882 | MX882 series Getting Started - Page 12
closed, then lift to open the Scanning Unit (Cover) (B). 2. Fix it with the Scanning Unit Support (C). • When you lift the Scanning Unit (Cover), do not touch the sure that the machine is turned on. For details, refer to to on page 7 in "1 Preparation." 1. Asegúrese de que la cubierta de documentos - Canon PIXMA MX882 | MX882 series Getting Started - Page 13
properly if you touch them. • There may be some transparent or light blue ink on the inside of the bag the Print Head comes in, or the inside of cap - this has no effect on print quality. Be careful not to get ink on yourself when handling these items. Levante firmemente la parte (G) de la palanca - Canon PIXMA MX882 | MX882 series Getting Started - Page 14
6 Tilt the Print Head forward and set it in place as shown. • Do not knock the Print Head against the sides of the holder. • Install in a well-lit environment. Incline el cabezal de impresión hacia adelante y sitúelo como se muestra. • No golpee el cabezal de impresión contra los laterales del - Canon PIXMA MX882 | MX882 series Getting Started - Page 15
se aprietan los laterales de un depósito de tinta con el orificio de ventilación en forma de L bloqueado, la tinta podría salpicar. D Hold the ink tank by its sides and slowly twist the orange protective cap 90 degrees horizontally to remove it off. Do not push the sides of the - Canon PIXMA MX882 | MX882 series Getting Started - Page 16
the color order indicated on the label. Make sure all the Ink lamps light red. • Once you have installed the ink tanks, do not remove them unnecessarily. • If the Print Head Holder moves to the right, close and reopen the Scanning Unit (Cover). Incline el depósito de tinta y, a continuación, introd - Canon PIXMA MX882 | MX882 series Getting Started - Page 17
2. Fold the Scanning Unit Support (F) towards the left. 3. Close the Scanning Unit (Cover) gently. 8 Wait for about 4 minutes until the LCD changes as shown in the es parte del funcionamiento normal. • Si aparece un mensaje de error en la pantalla LCD, asegúrese de que el cabezal de impresión y - Canon PIXMA MX882 | MX882 series Getting Started - Page 18
Align the Print Head Alineación del cabezal de impresión 4 1 A Extend the Paper Support (A). 1. Open the cover. 2. Lift it upwards. 3. Tilt it back to set in place. 2 3 D C B Move the Paper Guides (B) to both edges. Load a sheet of supplied specialty paper (Matte Photo Paper MP101) in the - Canon PIXMA MX882 | MX882 series Getting Started - Page 19
on the LCD, press the OK button to clear the error, then proceed to the next step. After the installation is complete, perform Print Head Alignment by referring to "When Printing Becomes Faint or Colors Are Incorrect" in the on-screen manual: Basic Guide. • The pattern is printed in black and blue - Canon PIXMA MX882 | MX882 series Getting Started - Page 20
paper in the Rear Tray, refer to to in "4 Align the Print Head" on page 16. En esta sección se describe cómo se carga el papel normal en el paper, refer to "Loading Paper" in the on-screen manual: Basic Guide after installation is complete. • Para obtener más información sobre cómo manipular el papel, - Canon PIXMA MX882 | MX882 series Getting Started - Page 21
E Pull out the Cassette (E). Extraiga el cassette (E). 3 4 F 5 G Move the left Paper Guide (F) to the edge. Slide the front Paper Guide (G) to align with the size of the paper. The front Paper Guide will click and stop when it aligns with the corresponding mark of paper size. Load plain paper - Canon PIXMA MX882 | MX882 series Getting Started - Page 22
6 H 7 8 2 H 1 Align the paper to the right side of the Cassette (1), and slide the left Paper Guide completely against the left edge of the paper (2). Make sure that the height of the paper stack does not exceed the line (H). Insert the Cassette - Canon PIXMA MX882 | MX882 series Getting Started - Page 23
to "7 Select Connection Method" on page 24. Depending on your needs, select one of the following three modes for receiving faxes. You can change the receive mode after installation is complete. For details, refer to "Setting the Receive Mode" in the on-screen manual: Basic Guide. En función de sus - Canon PIXMA MX882 | MX882 series Getting Started - Page 24
's ringtone sounds. The fax is received automatically when the machine detects the fax ring pattern. DRPD must be supported by your telephone service provider. Please contact them for service details. Suena el tono de llamada del teléfono. El fax se recibe automáticamente cuando el equipo detecta - Canon PIXMA MX882 | MX882 series Getting Started - Page 25
1 2 A 3 C B Press the FAX button (A). Button layout on the Operation Panel changes automatically depending on use. When the display changes, check the button positions. Press the center FUNCTION button (B). Use the { or } button (C) to select a receive mode, then press the OK button. The fax - Canon PIXMA MX882 | MX882 series Getting Started - Page 26
cable Go to "10 Wired Setup" on page 36. Vaya a "10 Conexión por supports wireless connection or wired connection, refer to the manual supplied with the device, or contact its manufacturer. If Your Device Supports Wireless Connection Check if it supports IEEE802.11n/g/b. If Your Device Supports - Canon PIXMA MX882 | MX882 series Getting Started - Page 27
it to a computer, software including the drivers needs to be copied (installed) to the computer's hard disk. The installation process takes about 20 internet service provider. • It may be necessary to restart your computer during the installation process. Follow the on-screen instructions and - Canon PIXMA MX882 | MX882 series Getting Started - Page 28
Easy-WebPrint EX is Web print software that is installed on the computer when installing the supplied software. Internet Explorer 7 or later (Windows) or Safari 4 or later (Mac OS X v.10.5 or later) is required to use this software. An Internet connection is required for installation. Press the ON - Canon PIXMA MX882 | MX882 series Getting Started - Page 29
el contenido del CD-ROM, haga doble clic en MSETUP4.EXE. 3 Windows 7/Windows Vista Windows XP Click Run Msetup4.exe on the AutoPlay screen, then click Yes name or password, click the help button, then follow the on-screen instructions. Haga doble clic en el icono Setup de la carpeta del CD-ROM - Canon PIXMA MX882 | MX882 series Getting Started - Page 30
6 Click Easy Install. The drivers, application software, and on-screen manuals are installed. • If you want to select particular items to install, click Custom Install. Click Install. Select Use the printer via USB, then click Next. Follow any on-screen instructions to proceed with the software - Canon PIXMA MX882 | MX882 series Getting Started - Page 31
port is for USB. Cuando aparezca la pantalla Conexión de impresora (Printer Connection), conecte el equipo al ordenador mediante un cable USB. Después de If the power is on, the Print Head Holder will move when the Scanning Unit (Cover) (B) is opened. If you can agree to Extended Survey Program - Canon PIXMA MX882 | MX882 series Getting Started - Page 32
install, perform from on page 26 in "8 Install the Software (USB Connection)." Click Custom Install in , then select XPS Printer Driver in the Custom Install screen. For details on useful functions of the XPS Printer Driver, refer to the on-screen manual: Advanced Guide. Click Exit to complete the - Canon PIXMA MX882 | MX882 series Getting Started - Page 33
utilizar con una conexión por cable e inalámbrica al mismo tiempo. • If an error message appears or if you have trouble with the network connection, refer to the printed manual: Network Setup Troubleshooting. • When using a router, connect the machine and computer to the LAN side (same network - Canon PIXMA MX882 | MX882 series Getting Started - Page 34
in the provided spaces and then proceed to page 33. En la mayoría de los casos consultar la información siguiente, consulte el manual de instrucciones del punto de acceso o Canon PIXMA Wireless Setup Assistant or the instructions which can be downloaded from the Canon support webpage (www.usa.canon - Canon PIXMA MX882 | MX882 series Getting Started - Page 35
, the Wi-Fi lamp (D) lights blue. 1. Pulse el botón Configuración (Setup) (A). 2. Utilice el botón [ o ] (B) para seleccionar Configurac. LAN inalámbrica (Wireless LAN setup). 3. Pulse el botón OK. Utilice el botón { o } (C) para seleccionar Sí (Yes) y, a continuación, pulse el botón OK. Cuando se - Canon PIXMA MX882 | MX882 series Getting Started - Page 36
characters are not displayed properly, however, can be selected. Make sure that one of the above screens is displayed, then press the OK button. If the above screen is not displayed, go to on page 35. Seleccione Configuración fácil (Easy setup) y, a continuación, pulse el botón OK. Seleccione - Canon PIXMA MX882 | MX882 series Getting Started - Page 37
For details on character entry, refer to the printed manual: Network Setup Troubleshooting. Make sure that the network key is correct, izquierdo. Cuando aparezca la pantalla anterior, pulse el botón OK. • Si aparece Error al conectar con el punto de acceso. (Failed to connect to the access point - Canon PIXMA MX882 | MX882 series Getting Started - Page 38
. For details, refer to your device's instruction manual or contact its manufacturer. • In an office wireless and wired connection at the same time. • If an error message appears or if you have trouble with the network connection, refer to the printed manual: Network Setup Troubleshooting. Go to page - Canon PIXMA MX882 | MX882 series Getting Started - Page 39
1 A B 2 D C Remove the Cap (A), then connect a network device (router, etc.) with an Ethernet cable (B). The Wired LAN Connector is located on the right side at the back of the machine. The upper port is for an Ethernet cable. 1. Press the Setup button (C). 2. Use the [ or ] button (D) to - Canon PIXMA MX882 | MX882 series Getting Started - Page 40
(E) to select LAN settings, then press the OK button. Select Change wireless/wired, then press the OK button. Select Wired LAN active, press the OK button. Next, read "11 Install the Software (Network Connection)" on page 39! Utilice el botón { o } (E) para seleccionar Configuración de LAN (LAN - Canon PIXMA MX882 | MX882 series Getting Started - Page 41
drivers needs to be copied (installed) to the computer's hard service provider. • It may be necessary to restart your computer during the installation process. Follow the on-screen instructions que el software de Canon está intentando acceder a or later (Windows) or Safari 4 or later (Mac OS X - Canon PIXMA MX882 | MX882 series Getting Started - Page 42
contenido del CD-ROM, haga doble clic en MSETUP4.EXE. 40 2 Windows 7/Windows Vista Windows XP Click Run Msetup4.exe on the AutoPlay screen, then click Yes name or password, click the help button, then follow the on-screen instructions. Haga doble clic en el icono Setup de la carpeta del CD-ROM - Canon PIXMA MX882 | MX882 series Getting Started - Page 43
5 Click Easy Install. The drivers, application software, and on-screen manuals are installed. • If you want to select particular items to install, click Custom Install. Click Install. If you select wireless connection on page 24 Select Use the printer with wireless LAN connection, then click Next - Canon PIXMA MX882 | MX882 series Getting Started - Page 44
If the Printer Connection screen appears instead of this screen, the connection method is not correctly selected in . − For Windows Click Cancel and start again from , then select the connection method, which you select on page 24, in . − For Macintosh Follow on-screen instructions and proceed with - Canon PIXMA MX882 | MX882 series Getting Started - Page 45
IJ Network Tool screen, refer to the printed manual: Network Setup Troubleshooting. Next, read "Registration (Macintosh)" on page 44! En la pantalla Canon IJ Network Tool, seleccione MX880 series en Impresoras (Printers); a continuación, haga clic en Siguiente (Next). • Si se muestra el cuadro - Canon PIXMA MX882 | MX882 series Getting Started - Page 46
. Windows users: read "Information" on page 47. • The alphanumeric characters after Canon MX880 series is the machine's Bonjour service name or MAC address the Register Printer and Scanner screen appears, click Register Printer. Mac OS X v.10.6.x v.10.5.x v.10.4.11 Go to - . Go to - on page 45. - Canon PIXMA MX882 | MX882 series Getting Started - Page 47
no printers available. screen appears, click Add. Click More Printers in the Printer Browser window. Select Canon IJ Network in the pop-up menu, select Canon MX880 series in the list of printers, then click Add. Make sure that Canon MX880 series is added to the list of printers. Go to on page 46 - Canon PIXMA MX882 | MX882 series Getting Started - Page 48
and Scanner screen appears, click Register Scanner. Select Canon MX880 series on the Canon IJ Network Scanner Selector EX screen, then click OK. Click Next on the Register Printer and Scanner screen. Next, read "Information" on page 47! Cuando aparezca la pantalla Registro de la impresora y del - Canon PIXMA MX882 | MX882 series Getting Started - Page 49
la instalación 1 Click Next. Follow any on-screen instructions to proceed with the software installation. If the serial number equipo. A • If the power is on, the Print Head Holder will move when the Scanning Unit (Cover) (A) is opened. Haga clic en Siguiente (Next). Siga las instrucciones que - Canon PIXMA MX882 | MX882 series Getting Started - Page 50
Canon Solution Menu EX dialog. Remove the Setup CD-ROM and keep it in a safe place. • The buttons displayed on Solution Menu EX may vary depending on the country or region of purchase. Congratulations! Setup is complete. To learn more about the Solution Menu EX and on-screen manual, proceed to page - Canon PIXMA MX882 | MX882 series Getting Started - Page 51
details on useful functions of the XPS Printer Driver, refer to the on-screen manual: Advanced Guide. on page 40 in "11 Install the Software (Network Connection)." Click Instalación del Controlador de impresora XPS (XPS Printer Driver) En Windows 7 y Windows Vista SP1 o posterior, también se puede - Canon PIXMA MX882 | MX882 series Getting Started - Page 52
machine is already connected to a wireless/wired connection, it can be used to use the machine. 2 Follow the on-screen instructions to install the software. Other settings are not required. "11 Install the Software (Network Connection)" on page 39. Para obtener más información sobre el procedimiento - Canon PIXMA MX882 | MX882 series Getting Started - Page 53
Connection Cambio de USB a una conexión inalámbrica 13 To change to a wireless connection from a USB connection, start over from "9 Wireless Setup" on page 31 to set up a wireless connection. Para cambiar a una conexión inalámbrica desde una conexión USB, vuelva a empezar desde "9 Configuraci - Canon PIXMA MX882 | MX882 series Getting Started - Page 54
with the drivers. You can full use of the machine! For example, • Open the on-screen manual. pages in Internet Explorer (Windows) or Safari (Macintosh). Some of its features include: • Printing a web page manual: Basic Guide. For details on Easy-WebPrint EX, refer to the on-screen manual: Basic Guide - Canon PIXMA MX882 | MX882 series Getting Started - Page 55
section explains how to print images stored on the computer. • For details, refer to "5 Load Paper" on page 18. Start Solution Menu EX from the Canon Solution Menu EX icon on the desktop (Windows) or on the Dock (Macintosh), click Photo Print, then click Photo Print (C). Easy-PhotoPrint EX starts - Canon PIXMA MX882 | MX882 series Getting Started - Page 56
then select a layout for the image. Click Print. If you are using Windows, printing will start. If you are using Macintosh, click Print on the Print start printing. For more information, refer to the on-screen manual: Advanced Guide. Seleccione una carpeta que contenga imágenes y, a continuación - Canon PIXMA MX882 | MX882 series Getting Started - Page 57
E Load A4 or Letter-sized plain paper into the Cassette (A). This section describes how to perform a standard copy. • For details, refer to "5 Load Paper" on page 18. Open the Paper Output Tray (B), then open the Document Cover (C). If printing starts while the Paper Output Tray is closed, it will - Canon PIXMA MX882 | MX882 series Getting Started - Page 58
and Color button light up. For the procedure to copy on paper other than plain paper, refer to "Copying" in the on‑screen manual: Advanced Guide. 1. Cierre la cubierta de documentos. 2. Pulse el botón COPIA (COPY) (F). Aparece la pantalla de espera de copia. 3. Pulse el botón Color (G) para hacer - Canon PIXMA MX882 | MX882 series Getting Started - Page 59
for Faxing" in the on-screen manual: Basic Guide. • The setting may not be available depending on the country or region of your residence. Open the Document Tray (C), then move the Document Guides (D) to both edges. • For details on supported documents and settings for image quality, density - Canon PIXMA MX882 | MX882 series Getting Started - Page 60
57. To connect the telephone line correctly, refer to to on page 6 in "1 Preparation." • For details on sender information, refer to "Specifying the Basic Settings for Faxing" in the onscreen manual: Basic Guide. • When the machine is ready for faxing, the Black button and Color button light up - Canon PIXMA MX882 | MX882 series Getting Started - Page 61
Using WPS (Wi-Fi Protected Setup) Configuración inalámbrica mediante WPS (Wi-Fi Protected Setup) 16 Read this section only when setting 1 up a wireless connection by using 2 B D the WPS (Wi-Fi Protected Setup). A C 1. Press the Setup button (A). 2. Use the [ or ] button (B) to select - Canon PIXMA MX882 | MX882 series Getting Started - Page 62
the setup again and set the new PIN code displayed on the screen to the access point. If another error is displayed, refer to the printed manual: Network Setup Troubleshooting. • Si no finaliza la instalación en 10 minutos y aparece la pantalla de error de tiempo de espera agotado, pulse el bot - Canon PIXMA MX882 | MX882 series Getting Started - Page 63
, press the OK button, then start over from . • If another error appears, refer to the printed manual: Network Setup Troubleshooting. Next, read "11 Install the Software (Network Connection)" on page 39! Mantenga pulsado el botón WPS del punto de acceso (durante unos 5 segundos) y, a continuaci - Canon PIXMA MX882 | MX882 series Getting Started - Page 64
instructions to complete the settings on the computer. 5. Go to . 1. Desde el menú Iniciar (Start) de Windows, seleccione Red (Network); a continuación, haga clic en Agregar un dispositivo inalámbrico (Add a wireless machine supports "WCN-UFD." • Canon assumes es compatible con "WCN-UFD". • Canon no - Canon PIXMA MX882 | MX882 series Getting Started - Page 65
Copy Specifications Multiple copy max. 99 pages Intensity adjustment 9 positions, Auto intensity (AE copy) Reduction/Enlargement 25 % - 400 % (1 % unit) Scan Specifications Scanner driver TWAIN/WIA (for Windows 7/Windows Vista/Windows XP) Maximum scanning size A4/Letter, 8.5" X 11.7"/216 X 297 - Canon PIXMA MX882 | MX882 series Getting Started - Page 66
the Canon inkjet printer. • Internet Explorer 7 or later (Windows), or Safari 4 or later (for Mac OS X v.10.5 or later) is required to install Easy-WebPrint EX. 18 Specifications are subject to change without notice. About Consumables Consumables (ink tanks / FINE Cartridges) are available for - Canon PIXMA MX882 | MX882 series Getting Started - Page 67
Marcación normal (con teclado numérico) Rellamada automática Rellamada manual (con botón Remarcación/Pausa: 10 destinos máx.) Otros Informe de la impresora de inyección de tinta Canon. • Se necesita Internet Explorer 7 o posterior (Windows), o Safari 4 o posterior (para Mac OS X v.10.5 o posterior) - Canon PIXMA MX882 | MX882 series Getting Started - Page 68
-OK-CANON This option provides live telephone technical support, free of service charges, Monday-Friday (excluding holidays), during the warranty period. Telephone Device for the Deaf (TDD) support is available at 1-866-251-3752. Ordering Information The following ink tanks are compatible with this
-
 1
1 -
 2
2 -
 3
3 -
 4
4 -
 5
5 -
 6
6 -
 7
7 -
8
-
9
-
10
-
11
-
12
-
13
-
14
-
15
-
16
-
17
-
18
-
19
-
20
-
21
-
22
-
23
-
24
-
25
-
26
-
27
-
28
-
29
-
30
-
31
-
32
-
33
-
34
-
35
-
36
-
37
-
38
-
39
-
40
-
41
-
42
-
43
-
44
-
45
-
46
-
47
-
48
-
49
-
50
-
51
-
52
-
53
-
54
-
55
-
56
-
57
-
58
-
59
-
60
-
61
-
62
-
63
-
64
-
65
-
66
-
67
-
68
 |
 |
ESPAÑOL
ENGLISH
series
Asegúrese de leer este manual antes de usar el equipo. Consérvelo a mano para utilizarlo como referencia en el futuro.
Guía de inicio
Equipo multifunción para oficina Canon Inkjet
Léame en primer lugar
Make sure to read this manual before using the machine. Please keep it in hand for future reference.
Getting Started
Canon Inkjet Office All-In-One
Read Me First