Canon PIXMA MX882 MX882 series Getting Started - Page 16
Install all the other ink tanks in the same way
 |
View all Canon PIXMA MX882 manuals
Add to My Manuals
Save this manual to your list of manuals |
Page 16 highlights
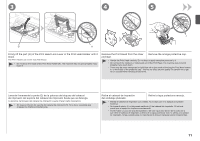
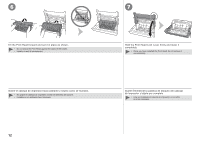
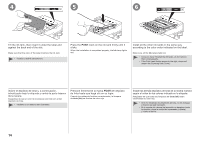
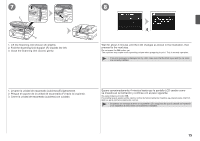
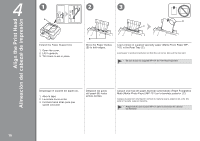
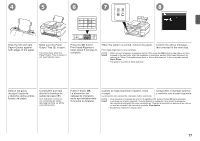
4 5 6 Tilt the ink tank, then insert it under the label and against the back end of the slot. Make sure that the color of the label matches the ink tank. • Install in a well-lit environment. Press the PUSH mark on the ink tank firmly until it clicks. When the installation is completed properly, the Ink lamp lights red. Install all the other ink tanks in the same way according to the color order indicated on the label. Make sure all the Ink lamps light red. • Once you have installed the ink tanks, do not remove them unnecessarily. • If the Print Head Holder moves to the right, close and reopen the Scanning Unit (Cover). Incline el depósito de tinta y, a continuación, introdúzcalo bajo la etiqueta y contra la parte trasera de la ranura. Asegúrese de que el color de la etiqueta coincide con el del depósito de tinta. • Instálelo en un entorno bien iluminado. Presione firmemente la marca PUSH del depósito de tinta hasta que haga clic en su lugar. Cuando la instalación finaliza correctamente, la lámpara de tinta (Ink) se ilumina de color rojo. Instale los demás depósitos de tinta de la misma manera según el orden de los colores indicado en la etiqueta. Asegúrese de que todas las lámparas de tinta (Ink) están encendidas de color rojo. • Una vez instalados los depósitos de tinta, no los extraiga a menos que sea necesario. • Si el soporte del cabezal de impresión se desplaza hacia la derecha, cierre la unidad de escaneado (cubierta) y vuelva a abrirla. 14
-
 1
1 -
2
-
3
-
4
-
5
-
6
-
7
-
8
-
9
-
10
-
 11
11 -
 12
12 -
 13
13 -
 14
14 -
 15
15 -
 16
16 -
 17
17 -
 18
18 -
 19
19 -
 20
20 -
 21
21 -
22
-
23
-
24
-
25
-
26
-
27
-
28
-
29
-
30
-
31
-
32
-
33
-
34
-
35
-
36
-
37
-
38
-
39
-
40
-
41
-
42
-
43
-
44
-
45
-
46
-
47
-
48
-
49
-
50
-
51
-
52
-
53
-
54
-
55
-
56
-
57
-
58
-
59
-
60
-
61
-
62
-
63
-
64
-
65
-
66
-
67
-
68
 |
 |
